Table of Contents
Advertisement
Quick Links
Advertisement
Chapters
Table of Contents

Related Manuals for Conair Thermolater vacuTrac

Summary of Contents for Conair Thermolater vacuTrac
- Page 1 www.conairgroup.com USERGUIDE UGH003-0102 Thermolater vacuTrac ® Positive/Negative Pressure Water Temperature Controller with TW-1 or TW-2 Microprocessor Corporate Office: 724.584.5500 Instant Access 24/7 (Parts and Service): 800.458.1960 Parts and Service: 814.437.6861...
- Page 2 Serial Number(s): Model Number(s) DISCLAIMER: Conair shall not be liable for errors contained in this User Guide or for incidental, consequential damages in connection with the furnishing, performance or use of this information. Conair makes no warranty of any kind with regard to this information, including, but not limited to the implied warranties of merchantability and fitness for a particular purpose.
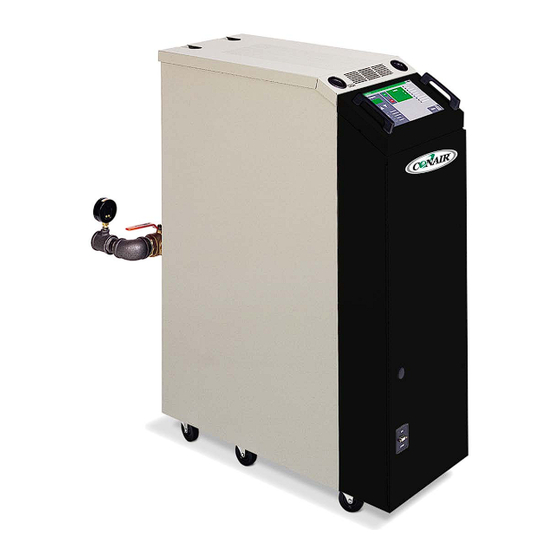
- Page 3 COMPACT, STURDY DESIGN systems. Other options include bell, Small footprint. Designed for efficient use of your valuable strobe or piezo horn for alarm con- floor space. ditions. One Conair Drive Pittsburgh, PA 15202 412-312-6000 FAX 412-312-6227 www.conairnet.com...
- Page 4 (9 or 12 kW) and vent to the atmosphere, Cooling Out they have a maximum process Check Cooling Pump Drain Valve Solenoid temperature of 180° F. Process Piping Valve Cooling Water/Make-Up Piping One Conair Drive Pittsburgh, PA 15202 412-312-6000 FAX 412-312-6227 www.conairnet.com...
- Page 5 Note: The purge option is not available on ble on the operator panel. the vacuTrac positive/negative pressure water temperature controllers. OPTIONS Alarm packages Call attention to alarm conditions with a light and horn package. One Conair Drive Pittsburgh, PA 15202 412-312-6000 FAX 412-312-6227 www.conairnet.com...
- Page 6 45.7 41.4 20.7 16.6 54.1 49.0 24.5 19.6 91.5 82.8 41.4 33.1 108.3 98.0 49.0 39.2 SPECIFICATIONS NOTES: † All voltages are 3 phase, 60 Hz. Specifications can change without notice. Check with a Conair representative for the most current information. One Conair Drive Pittsburgh, PA 15202...
- Page 7 ONAIR HERMOLATOR POSITIVE EGATIVE OPERATION ROCESS ATER ONNECTIONS ROCESS ONNECTIONS 1/4” Connect the connections on the back of the Thermolator using 1- FROM PROCESS TO PROCESS NPT piping. Viewed from the rear, the connection is located on the left hand side of the FROM PROCESS unit, and is clearly marked “...
- Page 8 water level float switch will make, opening the (3/8”) solenoid valve, replacing the COOLING MAKE hot discharged water with cooler water. This unit’s operation is similar to a TW-DI unit except that a VTR unit has a reservoir tank that is open to the atmosphere, which allows a maximum 180°...
- Page 9 Figure 1.
- Page 10 TW-1 C ONTROL PERATION Starting the Thermolator ® Run/Stop Turn on main power to the Thermolator ® Actual values display Press the RUN button to Setpoint display Setpoint and actual windows display start normal operation. The green window displays the temperature The window displays the three seconds, then display the most recently Press STOP to stop the...
- Page 11 The Thermolator continues operating, but this problem higher than the setpoint deviation limit allows. could lead to a shutdown condition if not corrected. The Conair Group, Inc. 1. High deviation temperature is set too low. Increase. One Conair Drive 2. Water has stopped flowing between supply outlet and...
- Page 13 TW-2 C ONTROL PERATION Starting the Thermolator ® Run/Stop Actual values display Press the RUN button to Setpoint display Turn on main power to the Thermolator ® start normal operation. The green window displays the temperature The window displays the Press STOP to stop the Setpoint and actual windows display at the middle of the mold.
- Page 14 The Thermolator continues operating, but this problem higher than the setpoint deviation limit allows. could lead to a shutdown condition if not corrected. The Conair Group, Inc. 1. High deviation temperature is set too low. Increase. 2. Water has stopped flowing between supply outlet and...
- Page 17 Thermolator ® TW-1 and TW-2 Water Temperature Control Units Installation Operation Maintenance Troubleshooting The Conair Group, Inc. Instant Access One Conair Drive Parts and Service Pittsburgh, PA 15202 (800) 458-1960 Phone: (412) 312-6000 (814) 437-6861 Fax: (412)-312-6320 www.conairnet.com UGH015/0100...
- Page 18 UGH015/0100 Serial number(s): Model number(s): DISCLAIMER: The Conair Group, Inc., shall not be liable for errors contained in this User Guide or for incidental, consequential dam- ages in connection with the furnishing, performance or use of this information. Conair makes no warranty of any kind with regard to this information, including, but not limited to the implied warranties of merchantability and fitness for a particular purpose.
-
Page 19: Table Of Contents
....1-1 NTRODUCTION ABLE OF Purpose of the User Guide ......1-2 ONTENTS How the guide is organized . - Page 20 ....(continued) AINTENANCE ABLE OF Performing System Tests ......5-5 ONTENTS The Key/Display Test .
-
Page 21: Introduction
NTRODUCTION G G Purpose of the User Guide ..1-2 G G How the guide is organized ..1-2 G G Your responsibilities as a user .1-2 G G ATTENTION: Read this so no one gets hurt ...1-3 UGH015/0100 Thermolator TW-1 and TW-2... -
Page 22: Purpose Of The User Guide
This User Guide describes the Conair Thermolator TW-1 and ® URPOSE OF TW-2 water temperature control units and explains step-by- step how to install, operate, maintain and repair this equip- ment. UIDE Before installing this product, please take a few moments to read the User Guide and review the diagrams and safety infor- mation in the instruction packet. -
Page 23: Attention: Read This So No One Gets Hurt
We design equipment with the user’s safety in mind. You can ATTENTION: avoid the potential hazards identified on this machine by following the procedures outlined below and elsewhere in the EAD THIS SO NO User Guide. ONE GETS HURT WARNING: Improper installation, operation or servicing may result in equipment damage or personal injury. - Page 24 ATTENTION: WARNING: Hazardous substance The electrical contactors in the EAD THIS SO NO Thermolator have mercury contactors. ONE GETS HURT Mercury is considered a hazardous sub- stance and must be dealt with accord- ingly. Material Safety Data Sheet (#7439- 97) has been included in the instruction packet.
-
Page 25: Description
ESCRIPTION G G What is the Thermolator TW Series? ....2-2 G G Typical applications ..2-2 G G How it works: Direct Injection (DI) models . -
Page 26: What Is The Thermolator Tw Series
The Thermolator TW models circulate water at a temperature HAT IS THE higher than the available water supply, to add or remove heat HERMOLATOR ? as needed to maintain a uniform temperature setpoint in the process. The TW-2 offers an enhanced control, with additional diagnostic features and autostart capabilities. - Page 27 Direct injection models maintain the process temperature OW IT ORKS by electrically heating and injecting cool water supplied to the Thermolator by a chiller, tower or other water source. IRECT NJECTION The temperature of the process fluid is measured as it leaves the unit’s heater tank. The fluid then flows through the “To Process”...
-
Page 28: How It Works: Closed Circuit
Closed Circuit models maintain the process temperature by ORKS heating and cooling fluid for the process circuit. Cooling water supplied by a chiller, tower or other water source, is LOSED IRCUIT mixed with the process fluid only during the initial filling or when water is needed to make up process fluid loss. -
Page 29: How It Works: Isolated Circuit
Isolated Circuit models maintain the process temperature ORKS by heating and cooling fluid for the process circuit. The process fluid, which is stored in a reservoir, is isolated from SOLATED IRCUIT cooling water supplied by a chiller, tower or other source The vent line allows warm The temperature of the process fluid to expand to the... -
Page 30: Specifications
Dimensions and performance characteristics vary according to PECIFICATIONS the model, voltage and components selected. See the cabinet style reference chart to determine dimensional information for your specific model. Additional technical information can be found in the Appendix of this User Guide. CABINET STYLE REFERENCE Heater Voltage Selection... - Page 31 Closed Circuit (CC) (1, 2 or 3) Isolated Circuit (IC) PERFORMANCE CHARACTERISTICS - *Lower operating temperatures can be obtained with larger cooling valves. Consult your Conair representative. Models TW1 -DI or TW2 -DI TW1 -CC or TW2 -CC TW1 -IC or TW2 -IC Minimum Setpoint Temperature °F {°C}...
-
Page 32: Features And Options
EATURES AND Incoloy heaters minimize chemical and PTIONS high temperature damage Two-piece cast construction Motor drip cover protects motor windings from moisture damage. High efficiency pumps from 3/4 to 7.5 Hp. Silicon carbide seals are standard. Pump seal flush line continuously cleans the pump seal for extended life. -
Page 33: Installation
NSTALLATION G G Unpacking the boxes ..3-2 G G Preparing for installation ..3-3 G G Connecting the water supply . .3-4 G G Optional purge valve hookups .3-5 G G Connecting the main power . -
Page 34: Unpacking The Boxes
Thermolator TW models come fully assembled. If they were NPACKING THE specified at the time of the order, the optional purge valve or motorized cooling valve is factory-installed. OXES Remote control cord (TW-2 only) Motorized cooling valve (optional) Thermolator Compressed air mold purge (optional) Carefully remove the Thermolator and compo-... -
Page 35: Preparing For Installation
The Thermolator is easy to install, if you plan the location and REPARING FOR prepare the area properly. NSTALLATION Position the Thermolator as close to the process machine as possible. Thermolator Process machine Alternate locations Make sure the installation area provides: ❒... - Page 36 The Thermolator process inlets and outlets must be connected ONNECTING to the plumbing that will circulate the temperature-controlled water or fluid through the process. Cooling water inlets and ROCESS AND outlets are connected to the cooling water supply. ATER UPPLY Remove the shipping pipe plug from the female connections on the back of the Thermolator.
-
Page 37: Optional Purge Valve Hookups
A purge valve is available as an option on Direct Injection and PTIONAL Closed Circuit units only. This valve quickly evacuates fluid from the process circuit, allowing faster disconnection of the URGE ALVE temperature controller from molds and hoses. An optional manual purge button controls this valve on TW-1 models. -
Page 38: Connecting The Main Power
WARNING: Electrical shock hazard ONNECTING This equipment is powered by three-phase main voltage. Always disconnect and lock out the main power source before performing any work OWER UPPLY involving electrical connections. All wiring, disconnects and fusing should conform to your region’s electrical codes and should be installed only by qualified personnel. -
Page 39: Testing The Installation
WARNING: Only qualified personnel ESTING THE should perform this procedure. NSTALLATION Parts of this test require opening the unit while it is energized. Only qualified personnel who have been trained in the use of electrical testing devices and in avoiding the safety hazards involved in safely troubleshooting this type of equipment should per- form this test procedure. -
Page 40: Initial Setup
NITIAL ETUP WARNING: Electric shock hazard This equipment is powered by high voltage. Always disconnect and lock out the main power source before opening the unit or the electrical enclosure to modify factory settings. Failure to disconnect and lock out the main power source can result in severe personal injury. -
Page 41: Changing Temperature Units
WARNING: Electric shock hazard HANGING This equipment is powered by high voltage. Always EMPERATURE disconnect and lock out the main power source before opening the unit or the electrical enclosure to NITS modify factory settings. Failure to disconnect and lock out the main power source can result in severe personal injury. -
Page 42: Enabling And Disabling Passcode Protection
NABLING AND WARNING: Electric shock hazard ISABLING This equipment is powered by high voltage. Always disconnect and lock out the main power source ASSCODE before opening the unit or the electrical enclosure to modify factory settings. Failure to disconnect and lock out the main power source can result in severe ROTECTION personal injury. - Page 43 NABLING AND ISABLING ASSCODE ROTECTION Press the RUN button to save the passcode. The control will display “Pr OFF” to prompt you to remove power to the unit. IMPORTANT: If RUN is not pressed, the new passcode will not be saved. Turn off power to the unit.
-
Page 44: Selecting The Temperature Control Point (Tw-2)
ELECTING THE WARNING: Electric shock hazard This equipment is powered by high voltage. Always EMPERATURE disconnect and lock out the main power source before opening the unit or the electrical enclosure to ONTROL OINT modify factory settings. Failure to disconnect and lock out the main power source can result in severe (TW-2 ONLY... - Page 45 ELECTING THE EMPERATURE ONTROL OINT (TW-2 ONLY Press the RUN button to save the control point. The control will display “Pr OFF” to prompt you to remove power to the unit. IMPORTANT: If RUN is not pressed, the new control point source will not be saved. Turn off power to the unit.
-
Page 46: Entering Setpoint Deviation Parameters
You can establish a normal operating range around the process NTERING temperature setpoint using the high and low deviation parame- ETPOINT ters. If the process temperature exceeds the high deviation limit, or falls below the low deviation limit for longer than 15 EVIATION minutes, the Thermolator will alert you to the unacceptable temperature variation with an alarm light. -
Page 47: Activating Spi Communication
TW-1 and TW-2 Thermolators provide SPI compatible support CTIVATING for RS-485 serial communications with a host machine. You can use SPI communication to change or monitor the: OMMUNICATION G Process temperature setpoint G High and low temperature deviation alarms G Process status (run and alarm conditions) NOTE: To disable SPI, use G Machine 1 status... -
Page 48: G G Installing The Auto Start
NSTALLING THE WARNING: Electric shock hazard This equipment is powered by high voltage. Always TART disconnect and lock out the main power source before opening the unit or the electrical enclosure to EATURE modify factory settings. Failure to disconnect and lock out the main power source can result in severe (TW-2 O personal injury. - Page 49 Set dip switch 4 to the NSTALLING THE 8 7 6 5 4 3 2 1 ON position. TART Close the electrical EATURE enclosure and restore power to the unit. (TW-2 O NOTE: All dip switch illus- trations in this manual show switches 7 and 8 set to ON.
-
Page 51: Operation
PERATION G G TW-1 control ....4-2 G G TW-2 control ....4-3 G G Mounting the TW-2 control in a remote location . - Page 52 TW-1 C All normal operating functions can be controlled from the ONTROL TW-1 control panel. If you have the optional manual mold purge, the control button is located on the side of the Thermolator electrical enclosure. Run/Stop Actual values display Setpoint display Press RUN button to The green window displays the temperature...
- Page 53 TW-2 C All normal operating functions can be controlled from the ONTROL TW-2 control panel, including the optional mold purge. Run/Stop Actual values display Setpoint display Press RUN button to The green window displays the temperature The Setpoint display shows the start normal operation.
-
Page 54: G G Mounting The Tw-2 Control
OUNTING THE CAUTION: Improper use of the swiveling TW-2 C control panel can damage the unit. ONTROL G Do not use the control panel handles or IN A EMOTE control cables to move the Thermolator. The handles are designed only for orientation of OCATION the control panel. - Page 55 NTERING A ASSCODE TW-1 and TW-2 Thermolators have a security feature that pre- vents accidental or unauthorized changes to the setpoint tem- perature, high and low deviation limits, SPI address, and baud rate. If passcode protection is enabled, you must enter the correct passcode to change these parameters.
-
Page 56: Starting The Thermolator
Before starting the Thermolator, verify that the system has TARTING THE been installed correctly for your application. See the section. NSTALLATION HERMOLATOR If Passcode Protection has been enabled, you must enter the correct passcode before you can change or enter any of the operating parameters, including the temperature setpoint. -
Page 57: Stopping The Thermolator
WARNING: Electrical shock and TOPPING THE hot surface hazards Before attempting maintenance of any kind HERMOLATOR on the Thermolator, you must stop the unit; disconnect and lockout the main power supply; and allow the unit to cool to less than 100°... -
Page 58: Using The Manual Purge Option
TW-1 and TW-2 direct injection and closed circuit models can SING THE be ordered with an optional purge valve, which clears the process lines of fluid using compressed air. The valve is oper- ANUAL URGE ated by a manual purge switch on the side of the unit. PTION IMPORTANT: Before purging the process lines, be sure... - Page 59 The TW-2 direct injection models can be ordered with an TW-2 SING THE optional purge valve, which clears the process lines of fluid using compressed air. The valve is operated by a purge button URGE EATURE on the control panel. IMPORTANT: Before purging the process lines, be sure that the cooling water source feed is closed.
-
Page 60: Performing An Auto Tune
ERFORMING AN WARNING: Electric shock hazard This equipment is powered by high voltage. Always disconnect and lock out the main power source before opening the unit or the electrical enclosure to modify factory settings. Failure to disconnect and lock out the main power source can result in severe personal injury. -
Page 61: G G Performing An Auto Tune
ERFORMING AN Press (the Setpoint Select button) simultaneously to begin the Auto Tune. The Actual display will flash “At” and the current process temperature to indicate that an Auto Tune is underway. If Auto Tune is successful, the controller automatically starts controlling using the new PID parameters. -
Page 63: Maintenance
AINTENANCE G G Maintenance schedule ..5-2 G G Accessing the Thermolator enclosure ....5-3 G G Checking fluid level in the reservoir . -
Page 64: Preventative Maintenance Schedule
Thermolator TW-1 and TW-2 water temperature controllers REVENTATIVE are essentially maintenance-free. However, to maintain the best performance, we recommend the following maintenance AINTENANCE schedule. CHEDULE G G Whenever process variables change ❒ ❒ Perform an Auto Tune. The Auto Tune ensures that the control continues to obtain good approximations of the PID constants used to compensate for the thermal lag of the system.. -
Page 65: To Access The Thermolator Enclosure
REVENTATIVE G G Annually (every 12 months) ❒ ❒ AINTENANCE Test and calibrate the unit’s control systems. The Thermolator’s Test Mode checks the operation CHEDULE of displays, control buttons, inputs and outputs. You can also calibrate the supply and return thermocouples. See P in this section. -
Page 66: Checking Fluid Level In The Reservoir (Ic)
The isolated, or totally closed, circuit models separate the HECKING THE cooling water from the process fluid, which is held in a reser- voir inside the unit. This reservoir should be kept at least LUID EVEL IN three-quarters full of the process fluid. ESERVOIR You can check the fluid level Sight glass... -
Page 67: Maintenance
TW-1 and TW-2 Thermolators provide a Test Mode that tests ERFORMING displays and keys on the control panel, as well as inputs and outputs. The Test Mode also allows calibration of the supply YSTEM ESTS and return line thermocouples. System tests and calibration should be performed annually. To enable Test Mode: Press to shut down the Thermolator. -
Page 68: The Key/Display Test
The Key/Display Test verifies the function of displays, LEDs ISPLAY and buttons on the control panel. Enable Test Mode. Press any key. If necessary, index to the Key/Display menu. Press and hold the Setpoint key for 3 seconds to index to each test menu until the controller displays “dSP”. -
Page 69: Input Test
The Input Test verifies the function of inputs available on the NPUT various TW-1 and TW-2 models. Not all inputs are used on all models. The performance evaluation of the inputs is based on the voltage sensing device (VSD). Connect all inputs to the system. Press any key to display the first test menus. -
Page 70: Output Test
The Output Test verifies the function of outputs available on UTPUT the various TW-1 and TW-2 models. Not all outputs are used on all models. The performance evaluation of the inputs is based on the output monitors (OM). Connect all outputs to the system. IMPORTANT: Testing each output requires the fir- ing of the associated solid state relay. -
Page 71: Output Monitors
All output monitors on the Thermolator can be enabled or dis- ISABLING OR abled permanently through the OM Enable/Disable Menu in Test Mode. NABLING You need to use this feature if you have replaced the mother- UTPUT board, or if dip switches 7 and 8 have been changed erro- neously. -
Page 72: Calibrating Temperature Sensors
TW-1 and TW-2 Thermolators use type “K” thermocouples to ALIBRATING sense the temperature in the return and supply process lines. These thermocouples should be calibrated annually, or when a EMPERATURE new thermocouple is installed, to ensure correct operation. ENSORS The Thermolator’s Calibration Mode provides zero and span calibration of both the supply and return line thermocouples. - Page 73 Press the up L L key to begin calibrating. ALIBRATING The controller displays the name of the current calibration EMPERATURE (examples: 32 SC.L; 32 rC.L; 510 SC.H; or 510 rC.H). ENSORS Wait until the control displays “don” or “bad.” A “don” message in the Setpoint display indicates the cali- bration was successful.
-
Page 74: Logging Operating Hours
You can see the total numbers of operation by accessing the OGGING Total Operating Hours Log in Test Mode. PERATING Enable Test Mode. OURS Press any key to display the first test menus. Index through test menus to the operating log. Press and hold the Setpoint key for 3 seconds to index to each test menu until the Actual display indicates “Log”. -
Page 75: Troubleshooting
ROUBLESHOOTING G G Before beginning ... .6-2 G G A few words of caution ..6-2 G G How to identify the cause of a problem ....6-3 IAGNOSTICS G G Shut down alarms . -
Page 76: Before Beginning
You can avoid most problems by following the recommended EFORE installation, operation and maintenance procedures outlined in this User Guide. If you do have a problem, this section will EGINNING help you determine what caused it and tell you how to fix it. Before you begin troubleshooting: ❏... -
Page 77: How To Identify The Cause Of A Problem
Most Thermolator malfunctions are indicated by an illuminat- OW TO DENTIFY ed alarm light and error codes displayed on the control panel. AUSE OF A A problem can trigger three types of alarms: G G Shut Down Alarms: The Thermolator detected a problem ROBLEM that caused it to shut down automatically to prevent equip- ment damage or personal injury. -
Page 78: Shut Down Alarms
The Thermolator has detected a problem that could lead to equip- ment damage or personal injury if it is not corrected. N The Alarm LED lights and the STOP/RUN LED flashes red. LARMS N The Thermolator automatically shuts down. N The control displays a red LED or alarm code indicating the source of the problem. - Page 79 The Thermolator has detected a problem that could lead to equip- ment damage or personal injury if it is not corrected. N The Alarm LED lights and the STOP/RUN LED flashes red. LARMS N The Thermolator automatically shuts down. N The control displays a red LED or alarm code indicating the source of the problem.
- Page 80 The Thermolator has detected a problem that could lead to equip- ment damage or personal injury if it is not corrected. N The Alarm LED lights and the STOP/RUN LED flashes red. LARMS N The Thermolator automatically shuts down. N The control displays a red LED or alarm code indicating the source of the problem.
- Page 81 The Thermolator has detected a problem that could lead to equip- ment damage or personal injury if it is not corrected. N The Alarm LED lights and the STOP/RUN LED flashes red. LARMS N The Thermolator automatically shuts down. N The control displays a red LED or alarm code indicating the source of the problem..
-
Page 82: Warning Alarms
The Thermolator has detected a problem that could lead to a shut ARNING down condition if it is not corrected. N The Alarm LED lights. LARMS N The Thermolator continues operating. N The control displays a red LED or alarm code indicating the source of the problem. - Page 83 The Thermolator has detected a problem that could lead to a shut ARNING down condition if it is not corrected. N The Alarm LED lights. LARMS N The Thermolator continues operating. N The control displays a red LED or alarm code indicating the source of the problem.
-
Page 84: G G Warning Alarms
The Thermolator has detected a problem that could lead to a shut ARNING down condition if it is not corrected. N The Alarm LED lights. LARMS N The Thermolator continues operating. N The control displays a red LED or alarm code indicating the source of the problem. - Page 85 The memory has exceeded Cycle power to the unit. its usable life or there is a Contact Conair service if an software bug. This error operating parameter such as the occurs only after changes setpoint is not being saved or if have been made to non- this error persists.
-
Page 86: Thermolator Will Not Power Up
If you apply power to the Thermolator and the control panel does HERMOLATOR not light, you have a problem with the main power circuit or the unit’s microprocessor board. OWER WARNING: Electrical Shock Hazard Disconnect and lockout the main power supply before proceeding. - Page 87 This procedure covers the factory-installed fuses on the unit’s HECKING AND motherboard. If you have installed an electrical disconnect or emergency stop switch, additional fuses and/or breakers may EPLACING have been used elsewhere in the in the main power circuit. USES To replace a blown fuse: Disconnect and lockout the main power.
-
Page 88: G G Resetting Overloads
The pump motor overload is located inside the unit’s electri- ESETTING cal enclosure. VERLOADS Disconnect and lockout the main power. Open the electrical enclosure door. Turn the screw on the front panel counterclockwise to open. Check the overload. If the yellow button is out, the overload has tripped. - Page 89 EPLACING THE Disconnect and lockout the main power supply. OTHERBOARD Open the electrical enclosure door. Turn the screw on the front panel counterclockwise to open. Mark or label each wire IMPORTANT: Always connected to the mother- 3 PHASE INPUT refer to the wiring dia- board.
-
Page 90: Replacing The Motherboard
WARNING: Electrical Shock Hazard EPLACING THE Only qualified service personnel who have been EATER trained on electrical testing and the procedures for avoiding the hazards should diagnose or correct prob- ONTACTOR lems that require opening the unit with power on. Thermolators use mercury displacement heater contactors. -
Page 91: Thermocouples
The Thermolator uses two type ‘K’ thermocouples HECKING to monitor supply and return process temperatures. One ther- mocouple is installed in the wall of the heater tank at the “to HERMOCOUPLES process” outlet. The other thermocouple is installed in the wall of the cooling tank at the “from process”... -
Page 92: Repairing Solenoid Valves
Every Thermolator has a solenoid valve assembly that controls EPAIRING the cooling water out flow. Closed circuit (CC) and Isolated Circuit (IC or TCC) units also have a vent valve assembly. OLENOID Solenoid valves also are found on the optional purge valve. ALVES WARNING: Electrical shock and... - Page 93 Indicates Parts Supplied EPAIRING in Solenoid Enclosure Kit Retaining Clip OLENOID ALVES Nameplate Retaining Cap Cover Sleeve Grounding Wire Yoke (Not present on all constructions) Insulating Washer Housing 7/8" Dia. Hole for 1/2" Conduit Coil Solenoid Base Insulating Washer Sub-Assembly 0.9375-26 UNS-2A Sleeve Thread...
-
Page 94: Replacing Heater Elements
WARNING: Electrical shock and EPLACING hot surface hazards Before attempting maintenance of any kind EATER on the Thermolator, you must stop the unit; disconnect and lockout the main power LEMENTS supply; and allow the unit to cool to less than 100°... - Page 95 EPLACING Lift the heating element out of the heater tube. Lift the element straight up. EATER LEMENTS Heater cap Heater element Heater gasket Replace the heater gasket if it is worn or cracked. Use a high termpertaure Teflon paste to ensure a good seal.
-
Page 96: Removing The Pump
WARNING: EMOVING Electrical shock and hot surface hazards Before attempting maintenance of any kind on the Thermolator, you must stop the unit; disconnect and lockout the main power supply; and allow the unit to cool to less than 100° F (38° C) Disconnect and lockout the main power. - Page 97 To replace a failed seal, you must disassemble the pump. ISASSEMBLING Remove the impeller nut. Insert a screwdriver in one SSEMBLING of the impeller waterway passages and back off the impeller nut. UMPS Remove the impeller. Insert a screwdriver in the slot of the motor shaft.
-
Page 98: Disassembling And Assembling 3/4 To 2 Hp Pumps
To replace a failed seal, you must disassemble the pump. ISASSEMBLING Remove the impeller retaining assembly. Insert a SSEMBLING screwdriver in one of the impeller waterway passages to hold the impeller steady while removing the retainer. 3 - 7.5 UMPS Remove the impeller. - Page 99 ISASSEMBLING Reattach the pump to SSEMBLING the volute case. Make sure you replace any dam- 3 - 7.5 UMPS aged gasket or O-ring between the pump assembly and volute case. Check for free rotation after assembly is completed. NOTE: Before restarting, close all drain openings using sealant on the threads and and refill the unit with fluid.
- Page 101 We’re Here to Help Conair has made the largest investment in customer support in the plastics industry. Our service experts are available to help with any problem you might have installing and operating your equipment. Your Conair sales representative also can help analyze the nature of your problem, assuring that it did not result from misapplication or improper use.
- Page 102 (except for parts that are typically replaced after normal usage, such as filters, liner plates, etc.). Conair’s guarantee is limited to replacing, at our option, the part or parts determined by us to be defective after examination. The customer assumes the cost of transportation of the part or parts to and from the factory.
-
Page 103: Appendix
Cooling Water Out LUMBING Check Cooling Valve Valve IAGRAMS Thermocouple From Process Mixing Tank Cooling Water In Return Heater Pressure Thermocouple Gauge Supply To Process Pressure Gauge Check Relief Valve Valve Pump Purge Valve (optional) Direct Injection Check valves included only with optional mold purge. -
Page 104: Plumbing Diagrams
LUMBING Cooling Water In Manual Fill IAGRAMS and Vent Port Cooling Water Out Cooling 3 Gal. Reservoir Valve Level Low Level Sight Glass Switch Return Thermocouple Vent Line From Process Cooling Heat Exchanger Make-Up Line Heater Supply Thermocouple Supply To Process Pressure Gauge Relief... -
Page 105: Technical Information
URVES PPENDIX ECHNICAL NFORMATION UGH015/0100... -
Page 107: Thermolator Spi Commands
SPI C The SPI commands supported by Conair Thermolator mold ® OMMANDS temperature controllers are listed in the following tables. UPPORTED BY The standard required commands and three optional com- mands are listed in the SPI Command Pairs table, along with ONAIR the Select and Poll command pairs in hexadecimal format. - Page 108 SPI S TATUS ORDS Status, Process Poll: 0x20 0x40 SPI STATUS WORD Word BIT position EEprom error SET SET A/D converter error SET SET CJC Error SET SET RAM hardware SET SET ROM checksum SET SET Probe Failure E/M Hi temp safety Prog.
- Page 109 SPI S TATUS ORDS Status, Machine 1 Poll: 0x20 0x42 SPI STATUS WORD Word BIT position EEprom error SET SET A/D converter error SET SET CJC Error SET SET RAM hardware SET SET ROM checksum SET SET Probe Failure E/M Hi temp safety SET SET Prog.
- Page 110 SPI S TATUS ORDS Status, Machine 2 Poll: 0x20 0x44 SPI STATUS WORD Word BIT position EEprom error SET SET A/D converter error SET SET CJC Error SET SET RAM hardware SET SET ROM checksum SET SET Probe Failure SET SET E/M Hi temp safety Prog.
- Page 111 Synonyms: Quicksilver; Liquid silver Formula: HG Molecular weight: 200.59 Trade name: Not applicable Chemical family: Metal Supplier of MSDS information: Emergency contact: The Conair Group Inc. For CHEMTREC assistance call One Conair Drive 800-424-9300 (in the U.S.) Pittsburgh, PA 15202 703-527-3887 (international) 412-312-6000 2.
- Page 112 MSDS: 5. Fire and Explosion Data Fire and explosion Mercury presents a slight fire and explosion hazard when 7439-97-6 exposed to heat or flame. Mercury vapors are heavier hazards: than air and may travel a considerable distance to a source of ignition and flash back. ERCURY Dry chemical, carbon dioxide, water spray or foam.
-
Page 113: Parts /Diagrams
ARTS IAGRAMS G G Spare Parts Lists ..PD-1 G G TW-1 Wiring ....PD-5 G G TW-1 Circuit Board ..PD-6 G G TW-2 Wiring . -
Page 114: Spare Parts Lists
ECOMMENDED TW-1 and TW-2 Thermolators 208-230/460V 9kW & 12kW units PARE ARTS ¾ HP through 7½ HP PUMP ASSEMBLIES Nickle resistant seal, open drip proof type motor Part No. Description 09000952 ¾ HP pump model 11C (with cast iron impeller) 09000953 1 HP pump model 11C (with cast iron impeller) 09000954... - Page 115 ECOMMENDED TW-1 and TW-2 Thermolators 208-230/460V, 9kW & 12kW units, ¾ HP through 7½ HP PARE ARTS PUMPMOTORS Part No. Description 09001403 ¾ HP 208/230/460V/3/60 ODP (Open Drip Proof) 09000378 1 HP 208/230/460V/3/60 ODP (Open Drip Proof) 09000381 2 HP 208/230/460V/3/60 ODP (Open Drip Proof) 09000384 3 HP 208/230/460V/3/60 ODP (Open Drip Proof) 09000387...
- Page 116 ECOMMENDED TW-1 and TW-2 Thermolators 208-230/460V, 9kW & 12kW units, ¾ HP through 7½ HP PARE ARTS HEATER CONTACTORS Part No. Description 20004401 Heater contactor for 9kW 208/230/460V 20004401 Heater contactor for 12kW 230/460V 09000417 Heater contactor for 12kW 208V REPLACEMENT BOARDS for TW-1 and TW-2, single- and two-zone Part No.
-
Page 117: Wiring
PD-5 TW-1 230/460V W IRING IAGRAM UGH015/0100... -
Page 118: Tw-1 Circuit Board
3 PHASE INPUT TW-1 CIRCUIT BOARD UNLDR 1/ VENT 2 SOL VENT SOL UNLDR 1/ VENT 2 SOL VENT SOL UNLDR 2/ COOL 1 SOL COOL SOL UNLDR 2/ COOL 1 SOL COOL SOL PUMP PUMP WARNING! PUMP PUMP IT IS VERY IMPORTANT THAT PUMP OL PUMP OL SWITCHES #7 AND #8 BE SET TO... - Page 119 PD-7 TW-2 230/460V W IRING IAGRAM UGH015/0100...
-
Page 120: Circuit Board
3 PHASE INPUT TW-2 CIRCUIT BOARD UNLDR 1/ VENT 2 SOL VENT SOL UNLDR 1/ VENT 2 SOL VENT SOL UNLDR 2/ COOL 1 SOL COOL SOL UNLDR 2/ COOL 1 SOL COOL SOL WARNING! PUMP PUMP PUMP PUMP IT IS VERY IMPORTANT THAT PUMP OL PUMP OL SWITCHES #7 AND #8 BE SET TO...
Need help?
Do you have a question about the Thermolater vacuTrac and is the answer not in the manual?
Questions and answers