Table of Contents
Advertisement
Quick Links
Download this manual
See also:
User Manual
Advertisement
Table of Contents

Related Manuals for ZKTeco ZM100


Summary of Contents for ZKTeco ZM100
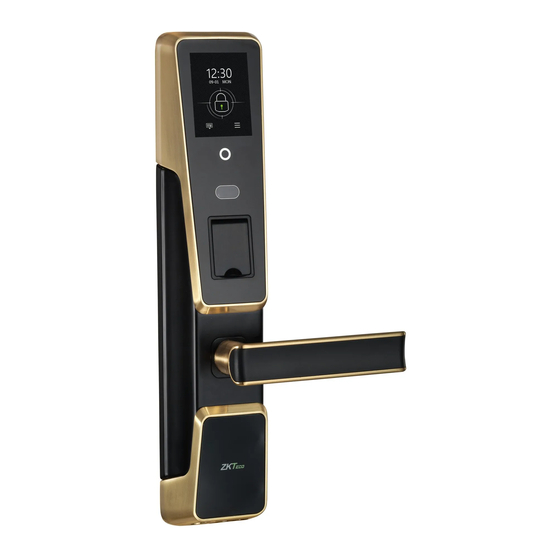
- Page 1 Installation Guide ZM100 Face and Fingerprint Lock Version: 1.0 Date: September, 2017...
-
Page 2: Table Of Contents
Contents Before Installation ..........1 Diagram . -
Page 3: Before Installation
Before Installation Diagram... -
Page 4: Packing List
Packing List Wooden Door Security Door... - Page 5 Check door thickness, prepare the proper screws and spindles. Door Thickness 35-45mm 45-50mm 50-60mm 60-65mm D Spindle (8*8) 65mm 85mm L Spindle (5*5) 50mm 60mm J Screw (M4) 25mm 40mm J Screw (M5) 25mm 40mm Notes: Screws and spindles for doors thickness of 35-65mm are all included in the standard package.
-
Page 6: Notes
Notes Cautions 1. New lock can not unlock with ANY verification. Please register one administrator at least first, if there is no any administrator, registration for normal users is not allowed. 2. The lock is equipped with mechanical keys for manual unlocking. Remove mechanical keys from the package and keep them in a safe place. -
Page 7: Installation Environment
Installation Environment This lock is recommended to be installed in the indoor and semi-outdoor environment, where the luminance is within 5000Lux. Recommended installation position: There are several situation will affect the recognition: Expose to direct Expose to direct Expose to slant Expose to strong sunlight through sunlight through... -
Page 8: Check Door Open Direction
Check door open direction. Left Inward Right Inward Left Outward Right Outward Note : Please install the mortise and strike plate according to the above pictures. (Without hooks) (With hooks) Check door type. Mortise without hooks is applied to wooden door, and mortise with hooks is applied to security door. -
Page 9: Tips
Tips 1. How to change the direction of latch bolt? Step1: Push the switch to the end Step2: Push the latch bolt into the mortise Step3: Rotate the latch bolt at 180° inside mortise, Œ then loose it. Ž 180°... - Page 10 3. How to use emergency power? 4.How to use mechanical key ? Unlocking method: Please remove the silicon stopper of the keyhole first, then insert the key into the keyhole and rotate 90° to left or right, press the handle to unlock. Caution: Please do not press down the handle before rotating the key.
-
Page 11: Installation
Installation 1. Drill holes on the door Recommended installation height door thickness If the user height is 1.35-1.80m, the 35~65mm height from handle centerline to ground is 1m. center line of the handle desired handle height backset 60mm Note1:Align the template along the vertical center line of the mortise(E)at the desired handle 0.5m height, and tape it to door. - Page 12 2. Install the mortise(E) Note: The mortise with hooks is optional.
- Page 13 3. Install outdoor unit(B) with gasket(C),and spindle(D) Note: 1. The small triangle must be placed toward the letter of R or L. 2. If the door is right open, the small triangle should towards R. 3. If the door is left open, the small triangle should towards L. Right Open Left Open Step1...
- Page 14 How to change the location of stud bolts? Note: Before install the waterproof gasket, if the height of stud bolts is unsuitable for the existed holes, you can adjust stud bolts location to make the lock suitable. Step2:Twist down the other stud bolt. Step1: Twist down the eight M3 screws and M5 stud bolt to take down the mounting plate.
- Page 15 4. Install mounting plate (I) with gasket(C), spring(K) and spindle(L) 1.Make sure spring K can withstand the front handle spindle before installation. 2.Insert 5*5 spindle L, and then tighten the small screws according to the pictures. Tighten screws to fix the spindle. Step1 Step2 Step3...
- Page 16 5. Install indoor unit (M) 6. Install battery (N) Install batteries and connect the battery joint. Note: The battery is installed at default and equipped with 1 piece lithium battery. When you purchase a rechargeable battery, please install according to the following pictures.
- Page 17 Lift the silicon cover in the below red box to recharge. Silicon Cover...
- Page 18 7. Mark and drill holes for strike...
-
Page 19: Quick Operation Guide
Quick operation guide Open the door with fingerprint Touch the power-on button to Verify the fingerprint Press down the handle to unlock power on the lock Open the door with password Touch the power-on button to Enter the password, Press down the handle to unlock power on the lock press OK to confirm Note: Users may enter any random digits in front of and behind the correct password to create... - Page 20 © Copyright 2017. ZKTeco Inc. ZKTeco Logo is a registered trademark of ZKTeco or a related company. All other product and company names mentioned are used for identification purposes only and may be the trademarks of their respective owners. All specifications are subject to change without notice. All rights reserved.
Need help?
Do you have a question about the ZM100 and is the answer not in the manual?
Questions and answers