Advertisement
Advertisement
Table of Contents

Related Manuals for ZKTeco SL01C1-20H


Summary of Contents for ZKTeco SL01C1-20H
- Page 1 SL01C1-20H MANUAL...
-
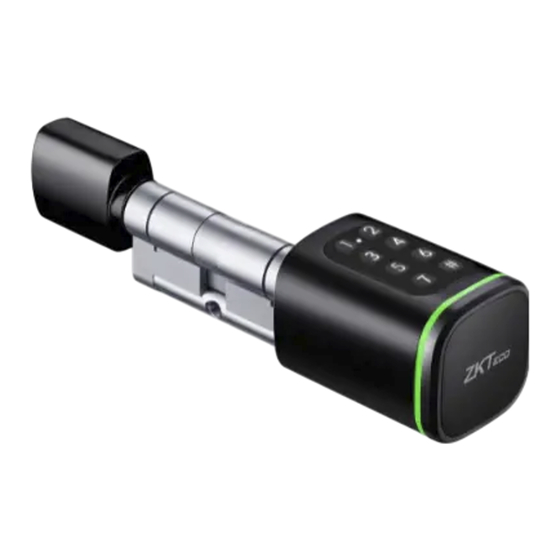
Page 2: Product Overview
Product overview • S m a r t C y l i n d e r L o c k • K e y c a r d • APP f u n c t i o n • T w o f a c t o r A u t h e n t i c a t i o n •... -
Page 3: Packaging Accessories
Packaging Accessories Smart Lock Please check the packing box and accessories when you got the item in hand. Epoxy Smart Card x 2 Sucker x 2 Manual Key x 2 Tools... - Page 4 Available in Black and silver...
- Page 5 Product Specifications Back knob Keycard area Keypad area Cylinder (Adjustable)
- Page 6 Reader View Type C port Manual key Battery box Cylinder Cover Sucker Emergency key...
- Page 7 Dimensions...
-
Page 8: Installation Step
Installation Step 1 Please use the screwdriver to take off the screw on the back knob position, refer the below Pic.1: Special Notice for Axis Door: You can use the screwdriver to take off the screw on the back knob position and adjust the tail size, accordingly, refer the below: Pull and adjust to your requirements... -
Page 9: Installation Steps
Installation Steps 2 Please insert the cylinder to the existed lock and fix the cylinder with the long screw as picture 2. Please insert the cylinder to the existed lock and fix the cylinder with the long screw as picture Please use the screwdriver to fasten the screw on the back knob position, refer the below picture 3: Please use the screwdriver to fasten the screw on the back knob position, refer the below picture... - Page 10 • Please take off the reader cover with the magnet or sucker (included in our accessories Installation Steps 3 bag),assemble 1xCR123A alkaline battery, refer the below picture 1xCR123A alkaline battery Stick sucker on back cover and turn to open. Notice after you insert the key into the keyhole and turn clockwise, you shall turn the reader to unlock the door but not to use the key to unlock the door directly...
- Page 11 Installation Steps 4 • Please test with your default password 123456 and end with “# “ under the factory state, refer the below picture Please test the lock with key card after you configure the lock with ZSmart APP Notice the keycard or fingerprint can only be enrolled by the ZSmart APP, so it is important to install this app in your mobile before start daily use.
- Page 12 Pairing the lock with APP Zsmart Settings: Step 1. Search for the “ZSmart” App in iOS App Store or Google Play Store. Step 2. Open the ZSmart App, register and sign into the account. Step 3. Make sure the lock is in Factory Default Mode. Turn on Bluetooth permission on your smartphone and stay near the lock (within 10 meters without obstacles).
- Page 13 Intelligent Configuration • Please run the ZSmart APP and click “Add Device” on the right top position for auto scan: Bluetooth must be on On the device press 0# to pair...
- Page 14 • Under ZSmart APP interface, you can see the features for the smart locks, such as Member /unlock records and settings etc.
- Page 15 • Add User Password Under ZSmart APP setting, you can click the password management and issue the password. Generate Randomly Click Password Management Click “+” Select User...
- Page 16 Add User Card Steps 1: Click Password Management Step2: Click “+” Step3: Select User Step 4: Generate Randomly 9 10 Under Select User Click Add Card ZSmart APP setting, please click the Tap Card on the lock Card Management and issue the card. induction area...
-
Page 17: Delete Users
Delete users Under ZSmart APP setting, you can click the “Member Management” and delete it with below operation: “Member Management” and delete it with below operation: Delete User Enable notification Click on Delete ,OK... - Page 18 Smart linkage and settings Under the settings, you can click the smart linkage for more scene and more options for the features upon the using condition.
-
Page 19: Passage Mode
Passage Mode Under ZSmart APP setting, you can tick” automatic lock switch”, under this setting the lock will be in always open state, you can press default password to cancel this passage mode(123456#). - Page 20 Reset the Lock Under ZSmart APP setting, you can click the “Remove Device” to reset the lock and the lock will be set to factory settings, you can press default password to unlock the lock(123456#).
- Page 21 Reset the Lock with Reset Card ( O n l y f o r e m e r g e n c y ) Touch the reset card to the induction area of the reader We provide one emergency solution to reset the lock with the reset card, but this is only for emergency use when the hardware reset operation does not work.
- Page 22 Troubleshoot and Solution(FAQ) TERMS & CONDITIONS Sales and Service Terms Please read the manual carefully before use *Limited 1-year Electronic Warranty *Limited Lifetime Mechanical and Finish Warranty *This product comes with a 1-year Limited Warranty on Electronic Parts *Mechanical and Finish Warranty against defects in materials and workmanship under normal use to the original residential user.
- Page 25 Thank you...
Need help?
Do you have a question about the SL01C1-20H and is the answer not in the manual?
Questions and answers