Table of Contents
Advertisement
Advertisement
Table of Contents

Related Manuals for Rice Lake SCT-10 Series


Summary of Contents for Rice Lake SCT-10 Series
- Page 1 SCT Weight Transmitter 10 Series Installation & Operator’s Manual 131129 Rev C...
-
Page 3: Table Of Contents
Course descriptions and dates can be viewed at www.ricelake.com/training or obtained by calling 715-234-9171 and asking for the training department. © Rice Lake Weighing Systems. All rights reserved. Printed in the United States of America. Specifications subject to change without notice. - Page 4 3.11 Communication Examples......48 4.0 Specifications ................51 Rice Lake continually offers web-based video training on a growing selection of product-related topics at no cost. Visit www.ricelake.com/webinars.
-
Page 5: Introduction
1.0 Introduction Manuals and Firmware/Software are available for viewing and/or downloading from the Rice Lake Weighing Systems website at www.ricelake.com/manuals Warranty information can be found on the website at www.ricelake.com/warranties Safety Safety Signal Definitions: Indicates an imminently hazardous situation that, if not avoided, will DANGER result in death or serious injury. -
Page 6: Equipment Recommendations
1.1.1 Equipment Recommendations Failure to follow the installation recommendations will be IMPORTANT considered a misuse of the equipment To Avoid Equipment Damage • Keep away from heat sources and direct sunlight. • Protect the instrument from rain. • Do not wash, dip in water or spill liquid on the instrument. •... -
Page 7: Load Cells
Windy Conditions - Shocks - Vibrations: The use of weigh modules is strongly recommended for all load cells to compensate for misalignment of the support surfaces. The system designer must ensure that the scale is protected against lateral shifting and tipping relating to shocks and vibration, windy conditions, seismic conditions and stability of the support structure. -
Page 8: Load Cell Testing
1.2.2 Load Cell Testing Load Cell Resistance Measurement (Use A Digital Multimeter): • Disconnect the load cells from the instrument and check that there is no moisture in the load cell junction box caused by condensation or water infiltration. If so, drain the system or replace it if necessary. -
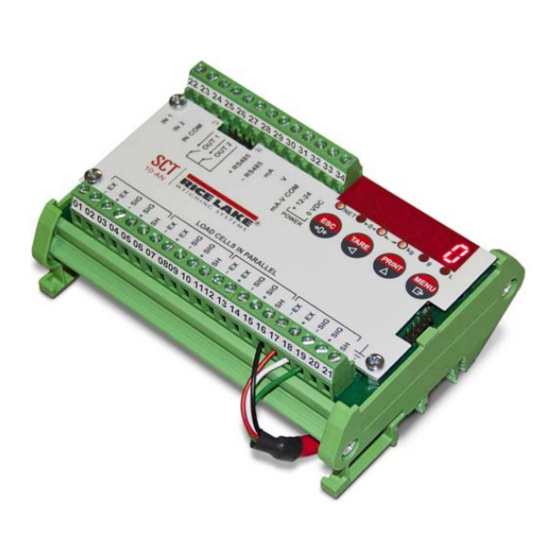
Page 9: Electrical Connections
• Transmits the gross or net weight via opto-isolated analog output 16 bit, current 0-20mA, 4-20mA or voltage 0-10V, 0-5V (±0V / ±5V by closing a soldered jumper). • Transmits the gross or net weight via RS-485 serial port, by means of protocols: - Modbus RTU - ASCII bidirectional protocol - Continuous transmission... -
Page 10: Led And Key Functions
LED and Key Functions Main function Secondary function * Net weight LED: net weight display (semi- LED lit: input 1 cosed automatic tare or preset tare) Zero LED (deviation from zero not more than LED lit: input 2 closed +/- 0.25 divisions) Stability LED LED lit: output 1 closed Unit of measure: kg... -
Page 11: Instrument Commissioning
Instrument Commissioning Plug power cord in to outlet to turn on indicator, the display shows in sequence: - “SU” followed by the software code (e.g.: SU S ); - - “r” followed by the software version (e.g.: r 1.04.01 ); - - “HU”... -
Page 12: Configuration
2.0 Configuration SEtP1 PtArE 000000 CALIB FILTER PARA 0 0 SET AUTO 0 Calib TRAC 0 Submenu ANALOG TYPE MODE ANA 0 ANA FS COR 0 COR FS Enter # Enter # Enter # Enter # Enter # 4-20mA 0-20 mA Gross 0-10 V 0-5 V... - Page 13 Parameter Choices Description See Section 2.1Section 2.1 on page 10. Allows a stable weight display to be obtained. See Section 2.2 on page 17. See Section 2.3 on page 19. ...
-
Page 14: Calibration
2.1 Calibration Enter # Enter # Enter # Enter # Enter # Enter # Figure 2-2. Calibration Menu Structure Parameter Choices Description Enter # System Full Scale is determined by multiplying one deno * load cell capacity by the number of load cells used. Example of system full scale value calculation: 4 cells of 1000kg ---->... - Page 15 Parameter Choices Description Division (resolution) - the weight increment (display division size) that the scale counts by. Selections are: 0.0001 and 100 with x1 x2 x5 x10 increments. 0.0001 0.0002 0.0005 0.001 0.002 0.005 0.01 0.02 0.05 Enter # Maximum capacity (Live Load/Product) that can be displayed.
- Page 16 Parameter Choices Description Enter # Weight (Span) Calibration - after the Theoretical Calibration has been completed and zero is set, the calibration can be adjusted with actual test weights by changing the displayed value in this parameter. NOTE: If changes are made to the theoretical Full ...
-
Page 17: Theoretical Calibration
2.1.1 Theoretical Calibration This function allows load cell rated values to be set. To perform the theoretical calibration set , and in sequence: When entering a menu, the LED’s will begin scrolling, when selection is Note made and confirmed the LED’s will be off. MENU Press and hold , then press... -
Page 18: Zero Setting
MENU Press , is displayed. TARE PRINT MENU Press until is displayed, press . LED’s will begin scrolling. TARE PRINT MENU Press until desired capacity is displayed, press Press twice to exit set-up menu. 2.1.3 Zero Setting Perform this procedure after having set the Section 2.1.1 on page 13. This menu may also be accessed directly from the weight display, press Note and hold... -
Page 19: Weight (Span) Calibration (With Test Weights)
2.1.5 Weight (Span) Calibration (With Test Weights) After performing Section 2.1.1 on page 13 and Section 2.1.3 on page 14, this function allows correct calibration to be done using test weights of known value, if necessary, any deviations of the indicated value from the correct value to be corrected. Load the test weight onto the scale, use as high a percentage of the maximum quantity to be weighed as possible. -
Page 20: Setting Units Of Measure
PRINT By pressing after having confirmed the test weight that has been set, full scale appears, recalculated according to the value of the maximum test weight entered and making reference to the cell sensitivity set in the theoretical calibration (). 2.1.6 Setting Units of Measure MENU . -
Page 21: Filter On The Weight
kilograms grams tons pounds Value set in COEFF will be multiplied by the weight value currently displayed newton Value set in COEFF will be multiplied by the weight value currently displayed litres in COEFF set the specific weight in kg/l, assuming that ... - Page 22 Setting this parameter allows a stable weight display to be obtained. To increase the effect (weight more stable), increase the value. MENU . will be displayed. Press and hold , then press TARE PRINT MENU until is displayed, press Press .
-
Page 23: Zero Parameters
2.3 Zero Parameters MENU . will be displayed. Press and hold , then press TARE PRINT MENU Press until is displayed, press TARE PRINT MENU 2-1. Press until desired parameter is displayed, press . The currently programmed value is displayed and LED’s will be scrolling. TARE PRINT MENU... -
Page 24: Analog Output
2.4 Analog Output Parameter Choices Description 4-20 mA * Selects the analog output type. 0-20 mA 0-10 V 0-5 V -10 +10 V See Section 2.4.1 on page 21 -5 +5 V See Section 2.4.1 on page 21 Enter # Select mode to be tracked, gross or net. -
Page 25: Soldered Jumper
2.4.1 Soldered Jumper For the output -10 +10 V and -5 +5 V the soldered jumper J7 must be closed: • Remove the face plate of the instrument by removing the screws that attach it to the little columns on the printed circuit board. •... -
Page 26: Serial Communication Settings
2.5 Serial Communication Settings CALIb SErIAL PArA 0 Out-In FILtEr ANA LOG tESt rS485 bAud Addr HErt2 dELAY PArItY StOP Enter # Enter # nOnE 2400 nOnE NodbUS 4800 ASCII 9600 EUEn Cont In 19200 38400 rI P HdrI P 115200 HdrI Pn Figure 2-3. - Page 27 Parameter Choices Description (cont) Continuous weight transmission protocol (see Section 3.9) When the remote display is set to gross weight: - if the instrument displays the gross weight, the remote display shows the gross weight. - if the instrument shows the net weight the remote display shows the net weight alternated with the message “net”...
-
Page 28: Rs-485 Serial Communication
2.5.1 RS-485 Serial Communication 0 VDC RS485 - RS485 + 0 VDC RS485 - RS485 + 0 VDC RS485 - RS485 + 5 2 3 PC RS232 Figure 2-4. RS-485 Serial Communications 24 SCT Weight Transmitter Operator’s Manual... -
Page 29: Outputs And Inputs Configuration
If the RS-485 network exceeds 100 meters in length or baud-rate over Note 9600 are used, close the two jumpers, called RS-485 termination, to activate two 120 ohm terminating resistors between the ‘+’ and ‘–’ terminals of the line, on the terminal strip of the furthest instrument. Should there be different instruments or converters, refer to the specific manuals to determine whether it is necessary to connect the above- mentioned resistors. - Page 30 Parameter Choices Description Normally Open: the relay is de-energized and the contact is open when the weight is lower than the programmed setpoint value; it closes when the weight is higher than or equal to the programmed setpoint value.
-
Page 31: Test
Parameter Choices Description (NET/GROSS): by closing this input for less than one second, it performs a SEMI-AUTOMATIC TARE and the display will show the net weight. To display the gross weight again, hold the NET/GROSS input closed for 3 seconds. -
Page 32: Setpoints Programming
Parameter Choices Description Input Test - for each open input 0 is displayed, 1 is displayed when the input is closed. Output Test - Setting 0 - the corresponding output opens. Setting 1 - the corresponding output closes. ... -
Page 33: Reserved For The Installer
2.9 Reserved For The Installer 2.9.1 Default Scale Operation must only be performed after contacting technical IMPORTANT assistance With power off, press and hold , then power on. Display shows . MENU Press , display shows . MENU Press , display shows . -
Page 34: Keypad Or Display Locking
2.9.3 Keypad Or Display Locking PRINT Press immediately followed by , hold them down for about 5 seconds (this operation is also possible via the MODBUS and ASCII protocols): TARE MENU Press until desired parameter is displayed, press Parameter Description ... -
Page 35: Operation
3.0 Operation 3.1 Semi-Automatic Tare (Net/Gross) The semi-automatic tare value is lost upon instrument power-off. Note The semi-automatic tare operation is not allowed if the gross weight is zero. To capture tare and weigh in net mode (SEMI-AUTOMATIC TARE), TARE close the NET/GROSS input or press for 3 seconds. -
Page 36: Semi-Automatic Zero (Weight Zero-Setting For Small Variations)
If a semi-automatic tare (net) is entered, it is not possible to access Note the enter preset tare function. If a preset tare is entered, it is still possible to access the semiautomatic tare (net) function. The two different types of tare are added. -
Page 37: Modbus-Rtu Protocol
----- ErCEL Er OL Er Ad Er OF --------- MODE The response Bit LSB 76543210 76543210 76543210 76543210 76543210 to the zero xxxxxxx1 xxxx1xxx xxxxxx1x xxxxx1xx On gross: Status command is a xxx1xxxx 'value not Register On net: valid' error MODBU xx1xxxxx (error code 3) - Page 38 Modbus Supported Functions Among the commands available in the MODBUS-RTU protocol, only the following are used to manage communication with the instruments. Other commands may not be interpreted correctly and could generate errors or system shut-downs: FUNCTIONS DESCRIPTION 03 (0x03) Read Holding Register (Programmable Register Reading) 16 (0x10) Preset Multiple Registers (Write Multiple DI Register)
- Page 39 N° BYTES: Number of bytes transmitted as a value of the registers (2 bytes per register) VAL. REG.: Contents of the register beginning from the first. The answer contains the register identification modified after the command has been executed. Communication Error Management The communication strings are controlled by CRC (Cyclical Redundancy Check).
- Page 40 DESCRIPTION REGISTER Saving to EEPROM ACCESS 40001 Firmware version 40002 Type of instrument 40003 Year of Production 40004 Serial Number 40005 Active program 40006 Command Register 40007 Status Register 40008 Gross Weight H 40009 Gross Weight L 40010 Net Weight H 40011 Net Weight L 40012...
- Page 41 Weight (Span) Calibration Commands (With Test Weights) The instrument calibration can be changed via MODBUS. To carry out this procedure, the system must be unloaded and the weight value display reset to zero with the command ‘100’ of the Command Register. Then, a load must be placed on the system and the correct weight value must be sent to the registers 40037-40038;...
- Page 42 Inputs Register (40025) Outputs Register (40026) (Read Only) (Read And Write) Bit 0 INPUT 1 Status Bit 0 OUTPUT 1 Status Bit 1 INPUT 2 Status Bit 1 OUTPUT 2 Status Bit 2 Bit 2 Bit 3 Bit 3 Bit 4 Bit 4 Bit 5 Bit 5...
- Page 43 Least significant byte Most significant byte (L Byte) (H Byte) Utilization of the Coefficient value Units of Units of with the different Division Divisor Decimals measure measure units of measure value value description settings compared to the gross weight detected Kilograms Does not intervene Grams...
-
Page 44: Ascii Bidirectional Protocol
Possible Command To Send To The Command Register (40006) No command Reserved Reserved Keypad lock Keypad and display unlock Keypad and display lock NET display SEMI-AUTOMATIC ZERO Save data in EEPROM GROSS display Zero-setting for calibration Reserved Test weight storage for calibration Reserved Reserved Reserved... - Page 45 Setpoint Values Setting: The PC transmits: $aaxxxxxxyckckCR in which: xxxxxx = 6 characters for the setpoint value (48 ÷ 57 ASCII); y = A (set the value in the Setpoint 1) y = B (set the value in the Setpoint 2) Possible instrument responses: - correct reception: &&aa!\ckckCR - incorrect reception: &&aa?\ckckCR...
- Page 46 Error messages: In case of an instrument alarm for exceeding 110% of the full scale or 9 divisions above the value of the parameter NASS, the instrument sends the string: &aassO-Lst\ckck In case of faulty connection of the load cells or of another alarm, the instrument sends: &aassO-Fst\ckck in which:...
- Page 47 '8' for division value = 50 '9' for division value = 100 Zero Setting (See Section 2.1.3) The PC transmit the following ASCII string containing the zeroing command: $aazckckCR in which: z = weight zeroing command (122 ASCII) Possible instrument responses: - correct reception: &aaxxxxxxt\ckckCR - incorrect reception: &&aa?\ckckCR - If the instrument is not in gross weight displaying condition, the...
- Page 48 in which: t = gross weight identification code (116 ASCII). xxxxxx = 6 characters to indicate the current weight value. In case of correct calibration, the read value must be equal to test weight. Example: Calibration for instrument with address 1 and test weight of 20000 kg: query: $01s02000070(Cr) response: &01020000t\77(Cr) In case of correct calibration the read value has to be “020000”.
-
Page 49: Fast Continuous Transmission Protocol
3.8 Fast Continuous Transmission Protocol This protocol allows for continuous serial output at high update frequencies. Up to 80 strings per second are transmitted (with a minimum transmission rate of 9600 baud). See Section 2-4 on page 18 for limitations. Following communication modes available (see Section 2.4 on page 20): •... -
Page 50: Continuous Transmission Protocol To Remote Displays
3.9 Continuous Transmission Protocol To Remote Displays Using this protocol, the instrument transmits, in continuous mode, the weight to remote displays; the communication string is transmitted 10 times per second. Following communication modes are available (see Section 2.4 on page 20): •... -
Page 51: Interface To Remote Display
3.10 Interface to Remote Display Remote Display (Laser Light) 1. Press and hold , then press . is displayed. until is displayed. 2. Press . is displayed. 3. Press . is displayed. 4. Press 5. Press until ... -
Page 52: Communication Examples
3.11 Communication Examples The numerical data below are expressed in hexadecimal notation with prefix h. Example 1 Command for multiple writing of registers (hexadecimal command 16, h10): Assuming that we wish to write the value 0 to the register 40017 and the value 2000 to the register 40018, the string to generate must be: h01 h10 h00 h10 h00 h02 h04 h00 h00 h07 hD0 hF1 h0F The instrument will respond with the string:... - Page 53 Example 2 Command for multiple writing of registers (hexadecimal command 16, h10): Assuming that we wish to write the two setpoint values on the instrument, at 2000 and 3000 respectively, the string must be sent: h01 h10 h00 h10 h00 h04 h08 h00 h00 h07 hD0 h00 h00 h0B hB8 hB0 hA2 The instrument will respond with the string: h01 h10 h00 h10 h00 h04 hC0 h0F...
- Page 54 Example 3 Multiple command reading for registers (hexadecimal command 3, h03): Assuming that we wish to read the two gross weight values (in the example 4000) and net weight values (in the example 3000), reading from address 40008 to address 40011 must be performed by sending the following string: H01 h03 h00 h07 h00 h04 hF5 hC8 The instrument will respond with the string: H01 h03 h08 h00 h00 hF hA0 h00 h00 h0B hB8 h12 h73...
-
Page 55: Specifications
Specifications Power DC Measurement Range ± 10 mV = Sensitivity Power Supply and 12/24 VDC ± 2mV/V) Consumption (VDC) 10%; 5W Measurement Range ±19.5 mV Operator Interface Display STN backlit Max Sensitivity of ±3 mV/V transmissive LCD Usable Load Cells 128 x 64 pixel resolution Max Conversions... - Page 56 Specifications subject to change without notice. Rice Lake Weighing Systems is an ISO 9001 registered company. 230 W. Coleman St. • Rice Lake, WI 54868 • USA U.S. 800-472-6703 • Canada/Mexico 800-321-6703 • International 715-234-9171 • Europe +31 (0)26 472 1319 www.ricelake.com...
Need help?
Do you have a question about the SCT-10 Series and is the answer not in the manual?
Questions and answers