Table of Contents
Advertisement
Quick Links
Advertisement
Table of Contents

Related Manuals for Zippie Neptune 2


Summary of Contents for Zippie Neptune 2
- Page 1 SEATING SYSTEM DIRECTIONS FOR USE Neptune 2 294000.22002...
- Page 2 If you are visually impaired, this document can be viewed in PDF format at www.SunriseMedical.co.uk Neptune 2 Rev.1.0...
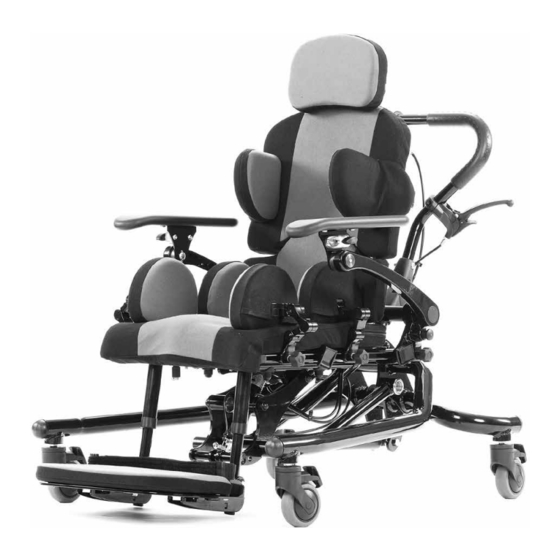
- Page 3 A. Lateral Supports B. Thigh Guids C. Footrest D. Castors E. MHT Base F. Hip Pads G. Sacral Pad H. Armrest Neptune 2 Rev.1.0...
-
Page 4: Measurements And Useful Information
The Neptune 2 chair has been designed to interface with a range of base frame options. If you have been supplied the seating system with a Zippie Mobility base frame please refer to the separate instruction manual relating to the specific base you have. -
Page 5: Introduction
This instruction manual contains very important information weight of accessories fitted to the product) is marked on the about the Neptune 2 seating system, how to use it safely and serial number label, (see section 6.0). obtain the best results from it. Please read all the information... -
Page 6: Table Of Contents
Adjustment Adjusting the Headrest Position (Fig.16.2) Hand Over Adjusting the Headrest Angle (Fig.16.3-16.4) Packaging 17.0 Hip Pad & Thigh Guide Adjustment Handle Fitting Hip Pad & Thigh Guide Width (Fig.17.1) Hip Pad & Thigh Guide Depth (Fig.17.2) Neptune 2 Rev.1.0... -
Page 7: Definitions
Advice to user that potential damage to equipment may occur if the advice CAUTION! is not followed NOTE: General advice or best practice Reference To Additional Documentation Dealer signature and stamp. Neptune 2 Rev.1.0... -
Page 8: Important Safety Advice
(not required for contoured seats.) • When fitted to an indoor base frame the Neptune 2 should always be positioned on a level, flat floor. The Neptune 2 chair Foot Sandals and Straps can be moved between one working area and another. - Page 9 All modifications, adjustments, reconditioning, repairs, disposal, WARNING! and servicing of the seating unit must ONLY be carried out by The child must not be in the therapy chair whilst it is the agencies who supplied the equipment. transported! Neptune 2 Rev.1.0...
- Page 10 *SM = Sunrise Medical. There are min/max height and tilt differences when using interfaces when compared to bolting the chair directly to the base, the EU trapezoid has the biggest effect on this due to the plate size. Neptune 2 Rev.1.0...
- Page 11 Please note the stability is affected by the following, all of which should be considered during use and when undertaking a risk assessment: • User weight • Seat depth • Recline angle • Seat tilt angle • Seat Height • Environment (slopes and thresholds). Neptune 2 Rev.1.0...
-
Page 12: Warranty
The life expectancy can also be considerably reduced by extreme or incorrect usage. The fact that we estimate a life expectancy for this product does not constitute an additional warranty. Neptune 2 Rev.1.0... -
Page 13: Brakes
Fig.3.1 Releasing Brakes To release the brakes you should flick the levers up using the top of your foot. When all brakes are released the chair will be free to travel in any direction. (Fig.3.2). Fig.4.2 Fig.3.2 Neptune 2 Rev.1.0... -
Page 14: Serial Number Location
Incorrect fitting of lap straps can put the user at serious risk. Base (Fig.5.2 - B). The Neptune 2 is fitted with buckles as standard which can be utilised for either 2 or 4 point lap belts. The primary fittings (A) are loacted on either side at the back of the chair. -
Page 15: Chest Harness - Adjustments
The same precautions highlighted here should be adhered to when using any form of trunk supports or flexi supports with straps. DANGER! If there is any possible chance of the child getting the straps caught around their neck, REMOVE THE HARNESS IMMEDIATELY. Neptune 2 Rev.1.0... -
Page 16: Lap Strap Safety
The cross strap on the to the back of the chest harness must be fitted chair. no higher than the sternum (mid chest). Primary Lap Strap Fitting Primary Lap Strap Fitting Secondary lap strap fitting (four-point lap strap) Neptune 2 Rev.1.0... -
Page 17: Seat Depth - Adjustments
• When increasing the seat depth it is best to stand at the rear of the chair with the brakes applied and pull the back frame towards you. • When reducing the seat depth you should do the same whilst standing at the front of the chair. Fig.9.1 Fig.10.2 Neptune 2 Rev.1.0... -
Page 18: Back Height - Adjustments
• Tighten the hand wheel securely to fix the back in place. pad. NOTE: • Once in place securely re-tighten the fixings. The hand wheel, (A) may be replaced with screws requiring a 4mm Allen Key. Fig.12.1 Fig.11.1 Neptune 2 Rev.1.0... -
Page 19: Arm Rest Positioning
Adjusting Arm Angle • Slide both arms of the tray through the relevant holes until • The arms fitted to your Neptune 2 chair can be altered to sit the desired position is reached, (B). throughout an angle range, enabling the user to level their tray •... -
Page 20: Lateral Support Adjustments
• Re-tighten fixing bolts or wing knob to secure the supports rotated relative to the next changing the angle and hence pad in place. width. • Move the pads to the desired position. Fig.15.1 Fig.16.1 Fig.15.2 Fig.16.2 Neptune 2 Rev.1.0... -
Page 21: Adjusting The Headrest Angle (Fig.16.3-16.4)
• Slide the pads forwards or backwards along the slot in the seat side rail to adjust the depth, (B). • Re-tighten fixing bolts or wing knob to secure the supports in place. Fig.17.1 Fig.16.3 Fig.16.4 Fig.17.2 Neptune 2 Rev.1.0... -
Page 22: Pommel Adjustment
• Loosen the fasteners below the seat plate. • Slide the pads up or down along the slot in the seat plate (A) Fig.18.3 to adjust the position. • Re-tighten fasteners to secure the supports in place. Fig.18.1 Fig.18.4 Fig.18.2 Fig.18.5 Neptune 2 Rev.1.0... -
Page 23: Leg Rest Adjustment (Length)
• Turn the screw to adjust the footplate angle. • Re-fit fasteners in closest hole. • Re-tighten the lock nut. Leg Rest Angle adjustment • Loosen the fasteners below seat plate. Fig.19.1 • Rotate leg-rest stem. • Re-tighten the fasteners. Fig.20.1 Neptune 2 Rev.1.0... -
Page 24: Sandal/Foot Strap Adjustment
• Fix in place by tightening the allen key bolt beneath the footplate. The multi height and tilt base caters for all sizes of Neptune 2. It is controlled by a hydraulic pump mechanism. Foot Straps To Raise The Chair (Fig. -
Page 25: Height Adjustment Standard Base
The operator should control the motion of the chair while the squeeze handle is engaged. The amount of support required will vary with the size and weight of the user. We recommend practicing this operation on first use before placing the client in the chair. Neptune 2 Rev.1.0... -
Page 26: Tilt In Space Standard Base
• To unfold, pull the handle up until you hear a ‘click’ ensuring it is in place. WARNING! Items should not be placed or hung from the push handle as this can compromise the stability of the base and may lead to injury or damage to the system. Neptune 2 Rev.1.0... -
Page 27: Mounting Seat To Base - Sm Mushroom Interface
When mounting the seating system to a base for the first time, or when an adjustment has been made to the size of the system, a stability assessment should be carried out prior to use of the equipment. Neptune 2 Rev.1.0... -
Page 28: Cleaning And Care
• Machine Wash: With care at 40°C. Covers must NOT be turned inside out and the zips MUST be closed. Remove from On the Neptune 2 there are two different fabric choices. machine as soon as washing cycle is complete. -
Page 29: General Maintenance
ANCHOR POINTS (where applicable) for transportation must be checked to ensure security, check there are conditions of use, no signs of damage, wear and tear or failure. wear will occur and a thorough inspection is recommended. Fixtures Check arm pads and headrest and replace if worn. Neptune 2 Rev.1.0... -
Page 30: Servicing By Approved Dealer
Sunrise Medical have specified technicians trained to service our products. If you would like Sunrise Medical to service your product or for further information please contact your authorised Sunrise Medical dealer. See “Dealer Signature and Stamp” box in the Definitions section, or use our address in the Introduction section. Neptune 2 Rev.1.0... -
Page 31: Service Record Log
Medical Seating Solutions Ltd. will require proof of service for any warranty claims or orders. Seating system serial number ___________________ Date delivered ______/______/______ Battery use by date ______/______/______ Date Serviced Performed Organisation Print Name & Sign Please contact Sunrise Medical if additional log sheets are required. Neptune 2 Rev.1.0... -
Page 32: Inspecting And Reissuing Of Equipment
The equipment should be free of excessive wear or distortion in any aspect of its main construction or accessories. Condition Wheels, tyres and brakes must be in good working condition, properly adjusted and inflated as appropriate. Neptune 2 Rev.1.0... -
Page 33: Accessories
Always ensure that the chair is packaged correctly before delivery. Handle Fitting Please note that the handle fitted is dependent on the size of the chair. You therefore need to ensure the size label on the handle matches the size of the chair being used. Neptune 2 Rev.1.0... - Page 34 Neptune 2 Rev.1.0...
- Page 35 Neptune 2 Rev.1.0...
- Page 36 = www.SunriseMedical.co.uk = www.SunriseMedical.de = www.sunrisemedical.fr = www.SunriseMedical.it = www.SunriseMedical.nl = www.SunriseMedical.es = www.SunriseMedical.pt = www.SunriseMedical.se = www.SunriseMedical.no = www.SunriseMedical.dk = www.SunriseMedical.ch = www.medicco.cz = www.Sunrise-Medical.pl = www.SunriseMedical.eu = www.sunrisemedical.com.au = www.SunriseMedical.com OM_Neptune 2_EU_EN_Rev.1.0_2017-12-18...
Need help?
Do you have a question about the Neptune 2 and is the answer not in the manual?
Questions and answers