Advertisement
Pressure Balancing Shower/Tub & Shower Valve
For Model Series: Z7100, Z7120, Z7200 & Z7220
Installation Maintenance Instructions Replacement Kits
INSTALLING THE TEMP-GARD SHOWER VALVE
MAX OPERATING PRESSURE = 125 PSI.
1. Install rough piping and valve body as shown. Do not use
PEX or CPVC CTS piping from valve to tub spout, this causes
too much back pressure for valve to function properly.
•
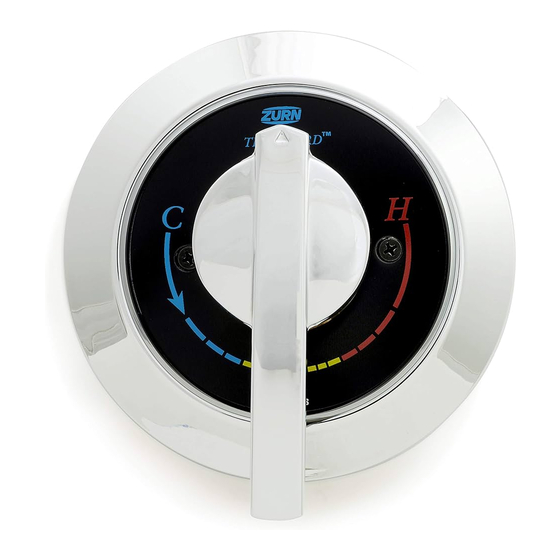
When facing valve, HOT "H" is on left and COLD "C"
is on right. Refer to marking on casting when installing.
(NOTE: When installing a valve with suffix "RC", the
inlets will be reversed.)
•
Valve should be installed with the plastic finishing frame
lettering face flush with the finish wall. All other trim
should be set aside.
WARNING: Caution should be taken when heating valve for
sweat connections to avoid damaging internal rubber and
plastic components in valve.
FOR OPTIMUM VALVE PERFORMANCE, BALANCE SUPPLY
PRESSURES TO LESS THAN 5 PSI PRESSURE DIFFERENTIAL
BETWEEN HOT AND COLD WATER SUPPLIES.
2. While finishing tile wall, remove plastic finishing frame and
fill area around valve body with grout or plaster.
•
Be careful to keep all ports free of obstructions.
3. Turn on both hot and cold supplies and flush out valve.
•
Valve will not operate unless both hot and cold water are
turned on.
•
Allow valve to run in warm position for a few minutes
to totally flush system. IF SYSTEM IS EXCESSIVELY
DIRTY, REMOVE THE CONTROL SPINDLE ASSEMBLY
TO ENSURE PROPER FLUSHING.
4. Set limit screw as directed by warning below.
5. Tighten packing nut(#10) to 15 in. lbs. of torque. Check for
desired frictional resistance when rotating handle(#38).
Packing nut (#10) can be tightened additionally, in small
increments, to increase frictional resistance.
•
Check bonnet, packing nut, diverter spindle o-ring,
and all valve, pipe, and fitting connections for leaks.
6. Assemble external trim on valve
•
Install escutcheon(#36)
(For valves without integral volume or integral volume/
diverter controls)
•
Install cover(#31) and dial plate(#32) with (2) cover
screws(#35).
•
Remove protective coating from dial plate.
•
Install temperature control handle(#38).
(For valves with integral volume or integral volume/diverter
controls)
•
Cover(#31) and dial(#32) are to be assembled by slid-
ing diverter/volume control lever handle(#33) into the
cover with the diverter clip(#34).
•
Install the assembly with(2) cover screws(#35).
•
Remove protective coating from dial plate.
•
Install temperature control handle(#38).
NOTE: When there is a shutoff valve installed after the control
valve, there shall be stop and check valves on the inlets. This is
to eliminate hot and cold cross-connection in the event the
valve handle is left on. Specify suffix "-SC" for ASSE approved
checks.
A
B
48 inches
Z7100
-
[1219 mm]
28 inches
48 inches
Z7101
[711 mm]
[1219 mm]
48 inches
Z7120
-
[1219 mm]
28 inches
48 inches
Z7121
[711 mm]
[1219 mm]
32 inches
Z7200
-
[813 mm]
44 inches
32 inches
Z7201
[1118 mm]
[813 mm]
32 inches
Z7220
-
[813 mm]
44 inches
32 inches
Z7221
[1118 mm]
[813 mm]
WARNING: This shower system may not protect the user from
scalding when there is a failure of other temperature control-
ling devices elsewhere in the plumbing system.
WARNING: This product contains lead. A chemical known to the
State of California to cause cancer or birth defects or other
reproductive harm. Attention plumber/installer: California law
requires that this warning be given to the consumer.
CF1007
Form #
SAN006742
C.N. No.
C
D
E
5/8 inches
-
-
[16 mm]
5/8 inches
-
-
[16 mm]
3/4 inches
1/2 inches
-
[19 mm]
[13 mm]
3/4 inches
1/2 inches
-
[19 mm]
[13 mm]
3/4 inches
1/2 inches
-
[19 mm]
[13 mm]
3/4 inches
1/2 inches
4 inches
[19 mm]
[13 mm]
[102 mm]
3/4 inches
1/2 inches
-
[19 mm]
[13 mm]
3/4 inches
1/2 inches
4 1/4 inches
[19 mm]
[13 mm]
[108 mm]
08/22/14
IS7000
Date:
Product #
K
1 of 4
Rev.
Sheet:
Advertisement
Table of Contents

Related Manuals for ZURN TEMP-GARD Z7100


Summary of Contents for ZURN TEMP-GARD Z7100
- Page 1 Pressure Balancing Shower/Tub & Shower Valve For Model Series: Z7100, Z7120, Z7200 & Z7220 Installation Maintenance Instructions Replacement Kits INSTALLING THE TEMP-GARD SHOWER VALVE MAX OPERATING PRESSURE = 125 PSI. 1.
- Page 2 •• Loosen packing nut prior to inserting new control stem, as this reduces possible damage to • When installing the ZURN TEMP-GARD valve in fiberglass packing components. or panel wall (1/16" to 1"), it is recommended to sandwich •• Lubricate control stem shaft threads with...
- Page 3 5 psi. COLD water lines. Back to Back Installation Drawings 6 1/4" MIN. 3 1/8"±1/2" The ZURN TEMP-GARD Pressure Balancing SHOWER DISCHARGE FINISHED Shower Valve is equipped with an adjustable WALL limit stop screw. The limit stop device is to be...
- Page 4 Phone: 1-800-997-3876 ♦ ♦ ♦ ♦ ♦ Fax: 919-775-3541 ♦ ♦ ♦ ♦ ♦ World Wide Web: www.zurn.com In Canada: ZURN INDUSTRIES LIMITED ♦ ♦ ♦ ♦ ♦ 3544 Nashua Drive ♦ ♦ ♦ ♦ ♦ Mississauga, Ontario L4V1L2 ♦ ♦ ♦ ♦ ♦ Phone: 905-405-8272 Fax: 905-405-1292...
Need help?
Do you have a question about the TEMP-GARD Z7100 and is the answer not in the manual?
Questions and answers