Table of Contents
Advertisement
Quick Links
Advertisement
Table of Contents

Subscribe to Our Youtube Channel
Related Manuals for Superabrasive Lavina 16


Summary of Contents for Superabrasive Lavina 16
- Page 1 Lavina16 ® Owner’s Manual SERIAL NUMBER: _________________...
-
Page 2: Table Of Contents
® Superabrasive Owner’s Manual – Lavina 16 10/2009 ® Refers to Lavina 16 Content GENERAL INFORMATION Preface .............................4 Manufacturer ..........................4 General Description........................4 Machine characteristics......................5 Lavina 16® Main Design ......................5 Technical Data .........................6 Environmental Conditions ......................6 Vibrations ..........................6 Sonorous Emissions.........................6 Vacuum Connection .........................6 Electrical Connection........................7... - Page 3 ® Superabrasive Owner’s Manual – Lavina 16 10/2009 ® Refers to Lavina 16 SPARE PARTS Assembly and Parts Specifications ..................16 Assembly and parts specification of the main head ...............17 Assembly and parts specification of the pulley units ..............18 Assembly and parts specification of the guard assembly............19 Assembly and parts specification of the motor base assembly..........20...
-
Page 4: General Information
® only! Every other use may possess risks to the persons involved. Do not use the Lavina 16 machine for any other applications except for the ones specified in this manual! -
Page 5: Machine Characteristics
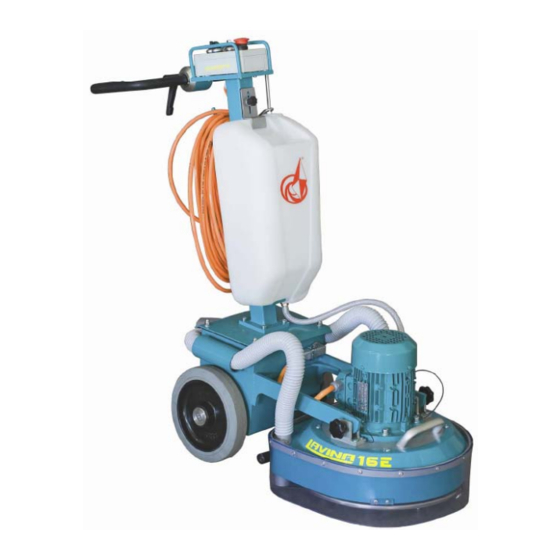
® Superabrasive Owner’s Manual – Lavina 16 10/2009 ® Refers to Lavina 16 Machine characteristics ® The Lavina 16 is made of two main component sections: carriage (1), which includes the frame, the water tank, the electrical box and the controls; and the main head (2), which includes the motor, the base plate and the 3 planetary heads with the tool holders. -
Page 6: Technical Data
Vacuum Connection ® A connection for a vacuum dust extractor is located on the carriage. The Lavina 16 does not include a vacuum dust extractor. The customer must purchase the vacuum dust extractor separately. The tube of the vacuum extractor must be Ø 50 mm and can be glided over the pipe. -
Page 7: Electrical Connection
Customer Service For customer assistance and technical support call your local distributor or call Superabrasive Inc. at 800-987-8403 or visit us at: www.superabrasive.com. If you misplace this manual, you can download it from our website or call us and we will mail you a copy. -
Page 8: Safety Devices And Safety Instructions
® Superabrasive Owner’s Manual - Lavina 16 10/2009 ® Refers to Lavina 16 SAFETY DEVICES AND SAFETY INSTRUCTIONS Recommended Use ® The Lavina 16 machine is designed and manufactured to grind and polish concrete, terrazzo and natural stone floors. It can be used for renovations as well as for polishing. The machine is designed for dry or wet use. -
Page 9: Arrest Functions
® Superabrasive Owner’s Manual - Lavina 16 10/2009 ® Refers to Lavina 16 Arrest Functions Functions of arrest of the machine are as follow: Button to stop the motor (category 1) Emergency button (category 1) Safe Use ® The Lavina 16 is designed to eliminate all risks correlated with its use. -
Page 10: The Work Area
The operator must understand and interpret all the drawings and designs in manual. ® The operator must know all sanitation and safety regulations pertaining to the operation of the Lavina 16 machine. The operator must know the machine’s work environment. -
Page 11: Transportation
Release the pin sets that attach the carriage to the main head (Fig.8) and dismount the carriage from the ® main head (Fig.9). The main head of the Lavina 16 has one handle and one support intended for easy moving and transportation of the machine. -
Page 12: Operation Preliminary Controls
Plug in the machine ® and also make sure that the power cord is free to follow the working direction of the Lavina 16 Adjusting and Mounting Tools Mount the tools only after ensuring that there is enough diamond bond material left. -
Page 13: Tools And Accessories Weights
TOOLS AND ACCESSORIES Weights Superabrasive offers an additional weight for increasing the productivity of the machine (Fig.13). An additional weight weighs about 22 lbs or 10 kg. Each individual application, type and condition of surface, power capacity of the outlet, etc. will determine the use of a weight. The weight stacks onto three nylon posts around the outer bowl (Fig.13). -
Page 14: Floating Back Up Plate
® Superabrasive Owner’s Manual - Lavina 16 10/2009 ® Refers to Lavina 16 Floating back up plate A floating back up plate is mounted on each of the three planetary heads. Its advantage is that it has elastic shock absorbers which enable the tool plate to float and follow the surface profile. -
Page 15: Non-Floating Back Up Plate
® Superabrasive Owner’s Manual - Lavina 16 10/2009 ® Refers to Lavina 16 Rigid Back up plate The tool plates attached on the three planetary heads can be non-floating (rigid), as well. These tools are more recommended for flat grinding work, without following the surface. -
Page 16: Spare Parts
® Superabrasive Owner’s Manual - Lavina 16 10/2009 ® Refers to Lavina 16 SPARE PARTS ® Lavina 16 Assembly and parts specification Figure 19 Lavina16® Figure № Item Description Quantity Fig.19 L16 Main head Fig.19 L16 L16-01.00.00.00-03 Carriage Fig.19 L16... -
Page 17: Assembly And Parts Specification Of The Main Head
® Superabrasive Owner’s Manual - Lavina 16 10/2009 ® Refers to Lavina 16 ® Lavina 16 Assembly and parts specification of the Main Head Figure 20 Figure № Item Description Quantity L16-10.02.00.00-04 Fig.20 L16 El. Motor 2НР,1.5kW; 230V AT 90 L4 L16-06.00.00.00... -
Page 18: Assembly And Parts Specification Of The Pulley Units
® Superabrasive Owner’s Manual - Lavina 16 10/2009 ® Refers to Lavina 16 L16-00.00.00.03 Fig.20 L16 Balancing roller L16-00.00.00.27 Fig.20 L16 Flat belt ТС-20/25EF1640x30х2.5 since 12.2008 L16-00.00.00.27C Fig.20 L16 Flat belt ТС-20/25EF1601x30х2.5 L16-07.00.00.00 Fig.20 L16 Low covering disc M5 DIN125A Fig.20 L16... -
Page 19: Assembly And Parts Specification Of The Guard Assembly
® Superabrasive Owner’s Manual - Lavina 16 10/2009 ® Refers to Lavina 16 ® Lavina 16 Assembly and parts specification of the guard assembly Figure 22 Figure № Item Description Quantity Fig.22 L16® L16-04.00.00.02 Guard for the Guard Assembly Fig.22 L16®... -
Page 20: Assembly And Parts Specification Of The Motor Base Assembly
® Superabrasive Owner’s Manual - Lavina 16 10/2009 ® Refers to Lavina 16 ® Lavina 16 Assembly and parts specification of Base Plate assembly Figure 23 Figure № Item Description Quantity Fig.23 L16® L16-06.01.00.00 Base plate Fig.23 L16® L25SPS-07.00.00.02-R Right fork Fig.23 L16®... -
Page 21: Assembly And Parts Specification Of The Carriage
® Superabrasive Owner’s Manual - Lavina 16 10/2009 ® Refers to Lavina 16 ® Lavina 16 Assembly and parts specification of the carriage Figure 24 Figure № Item Description Quantity Fig.24 L16® L16-01.01.00.00-03 Box assembly Fig.24 L16® L16-01.04.00.00 Square pipe assembly Fig.24 L16®... -
Page 22: Assembly And Parts Specification Of The Electrical And Control Board
® Superabrasive Owner’s Manual - Lavina 16 10/2009 ® Refers to Lavina 16 ® Lavina 16 Assembly and parts specification of the electrical and control board Figure 25 Figure № Item Description Quantity Fig.25L16® L16-01.07.01.00 Control box assembly Fig.25L16® PG 13.5/HO7-BQ-F-3x2,5... -
Page 23: Control Board
® Superabrasive Owner’s Manual - Lavina 16 10/2009 ® Refers to Lavina 16 ® Lavina 16 Control board Figure 26 Figure № Item Description Quantity Fig.26L16® XB7-ES542.P Emergency stop Fig.26L16® LED5mmCLIAR WHITE 1000/100 Led white Fig.26L16® Led holder Fig.26L16® LED5mmCLIAR GREEN 1300/15 Led green Fig.26L16®... -
Page 24: Electrical Board
® Superabrasive Owner’s Manual - Lavina 16 10/2009 ® Refers to Lavina 16 Lavina16® Electrical Board Figure 27 Figure № Item Description Quantity Fig.27 L16® ER557850 Rail Fig.27 L16® MLOOO 276696 Contactor Fig.27 L16® 2х6 Clamp Fig.27 L16® SIVF MODEL Signal lamp for KBVF Fig.27 L16®... -
Page 25: Electrical Schemes
® Superabrasive Owner’s Manual - Lavina 16 10/2009 ® Refers to Lavina 16 Lavina16® Electrical scheme Figure 28... -
Page 26: Maintenance And Inspection Cleaning
® Superabrasive Owner’s Manual - Lavina 16 10/2009 ® Refers to Lavina 16 MAINTENANCE AND INSPECTION Cleaning Keep your machine clean. Cleaning the machine on a regular basis will help detect and solve potential problems before they cause damage to the machine. Most importantly, check and clean the tool plate connections, power cord and plugs, vacuum hoses and water tank. -
Page 27: Troubleshooting
® Superabrasive Owner’s Manual - Lavina 16 10/2009 ® Refers to Lavina 16 TROUBLESHOOTING Index of Problems and Solutions Replacing Power Cord and Plugs: When replacing the power cord or plugs always use cords and plugs with same specifications as the original ones (Fig.29). - Page 28 Figure 32 • pull the water hose out from the tank (Fig.33 ) • unplug the electrical cord from the socket located on the bottom of the electrical board. • remove the two pins from the brackets (Fig.34) • separate the carriage from the head (Fig.35) Figure 33 Figure 34 Figure 35...
- Page 29 ® Superabrasive Owner’s Manual - Lavina 16 10/2009 ® Refers to Lavina 16 for the floating backup plate holders - pull them off (Fig.38) for the non-floating plates – first loosen and then remove the bolts. Figure 38 • turn the main head and let it rest on the motor.
- Page 30 ® Superabrasive Owner’s Manual - Lavina 16 10/2009 ® Refers to Lavina 16 • Trace the pattern of the belt onto the cast before removing it (Fig.43). • Loosen the belt and remove it (Fig.44 and 45). Figure 43 Figure 45 Figure 44 •...
- Page 31 ® Superabrasive Owner’s Manual - Lavina 16 10/2009 ® Refers to Lavina 16 Figure 47 Figure 48 • check the rollers. They can be removed by securing the roller from the top of the shaft and releasing the nut underneath (Fig.49 and Fig.50). Here also, you may pull lightly with the crowbars. Do not forget to check the tension device.
- Page 32 Figure 53 Figure 54 Do not put the belt with it’s with complete over the pulleys while pulling it on. The belt will go over his maximum tension and be destroyed. Apply the sealer and close the cover. Lock the screws, holding the cover (Fig.55) Figure 45 •...
- Page 33 • Mount the handle, the machine support, the back supports and the cross-bars (forks). • Mount the carriage • Apply the vacuum hoses and the water hose. • Apply the electrical cable in the socket on the bottom of the electrical board. ® Your Lavina 16 is now ready for use!
-
Page 34: Warranty And Returns Warranty Policy
This warranty applies to new, used and demo machines. Superabrasive does not authorize any person or representative to make any other warranty or to assume for us any liability in connection with the sale and operation of our products. -
Page 35: Warranty Card
• In no case a machine is to be returned to Superabrasive Inc. for credit or repair without prior authorization. Please contact Superabrasive Inc. or your local distributor for an authorization and... -
Page 36: Disposal
If machines are not exchanged, they are subject to a fifteen percent (15%) restocking fee. DISPOSAL If your machine after time is not usable or needs to be replaced, send the machine back to Superabrasive or a local distributor, where a professional dismantle complying with the environment laws and directives is guaranteed.
Need help?
Do you have a question about the Lavina 16 and is the answer not in the manual?
Questions and answers