Table of Contents
Advertisement
Quick Links
Advertisement
Table of Contents

Related Manuals for Superabrasive LAVINA L25EU


Summary of Contents for Superabrasive LAVINA L25EU
-
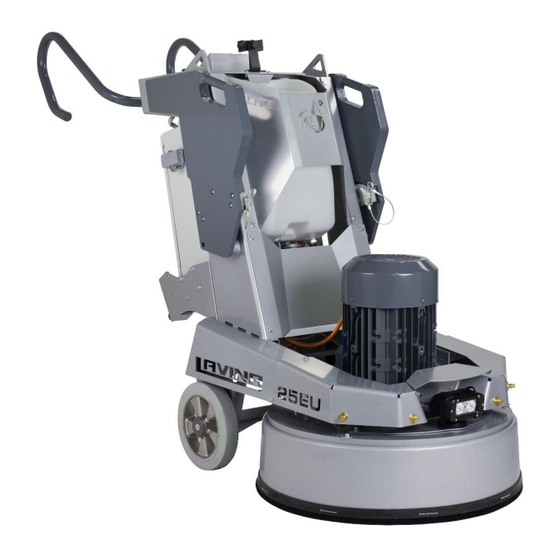
Page 1: Lavina Elite L25Eu
LAVINA ELITE L25EU User Manual www.superabrasive.com / factory@superabrasive.com... -
Page 2: Table Of Contents
Superabrasive User Manual Original Language Lavina® 25EU 12/2020 LAVINA ELITE L25EU ..............1 ELECTRICAL SYSTEM ................15 LAVINA® 25EU ELECTRICAL SCHEMES WITH YASKAWA INVERTER ..15 1. GENERAL INFORMATION ..............3 LAVINA® 25EU ELECTRICAL SCHEMES YASKAWA CONNECTION MAIN 1.1 MANUFACTURER................3 CIRCUIT TERMINALS ................ -
Page 3: General Information
1.1 MANUFACTURER Superabrasive was founded in 1987, as a manufacturer of high quality diamond tools for the stone and concrete industry. Today, Superabrasive is one of the world’s leading companies in the production of diamond tools and floor grinding machinery. At Superabrasive, we strive to deliver the very best solutions to our customers, and enable them to work more efficiently. - Page 4 Superabrasive User Manual Original Language Lavina® 25EU 12/2020 1.5.2 Machine head which contains: The Electric motor - its mounted on the base plate and it is driving the three heads with a belt system. The planetary motion - it derives from the main engine, driven by a simplex roller chain.
-
Page 5: Technical Data
The data on the label provides the correct Voltage and kW (needed for operational purposes); Weight (needed for transportation purposes); production year and serial number (needed for maintenance purposes). CUSTOMER SERVICE For customer assistance and technical support call your local distributor or call Superabrasive Ltd. or visit us at: www.superabrasive.com , where you can download a copy of this manual . -
Page 6: Safety Instructions
Superabrasive User Manual Original Language Lavina® 25EU 12/2020 2. SAFETY INSTRUCTIONS • Recommended Use NOTE: In order to reduce any consequences of the above‐ mentioned risks, we advise that machine operators The Lavina® E machine is designed and manufactured to grind and follow the instructions in the manual at all times. -
Page 7: Operator
Superabrasive User Manual Original Language Lavina® 25EU 12/2020 • • Always wear clothes suitable for the work environment. The operator must understand and be able to interpret all the drawings and designs in manual. OPERATOR • The operator must know all sanitation and safety regulations The operator must know the machine’s work environment. -
Page 8: Lifting
Superabrasive User Manual Original Language Lavina® 25EU 12/2020 3.3 LIFTING Lifting the machine by crane is possible by using the handles of the carriage (see fig. 3.5 and fig. 3.6).Do not lift any other loads on the machine. Always use hoisting equipment rated for 350 kg (772 lbs) or greater. -
Page 9: Water Flow Control System
Superabrasive User Manual Original Language Lavina® 25EU 12/2020 4.2 WATER FLOW CONTROL SYSTEM The operator can direct water to be sprayed in front of the machine (Fig.4.1) by positioning the lever in the horizontal position (Fig.4.2). Water will spray under the cover of the machine when the lever is in the vertical position (Fig.4.2). The pressure regulator is located above the lever (Fig.4.3) and controls the water pressure in the system. -
Page 10: Adjusting And Mounting Tools
Superabrasive User Manual Original Language Lavina® 25EU 12/2020 4.3 ADJUSTING AND MOUNTING TOOLS Lavina® 25E uses tool holder A63. With this new holder every one of our tools uses the “Quickchange” connection. To change the tools you need first to unlock the butterfly (fig 4.6 in blue) by using the key we provide you (you can see it in the pictures fig. 4.7) remove the security plate (fig 4.6 in red) then load the tools you want and insert the security plate again so the tools cannot go... -
Page 11: Control Board
Superabrasive User Manual Original Language Lavina® 25EU 12/2020 4.5 CONTROL BOARD 1. Polishing/Grinding switch In “grinding” position, the operator has the ability to control the rpm from 300 to 700 rpm. In “Polishing” position, the range increases to 300 to 1100 rpm. -
Page 12: Stopping The Machine
Superabrasive User Manual Original Language Lavina® 25EU 12/2020 4.8 STOPPING THE MACHINE The stopping of the machine must be done gradually until the motor stops. Do not stop moving the machine before the motor comes to rest, as the tools could damage the surface. -
Page 13: Popular Tools
NATO® WITH QUICK CHANGE ATTACHMENT Superabrasive's Nato resin pucks are a great tool choice for soft and hard concrete polishing applications. Among the thickest diamond pads on the market - featuring a thick 12mm layer of resin and diamonds for extra long life. Wide channels and a unique patented design allow for work on a cleaner surface, ensuring a quality polish. -
Page 14: Maintenance And Inspection
Superabrasive User Manual Original Language Lavina® 25EU 12/2020 7. MAINTENANCE AND INSPECTION CLEANING Keep your machine clean. Cleaning the machine on a regular basis will help detect and solve potential problems before they can cause damage to the machine. Most importantly, check and clean the tool plate connections, power cords, plugs, vacuum hoses, and water tank. -
Page 15: Electrical System
Superabrasive User Manual Original Language Lavina® 25EU 12/2020 OPERATION INTERVAL Daily Every 200 Every 400 Hrs. Hrs. Inspect power cords, plugs and vacuum hoses, loose bolt or screws. Check the rubber buffers, elastic element and fixing of the holders Inspect and clean the tool plate connections... -
Page 16: Lavina® 25Eu Electrical Schemes Yaskawa Connection Main Circuit Terminals
Superabrasive User Manual Original Language Lavina® 25EU 12/2020 LAVINA® 25EU ELECTRICAL SCHEMES YASKAWA CONNECTION MAIN CIRCUIT TERMINALS Figure 7.6 /scheme 2/ Figure 7.6 /scheme 3/... -
Page 17: Troubleshooting
Superabrasive User Manual Original Language Lavina® 25EU 12/2020 8. TROUBLESHOOTING INDEX OF PROBLEMS AND SOLUTIONS 8.1 SEPARATING THE HEAD FROM THE CARRIAGE Figure 8.1 1. Unscrew the four bolts to remove the panel fig. 8.2-1. 2. Disconnect the cable of lamp and remove the lamp fig. 8.2-3. - Page 18 Superabrasive User Manual Original Language Lavina® 25EU 12/2020 Figure 8.2...
-
Page 19: Dismounting/Mounting The Guard
Superabrasive User Manual Original Language Lavina® 25EU 12/2020 8.2 DISMOUNTING/MOUNTING THE GUARD You can dismount and mount the safe guard without separating the carriage from the main head. Put the machine in position to change the tools. Unscrew the four bolts M5 from the metal cover preventing the safe guard to fall. -
Page 20: Disassembling And Mounting Tool Holder To Change Buffers And Elastic Element
Superabrasive User Manual Original Language Lavina® 25EU 12/2020 8.5 DISASSEMBLING AND MOUNTING TOOL HOLDER TO CHANGE BUFFERS AND ELASTIC ELEMENT When the TOOL HOLDER is disassembled you can change defective parts – elastic element, buffers, etc. Lift the locking pin (Fig.8.5.1) to dismount the retaining washer (Fig.8.5.2). -
Page 21: Correcting Deflection Of The Used Planetary Chain
Superabrasive User Manual Original Language Lavina® 25EU 12/2020 8.6 CORRECTING DEFLECTION OF THE USED PLANETARY CHAIN Unscrew the bolts and take out the cover (Fig.8.6.1). Lift the machine in position to change the tools. Turn manually the holders in order to turn the main head, stop when you see through the window the chain tensioner (Fig.8.6.2). -
Page 22: Replacing The Planetary Driving Chain Wheel And Planetary Tensioner
Superabrasive User Manual Original Language Lavina® 25EU 12/2020 Figure 8.6.8 Figure 8.6.9 Figure 8.6.10 Figure 8.6.13 Figure 8.6.12 Figure 8.6.11 Mount the chain tensioner (Fig.8.6.10). Tighten the two screws (Fig.8.6.8)(Fig.8.6.9). Loosen the bolt of the chain tensioner a quarter to a half revolution (Fig.8.6.9). -
Page 23: Tensioning And Replacing The Belts
Superabrasive User Manual Original Language Lavina® 25EU 12/2020 8.8 TENSIONING AND REPLACING THE BELTS Figure 8.8.1 Figure 8.8.2 Figure 8.8.3 The transmission of the machine runs two timing belts (a main belt that rotates the plates (and tools) and an auxiliary planetary belt which propels the rotation of the head as a whole). - Page 24 Superabrasive User Manual Original Language Lavina® 25EU 12/2020 Figure 8.8.6 Figure 8.8.7 Figure 8.8.8 Figure 8.8.10 Figure 8.8.9 The reassembly is the same process in reverse. It is important to match the threads of the conical sleeve and the belt washer(Fig.8.8.11).
-
Page 25: Replacing The Driven Planetary Gear (Sprocket)
Superabrasive User Manual Original Language Lavina® 25EU 12/2020 8.9 REPLACING THE DRIVEN PLANETARY GEAR (SPROCKET) Remove the planetary chain and tensioner (see 8.6 ‐ MOUNTING NEW PLANETARY CHAIN). Dismount the tool holders, sealers, and bottom cover (TENSIONING AND REPLACING THE BELTS). Unscrew the cap to access the fastening bolts of the driven gear (Fig.8.9.1)(Fig.8.9.2). -
Page 26: Replacing The Planetary Unit
Superabrasive User Manual Original Language Lavina® 25EU 12/2020 8.11 REPLACING THE PLANETARY UNIT Figure 8.11.3 Figure 8.11.1 Figure 8.11.2 Unscrew the six bolts (Fig.8.11.1)(Fig.8.11.2) and press down the planetary unit. When mounting back secure with sealant (fig.8.11.3). 8.12 MOTOR CONNECTION In case the motor is being replaced, please follow the cable connections in the figures below (Fig.8.11.1). -
Page 27: Fault Diagnosis Inverter Yaskawa V1000
8.13 FAULT DIAGNOSIS INVERTER YASKAWA V1000 Pages are referring to Yaskawa Electric SIEP C710606 18A YASKAWA AC Drive – V1000 Technical Manual... - Page 28 Superabrasive User Manual Original Language Lavina® 25EU 12/2020...
-
Page 29: Warranty And Returns
Superabrasive Ltd. will not be responsible for these 9. DISPOSAL If your machine after time is not usable or needs to be replaced, send the machine back to Superabrasive or a local distribut or, where a professional disposal complying with the environment laws and directives is guaranteed. -
Page 30: Spare Parts
Superabrasive User Manual Original Language Lavina® 25EU 12/2020 11. SPARE PARTS ASSEMBLY AND PARTS SPECIFICATIONS 1. LAVINA®25EU GENERAL PARTS Item No. Description Pcs. L25EU20.00.00-2 Carriage L25EU10.00.00-2 Main Head L25EU01.00.00 Bumper L25SPS-07.03.00.00 Pin Assembly A50.00.00.00 LED light with magnetic base 8*-For machines before Serial №... -
Page 31: Lavina®25Eu Gard Assembly
Superabrasive User Manual Original Language Lavina® 25EU 12/2020 3. LAVINA® 25EU TOP COVER 1 PARTS Item No. Description Pcs. Bolt 30301210051 M6X16DIN6921 L25LE19.20.00-3 Inspection Cover 30301221022 Washer D35X1.4 L25Е10.70.00 Gard Assembly Bolt 30301210048 M6X12DIN6921 L25E19.00.00-1 Top Cover Assembly 30302000049 V-Ring Type A... -
Page 32: Lavina®25Eu Top Cover Assembly
Superabrasive User Manual Original Language Lavina® 25EU 12/2020 5. LAVINA®25EU TOP COVER ASSEMBLY Item No. Description Pcs. L25E19.10.00-1 Top Cover Bolt М5X10DIN933 30301210007 Spring Washer 30301220001 М5DIN127B 30308000419 Clamp L20GX-19.00.05 Tube 6. LAVINA® 25EU BOTTOM COVER 1 PARTS Item No. -
Page 33: Lavina® 25Eu Planetary Drive Parts
Superabrasive User Manual Original Language Lavina® 25EU 12/2020 7. LAVINA® 25EU PLANETARY DRIVE PARTS Item No. Description Pcs. 30301230098 Screw M6X16DIN912 L25X-03.00.00-R2 Pulley L25E10.00.03-K Front Washer Assembly Bolt М10X30DIN933 30301210059 L25E10.00.05 Washer L25E10.00.03 Front Washer L25GX.10.10.00 Central Pulley L25P-01.04.02 Distance Ring... -
Page 34: Lavina® 25Eu Pulley Unit Assembly
Superabrasive User Manual Original Language Lavina® 25EU 12/2020 7.1. LAVINA® 25EU PULLEY UNIT ASSEMBLY Item No. Description Pcs. L25E10.00.02-K Front Washer Assembly 30301210035 Bolt M5X12DIN933 L25E10.00.04 Washer L25E10.00.02 Front Washer Chain L25E16.20.00-1 Pulley Assembly 30302000032 V-Ring Type A L25Х-16.00.00-R3 Bearing Body... -
Page 35: Lavina®25Eu Tool Holder Parts
Superabrasive User Manual Original Language Lavina® 25EU 12/2020 9. LAVINA®25EU TOOL HOLDER PARTS see also fig.8.7.13 / (pos.1 include pos.1.1;1.2;1.3/pos.1.3 include pos.1.3.1 and etc.) Item No. Description Pcs. A63.10.00 Quick Change Assembly A63.12.00 Keylock Set A41.11.00 Quick Change plate A41.12.00 Security set 1.3.1... -
Page 36: Lavina® 25Eu Carriage Parts 2
Superabrasive User Manual Original Language Lavina® 25EU 12/2020 11. LAVINA® 25EU CARRIAGE PARTS 2 Item No. Description Pcs. L25E21.00.00-1-К Frame Nut М8DIN985 30301240106 30301210072 Bolt M8X16DIN6921 L20GX-20.00.21-2 Support right L25E20.60.00 Wheel Assembly L25E20.60.00-K Wheel Set E250-AL Camlock Fitting L25GE20.00.02 Clamp... -
Page 37: Lavina® 25Eu Water Tank
Superabrasive User Manual Original Language Lavina® 25EU 12/2020 14. LAVINA® 25EU WATER TANK Item No. Description Pcs. A62.00.00.01-K Water Tank-K 30323000209 Filter_LP 1/4 FNPT GFPP CB 80X80 SST CG BN 30313000077 Filter 30313000342 Fixed Elbow Male NPTF Thread -3/8 INC- NPT1/4... -
Page 38: Lavina® 25Eu Water Pump
Superabrasive User Manual Original Language Lavina® 25EU 12/2020 17. LAVINA® 25EU WATER PUMP Item No. Description Pcs. 30326000002 Pump 113C/M8234 30313000348 Fixed Elbow NPT Thread 30313000341 Stud Fitting 30313000056 Male Hex Plug 30301221015 Washer M5DIN9021 30301240090 Nut M5DIN985 18. LAVINA® 25EU WATER INSTALLATION Item No. -
Page 39: Control Board Assembly
Superabrasive User Manual Original Language Lavina® 25EU 12/2020 19 CONTROL BOARD ASSEMBLY Figure 18 19 CONTROL BOARD ASSEMBLY Item No. Description Pcs. Item No. Description L25E22.10.00 Control board assembly kit 30311000700 Button 30313000173 USB charger 30311000703 Button 30311000717 EMG Button... -
Page 40: Control Box Parts 380-400V
Superabrasive User Manual Original Language Lavina® 25EU 12/2020 20 CONTROL BOX PARTS 380-400V 20.Lavina L25EU CONTROL BOX PARTS 380-400 V Item No. Description Pcs. Item No. Description Pcs. L25E-30.10.00 Metal Box/only/ 14.1 L25E-30.20.01 Plug on Electro Motor Assembly Metal Box Plate L25EU-30.40.01...
Need help?
Do you have a question about the LAVINA L25EU and is the answer not in the manual?
Questions and answers