Advertisement
Quick Links
LEXUS
NX 200t/300h
Preparation
Part Number: PZ41B-X2620-00
PZ41B-X2622-00
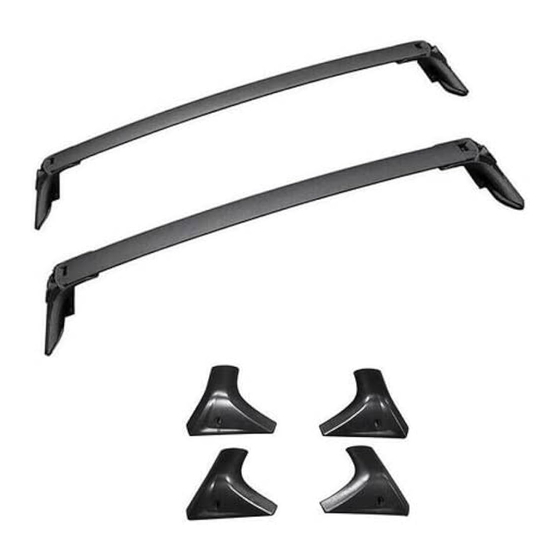
Kit Contents
(see next page for description)
Item #
Quantity Reqd.
1
1
2
1
3
2
4
4
5
2
6
2
Hardware Bag Contents
Item #
Quantity Reqd.
Additional Items Required For Installation
Item #
Quantity Reqd.
Conflicts
Recommended Tools
Personal & Vehicle
Protection
Blankets
Special Tools
Non-intrusive Infrared Temp
Probe/Gun
Installation Tools
Scissors
Special Chemicals
Cleaner
Soap & water solution
General Applicability
Recommended Sequence of Application
Item #
Accessory
1
2
3
Issue: C 01/05/2016
Description
Front cross bar
Rear cross bar
Cross bar rubber trim
Key
3-hole 3M film
2-hole 3M film
Description
Description
Notes
Protect the roof
Notes
Notes
Notes
VDC Approved Surface
Cleaner
*Mandatory
Page 1 of 10 pages
2015 -
Vehicle Service Parts
Item #
Quantity Reqd.
1
2
3
Legend
STOP: Damage to the vehicle may occur. Do not
proceed until process has been complied with.
OPERATOR SAFETY: Use caution to avoid risk of
injury.
CAUTION: A process that must be carefully observed
in order to reduce the risk of damage to the
accessory/vehicle and to ensure a quality installation.
TOOLS & EQUIPMENT: Used in Figures calls out the
specific tools and equipment recommended for this
process.
REVISION MARK: This mark highlights a change in
installation with respect to previous issue.
SAFETY TORQUE: This mark indicates that torque is
related to safety.
CROSS BARS
(may be required for reassembly)
Description
Advertisement

Related Manuals for Lexus PZ41B-X2620-00


Summary of Contents for Lexus PZ41B-X2620-00
- Page 1 LEXUS NX 200t/300h 2015 - CROSS BARS Preparation Part Number: PZ41B-X2620-00 PZ41B-X2622-00 Kit Contents Vehicle Service Parts (see next page for description) (may be required for reassembly) Item # Quantity Reqd. Description Item # Quantity Reqd. Description Front cross bar...
-
Page 2: Prepare For Installation
Vehicle Disassembly/Reassembly (panel removal, part storage, etc.). Electrical Component Disassembly/Reassembly (battery disconnection, connector removal, etc.). Please see your Lexus dealer for a copy of this document. 1. Prepare for Installation. (a) Verify the kit contents (Fig. 1-1). (1) A = Front cross bar... - Page 3 LEXUS NX 200t/300h 2015 - CROSS BARS Procedure (b) The surface temperature should be between 65ºF and 100ºF for optimum installation. The vehicle needs to be dry as well. (c) Protect the roof with a blanket. (d) Clean the mounting area as indicated with VDC-approved cleaner (Fig.
- Page 4 LEXUS NX 200t/300h 2015 - CROSS BARS Procedure (d) Insert the key to unlock and open the end covers (Fig 2-4). Leave the keys in the locks until the installation is complete. Fig. 2-4 (e) Spray the rubber trim (C) with soap and water solution if needed.
- Page 5 LEXUS NX 200t/300h 2015 - CROSS BARS Procedure (h) Swing the end covers up on top of the cross bar (Fig. 2-7). (i) Pull the adjustment knobs out and turn counterclockwise to loosen the assembly enough to allow for installation (Fig. 2-7).
- Page 6 LEXUS NX 200t/300h 2015 - CROSS BARS Procedure (d) Place the front cross bars into the two rearward holes in the side rails (Fig. 3-3). Front Fig. 3-3 (e) Ensure that the cross bar supports are placed properly into the side rail assembly by...
- Page 7 LEXUS NX 200t/300h 2015 - CROSS BARS Procedure (g) Tighten the driver’s side adjustment knob until it clicks (Fig. 3-6). Fig. 3-6 (h) After the first click, turn the knobs clockwise until they point down (Fig. 3-7). (i) Push the knobs inwards as far as possible.
- Page 8 LEXUS NX 200t/300h 2015 - CROSS BARS Procedure (c) Ensure that the cross bar supports are placed properly into the rail assembly by making sure the clamp is under the outer rail edge and the locating pins are fully seated into the holes in the rail assembly (Fig.
- Page 9 LEXUS NX 200t/300h 2015 - CROSS BARS Procedure (e) Tighten the driver’s side adjustment knob until it clicks (Fig. 4-5). Fig. 4-5 (f) After the first click, turn the knobs clockwise until they point down (Fig. 4-6). (g) Push the knobs inwards as far as possible.
- Page 10 LEXUS NX 200t/300h 2015 - CROSS BARS Checklist - these points MUST be checked to ensure a quality installation. Check: Look For: Accessory Function Checks Ensure the cross bars are secure and in Cross bar knobs are tight and the front bars...
Need help?
Do you have a question about the PZ41B-X2620-00 and is the answer not in the manual?
Questions and answers