Table of Contents
Advertisement
Quick Links
MODEL G0720R
HEAVY-DUTY BENCHTOP
MILLING MACHINE
OWNER'S MANUAL
COPYRIGHT © NOVEMBER, 2010 BY GRIZZLY INDUSTRIAL, INC., REVISED MAY, 2018 (HE)
WARNING: NO PORTION OF THIS MANUAL MAY BE REPRODUCED IN ANY SHAPE
OR FORM WITHOUT THE WRITTEN APPROVAL OF GRIZZLY INDUSTRIAL, INC.
(FOR MODELS MANUFACTURED SINCE 11/10) #CR13495 PRINTED IN CHINA
Advertisement
Table of Contents

Related Manuals for Grizzly G0720R


Summary of Contents for Grizzly G0720R
- Page 1 HEAVY-DUTY BENCHTOP MILLING MACHINE OWNER'S MANUAL COPYRIGHT © NOVEMBER, 2010 BY GRIZZLY INDUSTRIAL, INC., REVISED MAY, 2018 (HE) WARNING: NO PORTION OF THIS MANUAL MAY BE REPRODUCED IN ANY SHAPE OR FORM WITHOUT THE WRITTEN APPROVAL OF GRIZZLY INDUSTRIAL, INC.
- Page 2 This manual provides critical safety instructions on the proper setup, operation, maintenance, and service of this machine/tool. Save this document, refer to it often, and use it to instruct other operators. Failure to read, understand and follow the instructions in this manual may result in fire or serious personal injury—including amputation, electrocution, or death.
-
Page 3: Table Of Contents
Table of Contents INTRODUCTION ..........2 SECTION 5: ACCESSORIES ......28 Manual Accuracy ........... 2 SECTION 6: MAINTENANCE ......30 Contact Info............ 2 Schedule ............30 Machine Description ........2 Ongoing ............. 30 Identification ........... 3 Daily, Before Operations ......30 SECTION 1: SAFETY ........ -
Page 4: Introduction
Machine Description and it helps us determine if updated documenta- tion is available for your machine. The Model G0720R Heavy-Duty Benchtop Mill removes material from workpieces to form com- plex shapes. The headstock can be held station- ary at various angles while the spindle rotates the cutter. -
Page 5: Identification
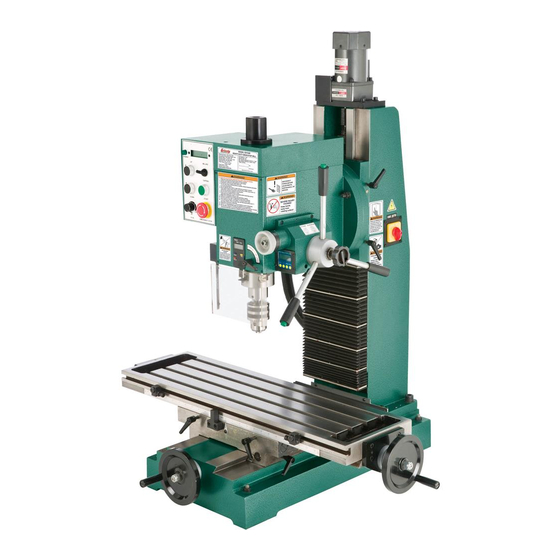
V. Headstock Power UP and DOWN Buttons Cast-Iron Base W. Spindle Speed Dial and RPM Display Base Mounting Boss X. Power Light K. Cross (Y-Axis) Handwheel Y. Tapping and Milling Mode Switch Precision Dovetailed Table Ways Start Button M. Table Locks Model G0720R (Mfg. Since 11/10) - Page 6 MACHINE DATA SHEET Customer Service #: (570) 546-9663 · To Order Call: (800) 523-4777 · Fax #: (800) 438-5901 MODEL G0720R HEAVY‐DUTY BENCH TOP MILLING MACHINE Product Dimensions: Weight................................596 lbs. Width (side-to-side) x Depth (front-to-back) x Height............... 14-1/2 x 30-1/2 x 43 in.
- Page 7 The information contained herein is deemed accurate as of 5/16/2018 and represents our most recent product specifications. Model G0720R PAGE 2 OF 3 Due to our ongoing improvement efforts, this information may not accurately describe items previously purchased. Model G0720R (Mfg. Since 11/10)
-
Page 8: Section 1: Safety
Everyday ery. Never operate under the influence of drugs or eyeglasses are NOT approved safety glasses. alcohol, when tired, or when distracted. Model G0720R (Mfg. Since 11/10) - Page 9 EXPERIENCING DIFFICULTIES. If at any time debris. Make sure they are properly installed, you experience difficulties performing the intend- undamaged, and working correctly BEFORE ed operation, stop using the machine! Contact our operating machine. Technical Support at (570) 546-9663. Model G0720R (Mfg. Since 11/10)
-
Page 10: Additional Safety For Mills
Failure to do so could result in serious per- risk of operator injury. If normal safety pre- cautions are overlooked or ignored, serious sonal injury, damage to equipment, or poor work results. personal injury may occur. Model G0720R (Mfg. Since 11/10) -
Page 11: Section 2: Power Supply
To reduce the risk of these hazards, avoid over- loading the machine during operation and make sure it is connected to a power supply circuit that meets the specified circuit requirements. Model G0720R (Mfg. Since 11/10) -
Page 12: Grounding & Plug Requirements
Two-prong outlets do not meet the grounding requirements for this machine. Do not modify or use an adapter on the plug provided—if it will not fit the outlet, have a qualified electrician install the proper outlet with a verified ground. -10- Model G0720R (Mfg. Since 11/10) -
Page 13: Section 3: Setup
When you are completely satisfied with the condi- tion of your shipment, inventory the contents. SUFFOCATION HAZARD! Keep children and pets away from plastic bags or packing materials shipped with this machine. Discard immediately. -11- Model G0720R (Mfg. Since 11/10) -
Page 14: Inventory
Fuse 2 Amp, Fast-Blow 5 x 20mm ..... 1 ing or they are pre-installed at the factory. Hex Wrench Set 4, 5, 6, & 12mm ..1 Ea K. Bottle for Oil ..........1 Figure 3. G0720R out of the crate. -12- Model G0720R (Mfg. Since 11/10) -
Page 15: Cleanup
Repeat Steps 2–3 as necessary until clean, then coat all unpainted surfaces with a quality metal protectant to prevent rust. -13- Model G0720R (Mfg. Since 11/10) -
Page 16: Site Considerations
Only install in an Shadows, glare, or strobe effects that may distract access restricted location. or impede the operator must be eliminated. 33" ⁄ " Figure 6. Minimum working clearances. -14- Model G0720R (Mfg. Since 11/10) -
Page 17: Mounting To Workbench
Switch Button Headstock Bolt UP/DOWN Flat Washer Buttons Speed Workbench Dial Flat Washer Emergency Lock Washer Stop Button Hex Nut Chip Guard Figure 7. Example of a through mount setup. Figure 8. Machine controls. -15- Model G0720R (Mfg. Since 11/10) - Page 18 Always disconnect the machine from power when investigating or correcting potential problems. 10. Test the variable speed by turning the spindle speed dial up then down. 11. Press the EMERGENCY STOP button to stop the spindle. -16- Model G0720R (Mfg. Since 11/10)
-
Page 19: Spindle Break-In
Tapping a speed of 1600 RPM for ten minutes. Mode Switch Run the machine at 800 RPM for another 15 minutes to allow it cool down. Spindle Rotation Direction Buttons Figure 9. Tapping controls. -17- Model G0720R (Mfg. Since 11/10) -
Page 20: Section 4: Operations
OMMEND that you read books, review industry trade magazines, or get formal training before beginning any projects. Regardless of the content in this section, Grizzly Industrial will not be held liable for accidents caused by lack of training. -18- Model G0720R (Mfg. Since 11/10) -
Page 21: Controls
L. EMERGENCY STOP Button: Stops the direction can be reversed at any RPM without mill and prevents restarting while it is in having to stop the spindle first. the depressed position. Rotate the button clockwise to reset it. -19- Model G0720R (Mfg. Since 11/10) -
Page 22: Digital Spindle Height Gauge
OFF/ON Button: Turns the digital height degrees and percent of grade conventions. gauge ON or OFF. U. Calibrate: Zeros the protractor at any position within the range of headstock tilt. HOLD: Locks the protractor at its current displayed value. -20- Model G0720R (Mfg. Since 11/10) -
Page 23: Selecting Spindle Rpm
These values are a guideline only. Refer to the MACHINERY'S HAND- Fine Feed Lock Knob BOOK for more detailed information. Fold-Out Lever Figure 14. Cutting speed table for HSS cutting tools. Figure 15. Spindle controls. -21- Model G0720R (Mfg. Since 11/10) -
Page 24: Drill Chuck Installation & Removal
Insert the spindle lock pin into the hole in the side of the spindle (see Figure 16). Figure 17. Drawbar wrench. Hold one hand under the chuck and finish loosening the drawbar by hand until it falls out of the spindle. -22- Model G0720R (Mfg. Since 11/10) -
Page 25: Collet Installation & Removal
If you do not use the drill chuck and arbor, you need to use a collet to insert the cutting tool into LACERATION HAZARD! the spindle. Your Model G0720R features an R-8 Leading edges of end mills spindle taper, which gives the freedom to use and other cutting tools can common R-8 collets. -
Page 26: Headstock Travel (Z-Axis & Rotation)
On the control panel push the UP or DOWN knob tightened. buttons (see Figure 19) to raise or lower the headstock with the elevation motor. Elevation Motor Up and Down Buttons Figure 19. Z-axis control. -24- Model G0720R (Mfg. Since 11/10) -
Page 27: Tilting
Figure 22. show the last angle or grade measured. Left Hex Nut Right Hex Nut Index Pin Lower Hex Nut Figure 22. Headstock tilt locking hex nuts. -25- Model G0720R (Mfg. Since 11/10) -
Page 28: X-Axis
Figure 25. X-Axis Table Lock Lever Y-Axis Table Lock Lever Figure 25. Table locks and scales. -26- Model G0720R (Mfg. Since 11/10) -
Page 29: Milling/Drilling Mode
X or Y handwheel to slowly feed the rotation back and forth to eject chips from the workpiece into the cutter. tap and hole in order to prevent chip loading and tap breakage. -27- Model G0720R (Mfg. Since 11/10) -
Page 30: Section 5: Accessories
Grizzly. Note: To use this tapping attachment on the NOTICE Model G0720R mill, you must purchase the G1427 R-8/ MT #2 Morse Taper sleeve. Refer to the newest copy of the Grizzly Catalog for other accessories available for this machine. - Page 31 Includes magnetic base, 1" dial indicator (.001"), Figure 33. G9324 Boring Head Combo Set. and 6" dial caliper (.001"). The extremely low price has made this a very popular seller! Figure 31. H3022 Measurement Tool Set. -29- Model G0720R (Mfg. Since 11/10)
-
Page 32: Section 6: Maintenance
Push the EMERGENCY STOP button and shut OFF the master power switch (to pre- vent accidental startup). • Remove any rotary tables, vises, fixtures, or workpieces from the table to prevent rusting the table surface. -30- Model G0720R (Mfg. Since 11/10) -
Page 33: Ball Oilers
Leadscrew Figure 35. Headstock ball oiler locations. Ball Oiler Rear Ball Oiler Left Column Ball Oiler Front Ball Oiler Figure 39. Table and base ball oiler locations. Figure 36. Left column ball oiler location. -31- Model G0720R (Mfg. Since 11/10) -
Page 34: Leadscrews
Exposed Leadscrew Lightly coat the entire leadscrew with lithium grease. Figure 40. Table leadscrew. Lithium Grease Lithium Grease Cover Held Down Figure 41. Headstock leadscrew access and lubrication. -32- Model G0720R (Mfg. Since 11/10) -
Page 35: Battery Replacement
Figure 44. Positive Pole of All Three Batteries Figure 42. Battery replacement icon. Must Face Outward Figure 44. Digital protractor battery replacement. Reassemble in reverse order. -33- Model G0720R (Mfg. Since 11/10) -
Page 36: Section 7: Service
1. Loosen/replace lock lever and to lift headstock. adjust gib. 2. Headstock lead screw is binding. 2. Clean and relubricate headstock leadscrew and gears. 3. Motor or bearings at fault. 3. Replace motor or offending bearings. -34- Model G0720R (Mfg. Since 11/10) -
Page 37: Gib Adjustment
Repeat adjustments as necessary until the the gibs. gib screw drag is acceptable, and re-install the way cover. When properly adjusted, there should be slight resistance felt in the handwheels when the table is moved. -35- Model G0720R (Mfg. Since 11/10) -
Page 38: Headstock Gib Adjustment
⁄ -turn, and tighten the lower gib screw ⁄ -turn. When properly adjusted, there should be a slight pre-loaded fit between the column and the headstock. Reinstall the column way cover. -36- Model G0720R (Mfg. Since 11/10) -
Page 39: Section 8: Wiring
The photos and diagrams included in this section are best viewed in color. You can view these pages in color at www.grizzly.com. READ ELECTRICAL SAFETY READ ELECTRICAL SAFETY -37- Model G0720R (Mfg. Since 11/10) ON THIS PAGE! ON PAGE 37! -
Page 40: Wiring Overview
System Spindle Elevation Overview Motor Motor Control Panel Chip Guard Main Safety Switch Electrical Spindle Panel Power Direction Switch Switch Work Lamp Elevation Travel Limit Switches Power Cord READ ELECTRICAL SAFETY -38- Model G0720R (Mfg. Since 11/10) ON PAGE 37! -
Page 41: Wiring Diagram
S1 K3 K4 +5V SA SB SC S1 K3 K4 +5V SA SB SC 110 VAC Neutral Circuit Breaker Juche D247-63 D32 230–400V Ground 5-15 Plug (As Recommended) READ ELECTRICAL SAFETY -39- Model G0720R (Mfg. Since 11/10) ON PAGE 37! -
Page 42: Wiring Diagram
UP Button 250VAC START Button DOWN Button Electrical Panel Control Panel Circuit Board STOP Button (see Page 39) Chip Guard Spindle Safety Switch Direction Switch Halogen Work Lamp READ ELECTRICAL SAFETY -40- Model G0720R (Mfg. Since 11/10) ON PAGE 37! -
Page 43: Electrical Components
Switch Figure 48. Main power switch and transformer. Electrical Box Fuse Figure 47. Motor power supply circuit Work board. Lamp Limit Switches Figure 49. Rear view electrical components. READ ELECTRICAL SAFETY -41- Model G0720R (Mfg. Since 11/10) ON PAGE 37! - Page 44 Headstock Elevation Motor Spindle Motor (Inside) Main Power Switch Figure 51. Chip guard safety switch. Figure 52. Tapping button slip ring contact. Figure 54. Front view electrical components. READ ELECTRICAL SAFETY -42- Model G0720R (Mfg. Since 11/10) ON PAGE 37!
-
Page 45: Section 9: Parts
SECTION 9: PARTS Head Breakdown -43- Model G0720R (Mfg. Since 11/10) - Page 46 FUSE 1A FAST-BLOW 5 X 20MM P0720R087 DIGITAL SPINDLE HEIGHT SCALE P0720R043 STRAIN RELIEF P0720R088 PIN 3 X 12 PLASTIC P0720R044 TAPER PIN P0720R089 BUS BAR P0720R045 E-CLIP 5MM P0720R090 CONTACT RACK READ ELECTRICAL SAFETY -44- Model G0720R (Mfg. Since 11/10) ON PAGE 37!
- Page 47 145 P0720R145 DRILL CHUCK B18 117 P0720R117 DIGITAL PROTRACTOR SENSOR 146 P0720R146 PROTRACTOR BATTERY LITHIUM CR2032 118 P0720R118 SPACER 147 P0720R147 SCALE BATTERY ALKALINE SR44 119 P0720R119 PIN 10 X 55 148 P0720R148 CONTROL PANEL CIRCUIT BOARD -45- Model G0720R (Mfg. Since 11/10)
-
Page 48: Column Breakdown
Column Breakdown -46- Model G0720R (Mfg. Since 11/10) - Page 49 COLUMN CASTING P0720R266 COLUMN WAY COVER P0720R233 STRAIN RELIEF M16 LT P0720R267 BOTTOM WAY COVER PLATE P0720R234 POWER CORD 14G 3C 8FT 5-15 P0720R268 FUSE 30A FAST-BLOW 1/4" X 1" P0720R235 CORD CONDUIT PLASTIC LT -47- Model G0720R (Mfg. Since 11/10)
-
Page 50: Table Breakdown
Table Breakdown -48- Model G0720R (Mfg. Since 11/10) - Page 51 STEEL FLUTED RIVET 2 X 4MM P0720R331 CROSS HANDWHEEL P0720R360 LONGITUDINAL SCALE P0720R332 CROSS GRADUATED DIAL P0720R361 END CAP 333A P0720R333A CROSS LEADSCREW W/NUT P0720R362 LEFT LONGITUDINAL BEARING SEAT P0720R333 CROSS LEADSCREW 8 TPI P0720R363 PLUG DIN910 -49- Model G0720R (Mfg. Since 11/10)
-
Page 52: Label Placement
MUST maintain the original location and readability of the labels on the machine. If any label is removed or becomes unreadable, REPLACE that label before using the machine again. Contact Grizzly at (800) 523-4777 or www.grizzly.com to order new labels. -50-... - Page 53 Would you recommend Grizzly Industrial to a friend? _____ Yes _____No Would you allow us to use your name as a reference for Grizzly customers in your area? Note: We never use names more than 3 times. _____ Yes _____No 10.
- Page 54 FOLD ALONG DOTTED LINE Place Stamp Here GRIZZLY INDUSTRIAL, INC. P.O. BOX 2069 BELLINGHAM, WA 98227-2069 FOLD ALONG DOTTED LINE Send a Grizzly Catalog to a friend: Name_______________________________ Street_______________________________ City______________State______Zip______ TAPE ALONG EDGES--PLEASE DO NOT STAPLE...
-
Page 55: Warranty And Returns
WARRANTY AND RETURNS Grizzly Industrial, Inc. warrants every product it sells for a period of 1 year to the original purchaser from the date of purchase. This warranty does not apply to defects due directly or indirectly to misuse, abuse, negligence, accidents, repairs or alterations or lack of maintenance.
Need help?
Do you have a question about the G0720R and is the answer not in the manual?
Questions and answers