Table of Contents
Advertisement
Quick Links
Download this manual
See also:
User Manual
Advertisement
Table of Contents

Related Manuals for Avonic AV-CM40


Summary of Contents for Avonic AV-CM40
- Page 1 Avonic PTZ Camera 20x zoom AV-CM40 www.avonic.eu User Manual | Version 1.1...
- Page 1 Avonic PTZ Camera 20x Zoom AV-CM40 User Manual www.avonic.eu Version 1.0...
-
Page 2: Table Of Contents
Join Avonic ................ -
Page 2: Table Of Contents
Join Avonic . . . . . . . . . . . . . . . . . . . . - Page 3 Pelco-P Protocol Command List ................Appendix B Dimensions ....................34 www.avonic.eu...
- Page 3 Appendix A ................................25 VISCA Camera Return Command List . . . . . . . . . . . . . . . . . . . . . . . . . . . . . . . . . . . . . . . . . . . . . . . . . . . . . . . . . . . . . . . . . . . . . . . . . . . . . VISCA Query Command List .
-
Page 4: Introduction
Contact For any questions or suggestions, contact your reseller or the local distributor of Avonic. Find the local distributor on the website of Avonic. For the most recent version of the manual or datasheet, look at the Avonic website: www.avonic.eu Join Avonic facebook.com/avonicPTZ... -
Page 4: Introduction
Introduction Congratulations Thank you for your Avonic purchase. Before beginning to operate this device, please read the manual in order to make sure the best performance is obtained. Save this manual for future reference. Contact For any questions or suggestions, contact your reseller or the local distributor of Avonic. -
Page 5: Package Contents And Accessories
Be cautious to take the camera by its base. When placing back the ca- mera in its protective foam, be sure the lens is in horizontal position. Accessories Avonic Ceiling mount Avonic Wall mount Wall and Ceiling mount SKU white : CM-CMW SKU white : CM-WMW... -
Page 5: Package Contents And Accessories
When placing back the camera in its protective foam, be sure the lens is in horizontal position. Accessoiries Avonic Ceiling mount Avonic Wall mount Wall and Ceiling mount SKU white : CM-CMW SKU white : CM-WMW SKU white : AV-MT200-W... -
Page 6: Product Overview
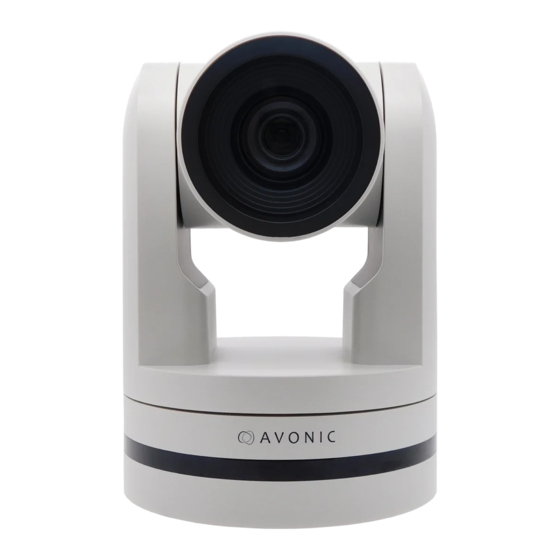
PRODUCT OVERVIEW The Avonic CM40 is a high-quality PTZ camera, with an HDMI, USB2.0 and 3G-SDI output. The camera is designed for fixed installations and high quality video in low light conditions. The camera is equipped with high quality components like a Panasonic CMOS sensor and a glass lens with 20x optical zoom. Control the camera over RS232 or RS485 with any controller with VISCA or PELCO support. -
Page 6: Product Overview
Product Overview The Avonic CM40 is a high-quality PTZ camera, with an HDMI, USB2 . 0 and 3G-SDI output . The camera is designed for fixed installations and high quality video in low light conditions. The camera is equipped with high quality components like a Panasonic CMOS sensor and a glass lens with 20x optical zoom . -
Page 7: Installation
RS-232 mini-DIN-8 OUT for daisy chaining RS-232 connection 3G-SDI video output SMTPE 424M compliant HDMI Type A USB2.0 Type A, UVC video output RJ45 Ethernet connection (for firmware update only) DC12V power with locking screw (connect the supplied DC PSU) Power ON/OFF Back to top www.avonic.eu... -
Page 7: Installation
3G-SDI video output SMTPE 424M compliant HDMI Type A USB2 . 0 Type A, UVC video output RJ45 Ethernet connection (for firmware update only) 10 . DC12V power with locking screw (connect the supplied DC PSU) 11 . Power ON/OFF www.avonic.eu... -
Page 8: System Select Switch
(Note: If the position preset 0 has been stored, the position preset 0 will be called after initialization). From this point onwards the user can control the camera with RC or Serial Communication. RS232 Interface Back to top www.avonic.eu... -
Page 8: System Select Switch
System Select Switch 1080p60 720p30 1080p50 720p25 1080i60 1080p59.94 1080i50 1080i59.94 720p60 720p59.94 720p50 1080p29.97 1080p30 720p29.97 1080p25 Undefined CAUTION: After changing the switch, you need to restart the camera to take effect. 720 p30 and 720 p25 only supported by the HDMI output. Power adapter This equipment is equipped with a 12V/2A DC power supply. -
Page 9: Visca Network Connection Diagram
The camera is equipped with a limited WebGUI to perform a firmware upgrade. The camera can be atta- ched directly to a PC with standard network patch cable or to a network switch. For further information, see chapter Operation section WebGUI. Back to top www.avonic.eu... -
Page 9: Visca Network Connection Diagram
VISCA network connection diagram When connecting multiple cameras through RS-232, use daisy chaining network architecture . Max cable length for RS-232 is 10-15m . RS-232 RS-232 RS-232 Controller Camera Camera Camera RS485 network connection diagram To connect multiple cameras by RS485, the cameras are attached to a 2-wire twisted pair bus (max length 1200m) that is terminated at both ends with a 120 Ω... -
Page 10: Operation
OPERATION Remote controller Power Camera select Number Keys Focus + - Auto/Manual Focus Zoom + - Set & Clear Preset PTZ keys (up/down/left/right) Home BLC (Back Light Control) ON/OFF Menu Function Keys (F1/F2/F3/F4) Blank buttons Back to top www.avonic.eu... -
Page 10: Operation
Operation Remote controller Power Camera select Number Keys Focus + - Auto/Manual Focus Zoom + - Set & Clear Preset PTZ keys (up/down/left/right) Home BLC (Back Light Control) ON/OFF Menu Function Keys (F1/F2/F3/F4) Blank buttons www.avonic.eu... - Page 11 “Set Preset”. You can call the preset by pressing the number 0-9 on the remote control. Set Preset: [SET PRESET]+[<number>] Call Preset: [<number>] Clear Preset: [CLEAR PRESET]+[<number>] If the position preset 0 has been stored, this position will be called after initialization. Back to top www.avonic.eu...
- Page 11 0-9. To set a preset first point the camera in a specific directing and a specific zoom position . Now assign the position to a number with the button “Set Preset” . You can call the preset by pressing the number 0-9 on the remote control . www.avonic.eu...
-
Page 12: Other Key Combinations
: Switch the video format to 1080p25* [#]+[#]+[8] : Switch the video format to 720p30* [#]+[#]+[9] : Switch the video format to 720p25* *NOTE: THE CAMERA RETURNS TO THE VIDEO OUTPUT SETTING OF THE ROTARY DIAL AFTER A REBOOT Back to top www.avonic.eu... -
Page 12: Other Key Combinations
: Switch the video format to 720p50 [#]+[#]+[6] : Switch the video format to 1080p30 [#]+[#]+[7] : Switch the video format to 1080p25 [#]+[#]+[8] : Switch the video format to 720p30 [#]+[#]+[9] : Switch the video format to 720p25 www.avonic.eu... -
Page 13: Osd Menu
Language Setup Protocol The OSD menu can be accessed by the Visca Address Remote Control or an Avonic PTZ controller. Visca Address Fix In the following pages, the navigating is Pelco-P Address described for using the IR Remote Control. Pelco-D Address... -
Page 13: Osd Menu
OSD Menu The OSD menu can be accessed by the Remote Control or an Avonic PTZ controller . In the following pages, the navigating is described for using the IR Remote Control . www.avonic.eu... - Page 14 2400 / 4800 / 9600 / 115200 / 38400 Select Item Change Value [Menu] Back 3. CAMERA CAMERA Exposure Color Image Focus Noise Reduction Style Soft / Default / Normal / Clarity / Bright Select Item Change Value [Menu] Back Back to top www.avonic.eu...
- Page 14 1 . MENU Press [MENU] button to display the main menu on the screen . Use the arrow buttons to move the cursor to the item to be set . Press the [HOME] button to enter the corresponding sub-menu . Press [ MENU Language EN / CN...
- Page 15 RG Tuning -10 ~ 10 BG Tuning -10 ~ 10 0 ~ 255 0 ~ 255 Saturation 60% - 200% 0 ~ 14 AWB Sensitivity Low / Middle / High Select Item Change Value [Menu] Back Back to top www.avonic.eu...
- Page 15 Auto / 3000K / 4000K / 5000K / 6000K / 7000K / Manual / OnePush RG Tuning -10 ~ 10 BG Tuning -10 ~ 10 0 ~ 255 0 ~ 255 Saturation 60% - 200% 0 ~ 14 AWB Sensitivity Low / Middle / High Select Item Change Value [Menu] Back www.avonic.eu...
- Page 16 Change Value [Menu] Back 3.5 NOISE REDUCTION NOISE REDUCTION NR-2D 1 ~ 7 / Auto / OFF NR-3D 1 ~ 8 / OFF Dynamic Hot Pixel 1 ~ 5 / OFF Select Item Change Value [Menu] Back Back to top www.avonic.eu...
- Page 16 3 . 3 IMAGE The Flip function can be set, althoug the camera has an automatically flip function. IMAGE Brightness 0 ~ 14 Contrast 0 ~ 14 Sharpness 0 ~ 15 Flip-H ON / OFF Flip-V ON / OFF B&W-Mode Color / B&W Gamma 0 .
- Page 17 Change Value [Menu] Back 5. VERSION VERSION MCU Version date Camera Version date AF Version date [Menu] Back 6. RESTORE DEFAULT RESTORE DEFAULT Restore default? NO / YES Select Item Change Value [Menu] Back [Home] OK Back to top www.avonic.eu...
- Page 17 Select Item Change Value [Menu] Back 5 . VERSION VERSION MCU Version date Camera Version date AF Version date [Menu] Back 6 . RESTORE DEFAULT RESTORE DEFAULT Restore default? NO / YES Select Item Change Value [Menu] Back [Home] OK www.avonic.eu...
-
Page 18: Serial Communication Control
Serial Communication Control COM port settings In default working mode, an Avonic camera is able to connect to a VISCA controller with RS-232 or RS-485 serial interface. The camera can be controlled via RS-232, the parameters of RS-232C are as follows: •... -
Page 18: Serial Communication Control
The camera can be controlled via RS-485, Half-duplex mode . The parameters are: • Baud rate: 2400/4800/9600 • Start bit: 1 bit . • Data bit: 8 bits . • Stop bit: 1 bit . • Parity bit: none . For command list, see Appendix A www.avonic.eu... -
Page 19: Webgui
The default password is : admin The login screen looks like this: System In the System Tab it is possible to change username and password, perform a firmware upgrade, reset the camera to Default settings and Reboot the camera. Back to top www.avonic.eu... -
Page 19: Webgui
The default password is : admin The login screen looks like this: System In the System Tab it is possible to change username and password, perform a firmware upgrade, reset the camera to Default settings and Reboot the camera . www.avonic.eu... - Page 20 Update The update form gives information on the current firmware versions and the possibility to update the firm- ware by choosing an upgrade file provided by Avonic. Do not turn off the camera while updating. Network In the Network Tab network IP settings can be changed. These settings involve DHCP or fixed IP address and DNS settings and port settings.
- Page 20 Update The update form gives information on the current firmware versions and the possibility to update the firmware by choosing an upgrade file provided by Avonic. Do not turn off the camera while updating . Network In the Network Tab network IP settings can be changed. These settings involve DHCP or fixed IP...
- Page 21 Reboot If any changes made, these settings will only take effect after a reboot of the camera. Back to top www.avonic.eu...
- Page 21 Reboot If any changes made, these settings will only take effect after a reboot of the camera . www.avonic.eu...
-
Page 22: Maintenance
Turn the camera off and on again and check if the problem persists. • Restore to Factory Default Power Issues • No self-test (applies only to PTZ cameras) and no power LED - Check the net power - Check the power supply Back to top www.avonic.eu... -
Page 22: Maintenance
Turn the camera off and on again and check if the problem persists . • Restore to Factory Default Power Issues • No self-test (applies only to PTZ cameras) and no power LED - Check the net power - Check the power supply www.avonic.eu... -
Page 23: Image
- Check network cable - Check if PC is in the same subnet as camera - Reset the factory default ip settings by pressing [*] [#] [Manual] • Firmware update failed - Check firmware file integrity, download it again. Back to top www.avonic.eu... -
Page 23: Image
- Check network cable - Check if PC is in the same subnet as camera - Reset the factory default ip settings by pressing [*] [#] [Manual] • Firmware update failed - Check firmware file integrity, download it again. www.avonic.eu... -
Page 24: Visca Camera Return Command List
Outdoor mode OnePush mode 8x 01 04 35 03 FF One Push WB mode Manual 8x 01 04 35 05 FF Manual Control mode OnePush trigger 8x 01 04 10 05 FF One Push WB Trigger Back to top www.avonic.eu... -
Page 24: Visca Camera Return Command List
8x 01 04 35 02 FF Outdoor mode OnePush mode 8x 01 04 35 03 FF One Push WB mode Manual 8x 01 04 35 05 FF Manual Control mode OnePush trigger 8x 01 04 10 05 FF One Push WB Trigger www.avonic.eu... - Page 25 CAM_Bright Reset 8x 01 04 0D 00 FF Bright Setting 8x 01 04 0D 02 FF Down 8x 01 04 0D 03 FF Direct 8x 01 04 0D 00 00 0p pq: Bright Position 0q FF Back to top www.avonic.eu...
- Page 25 Gain Position CAM_Bright Reset 8x 01 04 0D 00 FF Bright Setting 8x 01 04 0D 02 FF Down 8x 01 04 0D 03 FF Direct 8x 01 04 0D 00 00 0p pq: Bright Position 0q FF www.avonic.eu...
- Page 26 8x 01 04 66 03 FF CAM_ColorGain Direct 8x 01 04 49 00 00 00 pp: Color Gain setting pp FF 00 (60%) to 0E -200% SYS_Menu 8x 01 06 06 03 FF Turns off the menu screen Back to top www.avonic.eu...
- Page 26 On/Off 8x 01 04 66 03 FF CAM_ColorGain Direct 8x 01 04 49 00 00 00 pp: Color Gain setting pp FF 00 (60%) to 0E -200% SYS_Menu 8x 01 06 06 03 FF Turns off the menu screen www.avonic.eu...
- Page 27 8x 01 04 A0 10 FF Reset Factory Setting CAM_Brightness Direct 8x 01 04 A1 00 00 0p pq: Brightness Position 0q FF CAM_Contrast Direct 8x 01 04 A2 00 00 0p pq: Contrast Position 0q FF Back to top www.avonic.eu...
- Page 27 CAM_SettingReset Reset 8x 01 04 A0 10 FF Reset Factory Setting CAM_Brightness Direct 8x 01 04 A1 00 00 0p pq: Brightness Position 0q FF CAM_Contrast Direct 8x 01 04 A2 00 00 0p pq: Contrast Position 0q FF www.avonic.eu...
- Page 28 8x 01 04 AA 01 FF Bottom 8x 01 04 AA 02 FF CAM_ColorHue Direct 8x 01 04 4F 00 00 00 p: Color Hue setting 0h 0p FF (− 14 dgrees) to Eh ( +14 degrees Back to top www.avonic.eu...
- Page 28 AF Zone weight select Center 8x 01 04 AA 01 FF Bottom 8x 01 04 AA 02 FF CAM_ColorHue Direct 8x 01 04 4F 00 00 00 p: Color Hue setting 0h 0p FF (− 14 dgrees) to Eh ( +14 degrees www.avonic.eu...
-
Page 29: Visca Query Command List
ExpComp Position CAM_BacklightMode 8x 09 04 33 FF y0 50 02 FF y0 50 03 FF CAM_Nosise2DMode 8x 09 04 50 FF y0 50 02 FF Auto Noise 2D y0 50 03 FF Manual Noise 3D Back to top www.avonic.eu... -
Page 29: Visca Query Command List
50 00 00 0p 0q FF pq: ExpComp Position CAM_BacklightMode 8x 09 04 33 FF y0 50 02 FF y0 50 03 FF CAM_Nosise2DMode 8x 09 04 50 FF y0 50 02 FF Auto Noise 2D y0 50 03 FF Manual Noise 3D www.avonic.eu... - Page 30 1920x1080p30 y0 50 02 FF 1280x720p60 y0 50 04 FF NTSC y0 50 05 FF NTSC y0 50 06 FF NTSC y0 50 07 FF 1920x1080p60 y0 50 08 FF 1920x1080i50 y0 50 09 FF 1920x1080p25 Back to top www.avonic.eu...
- Page 30 50 01 FF 1920x1080p30 y0 50 02 FF 1280x720p60 y0 50 04 FF NTSC y0 50 05 FF NTSC y0 50 06 FF NTSC y0 50 07 FF 1920x1080p60 y0 50 08 FF 1920x1080i50 y0 50 09 FF 1920x1080p25 www.avonic.eu...
- Page 31 50 01 FF Center y0 50 02 FF Bottom CAM_ColorHueInq 8x 09 04 4F FF y0 50 00 00 00 0p FF p: Color Hue setting 0h (− 14 degrees) to Eh ( +14 degrees Back to top www.avonic.eu...
- Page 31 50 00 FF y0 50 01 FF Center y0 50 02 FF Bottom CAM_ColorHueInq 8x 09 04 4F FF y0 50 00 00 00 0p FF p: Color Hue setting 0h (− 14 degrees) to Eh ( +14 degrees www.avonic.eu...
-
Page 32: Pelco-D Protocol Command List
Query Tilt Position 0xFF Address 0x00 0x5B Value Value Response High Byte Low Byte Query Zoom Position 0xFF Address 0x00 0x55 0x00 0x00 Query Zoom Position 0xFF Address 0x00 0x5D Value Value Response High Byte Low Byte Back to top www.avonic.eu... -
Page 32: Pelco-D Protocol Command List
0x00 0x00 Query Tilt Position 0xFF Address 0x00 0x5B Value Value Response High Byte Low Byte Query Zoom Position 0xFF Address 0x00 0x55 0x00 0x00 Query Zoom Position 0xFF Address 0x00 0x5D Value Value Response High Byte Low Byte www.avonic.eu... -
Page 33: Pelco-P Protocol Command List
Address 0x00 0x5B Value Value 0xAF Response High Byte Low Byte Query Zoom Position 0xA0 Address 0x00 0x55 0x00 0x00 0xAF Query Zoom Position 0xA0 Address 0x00 0x5D Value Value 0xAF Response High Byte Low Byte Back to top www.avonic.eu... -
Page 33: Pelco-P Protocol Command List
Query Tilt Position 0xA0 Address 0x00 0x5B Value Value 0xAF Response High Byte Low Byte Query Zoom Position 0xA0 Address 0x00 0x55 0x00 0x00 0xAF Query Zoom Position 0xA0 Address 0x00 0x5D Value Value 0xAF Response High Byte Low Byte www.avonic.eu... -
Page 34: Appendix B Dimensions
APPENDIX B DIMENSIONS Back to top www.avonic.eu... -
Page 34: Appendix B Dimensions
Appendix B Dimensions www.avonic.eu...
Need help?
Do you have a question about the AV-CM40 and is the answer not in the manual?
Questions and answers