
Related Manuals for Avonic AV-CM40


Summary of Contents for Avonic AV-CM40
-
Page 1: User Manual
Avonic AV-CM40 PTZ Camera 20x Zoom User Manual Version 1.0 Join Avonic Update notes: linkedin.com/company/avonic twitter.com/avonic1 facebook.com/avonic... -
Page 2: Table Of Contents
..................................27 MAGE ..................................27 ONTROL GUI ..................................27 APPENDIX A ................................29 VISCA C .......................... 29 AMERA ETURN OMMAND VISCA C ........................31 AMERA ONTROL OMMAND VISCA Q ............................36 UERY OMMAND -D P ..........................40 ELCO ROTOCOL OMMAND www.avonic.eu... - Page 3 -P P ..........................41 ELCO ROTOCOL OMMAND APPENDIX B QUICK START ............................. 42 APPENDIX C DIMENSIONS ............................. 42 www.avonic.eu...
-
Page 4: Introduction
Save this manual for future reference. Contact For any questions or suggestions, contact the reseller or the local distributor of Avonic. Find the local distributor on the website of Avonic. For the recent manual or datasheet, look at the Avonic website: www.avonic.eu... -
Page 5: Handling Precautions
Be cautious to take the camera by its base. When placing back the camera in its protective foam, be sure the lens is in horizontal position. Package contents Quantity Decription Avonic SKU 1 pc PTZ Camera AV-CM40 1 pc Power Supply 12V/A AV-CM40-PSU... -
Page 6: Accessories
Accessories Avonic Wall mount Avonic Ceiling mount SKU White : CM-WMW SKU White : CM-CMW SKU Black : CM-WMB SKU Black : CM-CMB www.avonic.eu... -
Page 7: Product Overview
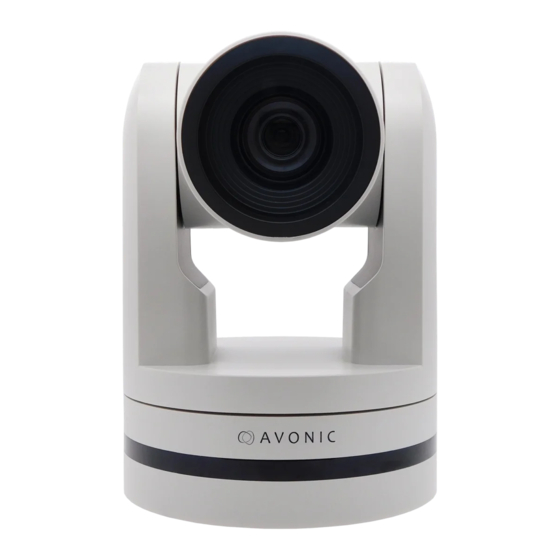
Product Overview The Avonic CM40 is a high-quality PTZ camera, with an HDMI, USB2.0 and 3G-SDI output. The camera is designed for fixed installations and works very well in low light conditions. The camera is equipped with high quality components like a Panasonic CMOS sensor and a glass lens with 20x optical zoom. -
Page 8: Installation
8. USB2.0 Type A, UVC video output 9. RJ45 Ethernet connection (for firmware update only) 10. DC12V power with locking screw (connect the supplied DC PSU) Power ON/OFF System Select Switch 1080p60 720p30 1080p50 720p25 1080i60 1080p59.94 1080i50 1080i59.94 720p60 720p59.94 www.avonic.eu... -
Page 9: Rs232 Interface
(Note: If the position preset 0 has been stored, the position preset 0 will be called after initialization). From this point onwards the user can control the camera with RC or Serial Communication. RS232 Interface www.avonic.eu... -
Page 10: Visca Network Connection Diagram
5m. IP network connection The AV-CM40 is equipped with a limited WebGUI to perform a firmware upgrade. The camera can be attached directly to a PC with standard network patch cable or to a network switch. -
Page 11: Operation
Camera select d. Number Keys e. Focus + - Auto/Manual Focus g. Zoom + - h. Set & Clear Preset PTZ keys (up/down/left/right) Home k. BLC (Back Light Control) ON/OFF Menu m. Function Keys (F1/F2/F3/F4) n. Blank buttons www.avonic.eu... - Page 12 A preset is a specific position of a camera that you save into the camera. A preset is assigned to a number from 0-9. To set a preset first point the camera in a specific directing and a specific zoom position. Now assign the position to a number with the button “Set Preset”. You www.avonic.eu...
- Page 13 HDMI/SDI/IP/USB output (depends on the camera model). If the menu is not in English, please press【*】+【#】+【4】to change the Menu language to English. m. Function Keys (F1/F2/F3/F4) Used the configure the IR channel inside the camera. See [c. Camera select] above for instructions. n. Blank buttons These buttons has no function with this camera www.avonic.eu...
-
Page 14: Osd Menu
: Switch the video format to 720p25 【#】+【#】+【9】 OSD Menu The OSD menu can be accessed by the Remote Control or an Avonic PTZ controller. In the following pages, the navigating is described for using the IR Remote Control. Menu tree (next page) www.avonic.eu... - Page 15 www.avonic.eu...
- Page 16 Visca Address 1 ~ 7 Visca Address Fix ON / OFF PELCO-P Address 1 ~ 255 PELCO-D Address 1 ~ 255 Baudrate 2400 / 4800 / 9600 / 115200 / 38400 Select Item Change Value [Menu] Back 3. CAMERA www.avonic.eu...
- Page 17 Auto / 3000K / 4000K / 5000K / 6000K / 7000K / Manual / OnePush RG Tuning -10 ~ 10 BG Tuning -10 ~ 10 0 ~ 255 0 ~ 255 Saturation 60% - 200% 0 ~ 14 AWB Sensitivity Low / Middle / High Select Item Change Value [Menu] Back www.avonic.eu...
- Page 18 Select Item Change Value [Menu] Back 3.5 NOISE REDUCTION NOISE REDUCTION NR-2D 1 ~ 7 / Auto / OFF NR-3D 1 ~ 8 / OFF Dynamic Hot Pixel 1 ~ 5 / OFF Select Item Change Value [Menu] Back www.avonic.eu...
- Page 19 Slow / Fast Select Item Change Value [Menu] Back 4. VERSION VERSION MCU Version date Camera Version date AF Version date [Menu] Back 5. RESTORE DEFAULT RESTORE DEFAULT Restore Default? NO / YES Select Item Change Value [Menu] Back [Home] OK www.avonic.eu...
-
Page 20: Serial Communication Control
The camera can be controlled via RS-485, Half-duplex mode. The parameters are: • Baud rate: 2400/4800/9600 • Start bit: 1 bit. • Data bit: 8 bits. Stop bit: 1 bit. • Parity bit: none. • Command List See Appendix A www.avonic.eu... -
Page 21: Webgui
WebGUI The AV-CM40 is equipped with a limited WebGUI to setup minimal functionality to perform a firmware upgrade. Login The default IP address of the AV-CM40W/B is 192.168.5.163 The default username is : admin The default password is : admin The login screen looks like this: www.avonic.eu... - Page 22 System In the System Tab it is possible to change username and password, perform a firmware upgrade, reset the camera to Default settings and Reboot the camera. www.avonic.eu...
- Page 23 Update The update form gives information on the current firmware versions and the possibility to update the firmware by choosing an upgrade file provided by Avonic. Do not turn off the camera while updating. www.avonic.eu...
- Page 24 Network In the Network Tab network IP settings can be changed. These settings involve DHCP or fixed IP address and DNS settings and port settings. Save changed settings and Reboot the camera. www.avonic.eu...
- Page 25 Reboot If any changes made, these settings will only take effect after a reboot of the camera. www.avonic.eu...
-
Page 26: Maintenance
No shooting extreme bright object for a long period of time, such as sunlight, light ⚫ sources, etc. No operating in unstable lighting conditions, otherwise the image will be flickering. ⚫ No operating close to powerful electromagnetic radiation, such as TV or radio ⚫ transmitters, etc. www.avonic.eu... -
Page 27: Troubleshooting
Check RS-232 or RS-485 cable quality, length, polarity and network architecture Check serial communication settings on both camera and controller Check VISCA / PELCO address settings on both camera and controller WebGUI Cannot enter WebGUI • Check network cable Check if PC is in the same subnet as camera www.avonic.eu... - Page 28 Firmware update failed • Check firmware file integrity, download it again. www.avonic.eu...
-
Page 29: Visca Camera Return Command List
Return when the (y: Socket No.) command has been executed. Command Function Command Package Note Error Syntax Error z0 60 02 FF Returned when the Messages command format is different or when a command with illegal command parameters is sent. www.avonic.eu... - Page 30 Command Not z0 6y 41 FF Returned when a command Executable (y: Execution command cannot be executed due to Socket current conditions. For No. Inquiry command: example, when commands controlling the focus manually are received during autofocus. www.avonic.eu...
-
Page 31: Visca Camera Control Command List
8x 01 04 44 00 00 0p pq: B Gain 0q FF CAM_AE Full Auto 8x 01 04 39 00 FF Automatic Exposure mode Manual 8x 01 04 39 03 FF Manual Control mode Shutter priority 8x 01 04 39 0A FF Shutter Priority www.avonic.eu... - Page 32 8x 01 04 54 0p FF p: NR Setting (0: Off, level 1 to 8) CAM_Flicker 8x 01 04 23 0p FF p: Flicker Settings (0: Off, 1: 50Hz, 2: 60Hz) CAM_DHotPixel 8x 01 04 56 0p FF p: Dynamic Hot Pixel www.avonic.eu...
- Page 33 8x 01 06 01 VV WW 02 01 FF DownLeft 8x 01 06 01 VV WW 01 02 FF DownRight 8x 01 06 01 VV WW 02 02 FF Stop 8x 01 06 01 VV WW 03 03 FF www.avonic.eu...
- Page 34 Center 8x 01 04 AA 01 FF Bottom 8x 01 04 AA 02 FF CAM_ColorHue Direct 8x 01 04 4F 00 00 00 p: Color Hue setting 0p FF 0h (− 14 dgrees) to Eh ( +14 degrees www.avonic.eu...
- Page 35 www.avonic.eu...
-
Page 36: Visca Query Command List
50 03 FF Manual Noise 3D CAM_Nosise2DLevel 8x 09 04 53 FF y0 50 0p FF Noise Reduction (2D) p: 0 to 5 CAM_Noise3DLevel 8x 09 04 54 FF y0 50 0p FF Noise Reduction (3D) p: 0 to 8 www.avonic.eu... - Page 37 50 01 FF 1920x1080p30 y0 50 02 FF 1280x720p60 y0 50 04 FF NTSC y0 50 05 FF NTSC y0 50 06 FF NTSC y0 50 07 FF 1920x1080p60 y0 50 08 FF 1920x1080i50 y0 50 09 FF 1920x1080p25 www.avonic.eu...
- Page 38 8x 09 04 AA FF y0 50 00 FF y0 50 01 FF Center y0 50 02 FF Bottom CAM_ColorHueInq 8x 09 04 4F FF y0 50 00 00 00 0p FF p: Color Hue setting 0h (− 14 degrees) to www.avonic.eu...
- Page 39 50 00 00 00 00 00 p: AF sensitivity ockInq 00 00 0p 0q rr 0s 0t 0u q: bit0: Picture flip(1:On, 0:Off) rr.bit6~3: Color Gain (0h(60%) to Eh(200%)) s: Flip(0: Off, 1:Flip-H, 2:Flip-V, 3:Flip-HV) t: bit2~0: NR2D level u: Gain limit www.avonic.eu...
-
Page 40: Pelco-D Protocol Command List
0x00 0x00 Query Tilt Position 0xFF Address 0x00 0x5B Value High Value Low Response Byte Byte Query Zoom Position 0xFF Address 0x00 0x55 0x00 0x00 Query Zoom Position 0xFF Address 0x00 0x5D Value High Value Low Response Byte Byte www.avonic.eu... - Page 41 Query Tilt Position 0xA0 Address 0x00 0x5B Value Value 0xAF Response High Byte Low Byte Query Zoom 0xA0 Address 0x00 0x55 0x00 0x00 0xAF Position Query Zoom 0xA0 Address 0x00 0x5D Value Value 0xAF Position High Byte Low Byte Response www.avonic.eu...
-
Page 42: Appendix C Dimensions
(Note: If the position preset 0 has been stored, the position preset 0 will be called up after initialization) Set all desired settings in the OSD by using the IR remote controller. Use Avonic PTZ Controller to control the camera. Appendix C Dimensions www.avonic.eu... - Page 43 www.avonic.eu...
Need help?
Do you have a question about the AV-CM40 and is the answer not in the manual?
Questions and answers