Table of Contents
Advertisement
Advertisement
Table of Contents

Related Manuals for Radleys Reactor-Ready


Summary of Contents for Radleys Reactor-Ready
- Page 1 August 2009 Issue 3 Instructions Reactor-Ready ™ Lab Reactor Patent Pending Your Local Distributor Radleys, Shire Hill, Saffron Walden, Essex, CB11 3AZ. United Kingdom. Tel: +44-(0)1799-513320 Fax: +44-(0)1799-513283 innovations for chemistry Email: sales@radleys.co.uk Web: www.radleys.co.uk...
-
Page 2: Table Of Contents
7. Quick Start Guide Page 7 7. Quick Start Guide - Continued Page 8 8. Set-Up & Operation - Continued 8.1 Optimising the thermal performance of Reactor-Ready 8.2 Operating temperature range 8.3 Setting up Reactor-Ready Page 9 8. Set-Up & Operation - Continued 8.4 Assembling the Manifolds... -
Page 3: Introduction
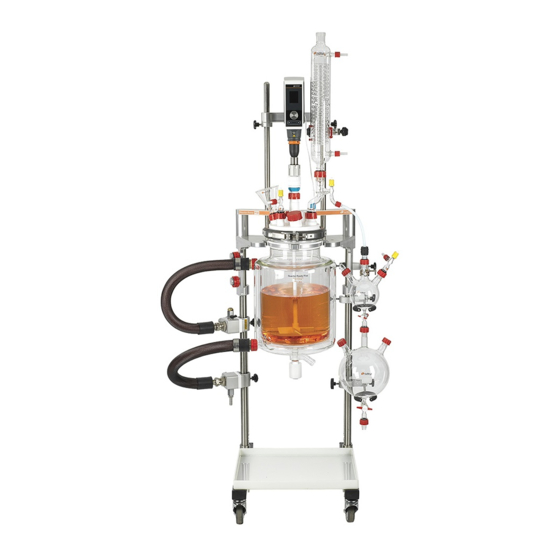
Please read this Instruction Manual thoroughly before operating your unit. 1. Introduction Reactor-Ready is a flexible benchtop reaction system incorporating a host of features around a purpose built framework, which can be used with a wide range of dedicated glass reaction vessels and accessories. Additional attachment of a thermoregulator allows a fully comprehensive range of heating and cooling operations to be performed. -
Page 4: Safety Information
• Reactor-Ready can be used with a recirculating fluid at a temperature of up to 190˚C, or down to -60°C without damage to the unit. Careful inspection of all fluid connections to Reactor-Ready should be regularly performed when operating at these temperatures. -
Page 5: Products & Accessories
• Two stainless steel vessel support collars Important: The support collar is needed for your Reactor-Ready vessel to fit in the novel quick-release clamp. Two collars are supplied with the Reactor-Ready Core System Important: Hoses to connect the Reactor-Ready framework to your thermoregulator are (RR121000), if you require more for additional vessels see details below: NOT included. -
Page 6: Component Guide
Reactor-Ready - Lab Reactor 6. Component Guide Reaction Vessel kits A. Glass Reaction Vessel with PTFE Stopcock B. PTFE Anchor Stirrer C. Sidearm Couplings (Connecting cap and connecting clip) D. Pt100 PTFE Temperature Probe E. PTFE Temperature Probe Adapter Reactor-Ready Core System... -
Page 7: Quick Start Guide
You will require a power supply for your thermoregula- tor and for your overhead stirrer. Reactor-Ready should not be moved after assembly so take care to locate it in its final position. Position the base on a flat surface. - Page 8 7.14 tightening the red (Rodaviss) screw cap fittings. 7.16 Connect the thermoregulator Inlet and Outlet hoses to the Reactor-Ready Inlet and Outlet Manifolds. The Manifolds have M24 fittings as stan- dard. Suitable adapters should be used for hoses that don’t have M24 fittings. Switch on the ther- moregulator and begin circulating fluid - to purge air from the system and fill the vessel heating jacket.
-
Page 9: Optimising The Thermal Performance Of Reactor-Ready
8.3 Setting up Reactor-Ready 8.3.1 Identify a level and clear space within your fumehood to site your Reactor-Ready assembly. Moving the assembly after set-up is not recommended so take care to plan your services and connections carefully. -
Page 10: Assembling The Manifolds
8.4.2 8.4 Assembling the Manifolds 8.4.1 Reactor-Ready features independent Inlet and Outlet Manifolds to simplify the connection between the thermoregulator and reaction vessel. The manifolds are attached to the support rods and feature precision bore slide bearings. These allow for smooth and independent vertical and horizontal adjustment, providing ultimate user flexibility in accommodating different vessel sizes. -
Page 11: Locating The Support Braces
8.5. Locating the support braces 8.5.1 8.5.1 The Reactor-Ready core includes four Safety Stop Collars that limit the downward movement of the Stirrer Support I-Brace and Vessel Support Clamp. Two collars are positioned and secured (one on each rod) under each of the two support braces. - Page 12 Reactor-Ready - Lab Reactor 8. Set-Up & Operation - Continued 8.6.2 Select the appropriate vessel for the chemistry that you 8.6.2 are performing. Position the Vessel Support Collar around the neck of the vessel so that it sits immediately below the angled section of the flange.
-
Page 13: Assembling The Vessel Lid, Stirrer Guide And Probe
Reactor-Ready - Lab Reactor 8. Set-Up & Operation - Continued 8.7. Assembling the vessel lid, stirrer guide and probe 8.7.2 8.7.1 Before attaching the lid to the reaction vessel the stirrer assembly must be mounted in the lid. 8.7.2 Position the Stirrer Guide in the central B24 lid port. Hand tighten the central red (Rodaviss) screw cap to secure. -
Page 14: Assembling The Thermofluid Hoses
Reactor-Ready - Lab Reactor 8. Set-Up & Operation - Continued 8.8.1 8.8.1 8.8 Assembling the thermofluid hoses 8.8.1 Attach one of the Quick Release Insulated Hoses to the lower Inlet Draindown Manifold by screwing the stainless female coned swivel fitting on the hose onto the stainless steel horizontal screw thread fitting on the Manifold. -
Page 15: Choosing Your Thermoregulator (Recirculator
8.10 Choosing your thermoregulator (recirculator) 8.10.1 There are a wide range of thermoregulators available, which are suitable for use with Reactor-Ready. Choice is determined by factors such as heating and cooling power over the required operating temperature range, and work space available. Careful consideration needs to be given to the performance required - fast heating and/or cooling or working at extreme temperatures will not be possible with a low powered thermoregulator. -
Page 16: Connecting The Thermoregulator
8.12.2 To enable the Reactor-Ready unit to be disconnected from the thermoregulator without draining, it is recommended that isolating valves are used between the thermoregulator hoses and Reactor-Ready. (See page 4 for details of adapters and valves.) Warning - Care must be taken to avoid pressurising the vessel jacket. -
Page 17: Draining Thermofluid From Reactor-Ready
8. Set-Up & Operation - Continued 8.16. Draining thermofluid from Reactor-Ready 8.16.1 If the reaction vessel needs to be removed from the Reactor-Ready framework for cleaning, or to replace it with another vessel, the thermofluid in the jacket must first be drained. -
Page 18: General Specifications
800rpm for short periods 10. Routine Maintenance 10.1 To maintain your Reactor-Ready system in prime condition it is important that care is taken to check all moving parts and seals regularly. 10.2 Moving parts should be kept clean and free from any obstructions or surface contamination. -
Page 19: General Information
11.3 Use of zero dead space stopcock The Reactor-Ready vessel drain valve should only be operated by hand and not with the use of tools. If the piston cannot be inserted or removed easily, do not attempt to force it. In this instance please contact your local distributor or email sales@radleys.co.uk. -
Page 20: Warranty - Fax Back
Please be sure to supply us with as much information as possible about the nature of your organisation and areas of interest. This will help us to send product information to the right people and reduce unnecessary mailings to the wrong people. Thank You. If you wish to be removed from the Radleys mail list, please tick this box.
Need help?
Do you have a question about the Reactor-Ready and is the answer not in the manual?
Questions and answers