Theben TR top2 Manual

Theben TR top2 Manual

Digital time switches with daily and weekly program
Table of Contents

Advertisement

Advertisement

Table of Contents
loading

Summary of Contents for Theben TR top2

  • Page 2: Table Of Contents

    Contents Time switch overview .......................... 5 1.1. Type TR top2 (35 mm) overview: ....................5 1.2. Type TR top3 (35 mm) overview: ....................6 Definitions ............................6 Display and operation.......................... 8 3.1. General ............................8 3.2. Operation ............................ 9 Installation information ........................10 4.1.
  • Page 3 BLE-Bluetooth OBELISK top3 ........................64 top3 app ............................... 66 Communication ............................ 66 Symbols in the app start menu......................66 Other symbols in the app ........................66 App functions............................66 Setting a project weekly program ...................... 67 Creating a new project ......................
  • Page 4 ..................... 80 Deleting switching times ......................80 Programming switching times in the graphical view (optional) ............81 Transferring switching times from the app to the time switch ........... 83 Transferring switching times from the time switch to the app ........... 86 If the transfer was successful, the view changes to edit mode and shows the switching times.
  • Page 5: 
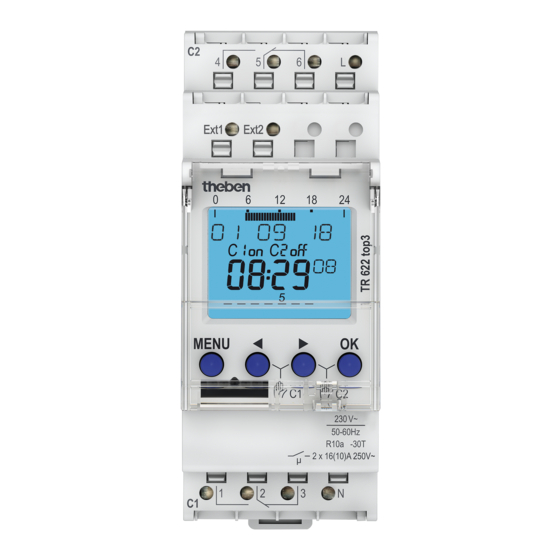
Time Switch Overview

    1. Time switch overview 1.1. Type TR top2 (35 mm) overview: TR 610 top2 TR 612 top2 TR 611 top2 TR 622 top2 TR 611 top2 RC TR 610 top2/TR 612 top2 have a smaller operating scope than the TR 611 top2/TR 622 top2:...
  • Page 6: Type Tr Top3 (35 Mm) Overview

    1.2. Type TR top3 (35 mm) overview: TR 610 top3 TR 612 top3 Functions TR 610 top3 TR 612 top3 Number of channels Switching time Pulse Cycle Random External input (number) Timer RC antenna connection Number of memory locations 2. Definitions Switching time Switching default for the time switch comprised of the time (hours + minutes), the weekday (Monday to Sunday) and the channel status (ON or OFF).
  • Page 7 OBELISK top2/ Memory card which can be inserted in the time switch. The program can be copied onto OBELISK top3 the memory card, transferred from the time switch as well as being able to read an additional language in the time switch from the memory card. The BLE OBELISK top3 function is now available for new devices from the SELEKTA top3 OBELISK top3 range.
  • Page 8: Display And Operation

    3. Display and operation 3.1. General TR top2 Page | 8...
  • Page 9: Operation

    TR top3 3.2. Operation Page | 9...
  • Page 10: Installation Information

    4. Installation information TR 611 top2/top3 TR 622 top2/top3 4.1. Information on the spring terminals  In the case of a cable the release lever for inserting the wire must be pressed downwards.  If the release does not work: Please bring the release lever all the way down (with force). If the wire can still not be pulled out ...
  • Page 11: Information On The Initial Start-Up

    The following instructions apply to the TR top2 as well as to the TR top3 serie. The only aspects in which TR top3 devices differ from TR top2 devices are the display colour and, to a minimal extent, the display layout:...
  • Page 12 Either confirm with the OK push button or modify the month (flashing) with the arrow buttons and then confirm by pressing OK. Either confirm with the OK push button or modify the day (flashing) with the arrow buttons and then confirm by pressing OK. Either confirm with the OK push button or modify the hours (flashing) with the arrow buttons and then confirm by pressing OK.
  • Page 13: Auto Mode Display

    6. Auto mode display 6.1. Explanation of the changing displays in the text line (Change approx. every 12 seconds) Change displays single channel time switch:  Base status: The text line displays the date and the bar graph the switching times for the current day. ...
  • Page 14: Segment Graph Bar Display

    6.2. Segment graph bar display  horizontal top  Help lines for 24 hours at 0 and 24 hours  Help points at 6, 12 and 18 hours  48 segment bar graph displays, one line = 30 minutes  Each bar graph display shows the programming for a specific time segment: Graph bar display 1: From 00:00:00 hours to 00:29:59 hours...
  • Page 15: Main Menu

    7. Main menu Note: The TR top3 series has a blue display. However the funktions correspond with the TR top2 series. (request the menu from the auto mode with the MENU push button) Note: Some of the steps in the submenu are not required depending on the device type.
  • Page 16: Menu: Program

    8 Menu: PROGRAM With the MENU push button request the main menu from the auto mode: Submenu PROGRAM: – QUERY – CHANGE – DELETE – END  In the devices TR 610 top2 and TR 612 top2 only switching times can be programmed. ...
  • Page 17 Press OK button. SWITCHING TIME appears on the display. (only in devices TR 611 top2, TR 622 top2 and TR 611 top2 RC). Press OK button. CHANNEL C1 appears on the display (only with the 2-channel devices). Select channel 1 with arrow push buttons ◄ and ►. Confirm channel 1 by pressing OK.
  • Page 18 With the arrow push buttons ◄ and ► select the first weekday for the switching time (Monday = Day 1) followed by confirmation with the OK push button. In order to copy the switching time to other weekdays confirm the question COPY with the OK push button.
  • Page 19 After the weekday SUNDAY, SAVE is offered again. The switch-on on Monday at 9:00 am has now been copied from Tuesday to Sunday. Confirm the programming by pressing A return is now made to NEW. The switch-off time still has to be entered. In the example: 6.30 pm In order to enter the switch-off time, the input steps, as described above, must be repeated i.e.
  • Page 20: Program Menu: Querying Switching Times

    9.2 PROGRAM menu: Querying switching times If it has to be verified whether the switching times have been correctly programmed all switching times can be queried. For example, if you wish to query the switching time for the previously programmed Friday: With the MENU push button request the main menu from the auto mode.
  • Page 21 If END is confirmed with the OK push button it is possible to return to the auto mode. Note: With the MENU push button it is possible to scroll back from all submenus into the auto mode again (ESC = Escape function) Example: Query channel 1 switch-on time for Tuesday With the MENU push button request the main menu from the auto mode.
  • Page 22 All programmed switching times are shown individually for each day. Should the switching occur on several days at the same time, the complete weekday block and the respective weekday number (Monday = 1, Tuesday = 2, etc.) flashes. If no switching time has been programmed on a weekday this day is shown with the fade-in -- : -- .
  • Page 23: Program Menu: Changing Switching Times

    Changing the time to 3:30 pm (proceed to reset the hour from 18 with the ◄ push button to 15 and confirm the change with the OK push button). The minutes do not have to be changed therefore confirm the 30 minutes with the OK push button.
  • Page 24 The first switching time to be saved is displayed. With the ► push button scroll through the saved switching times until the switching time to be changed is shown. Press OK push button (to start the change). Note: On the weekday numbers it is possible to ascertain that the switch-off time at 6:30 pm to date from Monday to Thursday (1 - 4) and on Saturday (6) and Sunday (7) is programmed.
  • Page 25: Program Menu: Deleting Switching Times

    9.4 PROGRAM menu: Deleting switching times In the PROGRAM menu the saved switching commands can be DELETED again. Example: In channel C1, the switch-off time on Monday at 9:00 am should be deleted. With the MENU push button request the main menu from the auto mode. Confirm the PROGRAM menu by pressing the OK push button.
  • Page 26: Program Menu: Pulse

    The entire switching time block (switch-on at 9:00 am from Monday to Sunday) can be deleted: DELETE BLOCK Press push button ►. It is now possible to remove Monday specifically from the block and delete it: DELETE MONDAY. Press OK button. The confirmation of the delete procedure is displayed briefly followed by an automatic return to the DELETE menu.
  • Page 27 With the ► button select the desired channel and then press OK (only for the 2-channel devices).  There is now a brief fade-in of the number of free memory locations, e.g. FREE 81) Press OK button. With the ◄ and ► push buttons enter the hour for carrying out the ON pulse (9:00 am), then press the OK push button.
  • Page 28 Press ► (scroll to the right) instead of the OK push button since the pulse should not be performed on a Saturday. Press ► (scroll to the right) since the pulse should not be performed out on a Sunday either. Press OK push button since the selection of the weekdays has been completed (the pulse should be performed on the weekdays Monday –...
  • Page 29: Program Menu: Cycle

    9.6 PROGRAM menu: CYCLE In addition to programming switching times and pulses in the case of devices TR 611 top2, TR 622 top2 and TR 611 top2 RC you can programme cyclical repetitive switchings (CYCLE) very quickly and with a reduced memory space requirement.
  • Page 30 With the MENU push button request the main menu from the auto mode. Confirm the PROGRAM menu by pressing OK. Press OK button. Press push button ► until CYCLE appears on the display and confirm with the OK push button. With the ►...
  • Page 31 Step 2: PULSE DURATION Enter the pulse duration using the ◄ und ► push buttons. To do so, select the hours for the switch-on duration (0 hours) followed by confirmation using the OK push button. Proceed to select the minutes for the switch-on duration (10 minutes) with the ◄ and ► push buttons and then confirm with the OK push button.
  • Page 32 With the ◄ and ► push buttons enter the hour for the cycle program end (5:00 pm), then press the OK push button. With the ◄ and ► push buttons enter the minutes for the cycle program end (00 minutes), then press the OK push button. Proceed to select the weekday on which the cycle program is to end.
  • Page 33: Time/Date Menu: Time

    10 Menu: TIME/DATE With the MENU push button request the main menu from the auto mode: Submenu TIME/DATE: 10.1 TIME/DATE menu: TIME Press OK button. Press OK button. Example: The time 1:21 pm should be set. Set the correct time using the ◄ and ► push buttons. To do so, set the hours followed by confirmation using the OK push button.
  • Page 34: Time/Date Menu: Date

    Now the TIME menu can be selected again (OK push button). With the ► push button it is possible to change to the other menu items in the TIME/DATE menu or to scroll to the END and return to auto mode using the OK push button.
  • Page 35: Time/Date Menu: Su-Wi

    10.3 TIME/DATE menu: SU-WI (Automatic summer/winter time changeover) On the correct date the time automatically carries out the changeover from winter to summer time and the reset from summer to winter time provided the changeover setting has been activated in the respective country.
  • Page 36 September, in a leap year 20th September) at midnight. Note: In TR top2 time switches this is set up in such a way that the timer goes forward on 22nd March (in a leap year on 21st March) from 0:00 midnight to 1:00 am and goes back on 22nd September (in a leap year on 21st September) at 1:00 am to 0:00 midnight.
  • Page 37: Time/Date Menu: Weekday

    10.4 TIME/DATE menu: WEEKDAY In the TR top2 time switches the figures 1 – 7 are used to display the weekdays. In this case it is usual that a public holiday is shown as the seventh day of the week and 1 is used for the first working day: day off = Sunday ...
  • Page 38: Time/Date Menu: Date Format

    The menu can also be exited with the MENU (ESC) push button. 10.5 TIME/DATE menu: DATE FORMAT In the TR top2 time switches the date is shown in the text line. Worldwide 3 different formats are usual for showing the date: Day.Month.Year ...
  • Page 39: Time/Date Menu: Time Format

    The menu can also be exited with the MENU (ESC) push button. 10.6 TIME/DATE menu: TIME FORMAT In the TR top2 time switches the current time is shown on the time display. Worldwide 2 different formats are usual for showing the time: - Germany, France, etc.:...
  • Page 40: Manual Menu: Permanent On/Off

    11:59 11:59 AM 12:00 12:00 NOON 12:01 12:01 PM 23:59 11:59 PM 11 Menu: MANUAL Section 6.3 describes how it is possible to exit the auto mode directly and set the manual and permanent switching. Alternatively, this can also be set through the MANUAL menu. Furthermore, additional manual switching functions are possible (different depending on the device type).
  • Page 41: Manual Menu: Manual On

    11.2 MANUAL menu: MANUAL ON Note: If HOLIDAY is active the manual switching is no longer available during this time. With the MENU push button request the main menu from the auto mode. Press the ► push button twice and confirm the MANUAL menu with the OK push button. With the ◄...
  • Page 42: Manual Menu: Holidays

    Press push button ► until TIMER appears on the display and confirm with the OK push button. With the ◄ and ► push buttons select between switch-on ON and switch- off OFF and confirm with the OK push button accordingly. Select the sequence duration (hours) with push buttons ◄...
  • Page 43 With the ◄ and ► push buttons select the desired channel and then press OK (only for the 2-channel devices). Press push button ► until HOLIDAY appears on the display and confirm with the OK push button. A direct input start occurs with ON - OFF- selection (for TR 611 top2/TR 622 top2 random 1 and random 2 can also be selected): ►...
  • Page 44: Manual Menu: Random (Only For Tr 611 Top2, Tr 622 Top2)

    can be programmed). or change with ► ► ► Notes:  As a default for the holiday end the values from the holiday start plus one hour are taken.  If the start hour is 11:00 pm the default value for the next day is taken as zero. ...
  • Page 45 Press push button ► until RANDOM appears on the display and confirm with the OK push button. Select RANDOM 1 with push button OK or with push button ► change to RANDOM 2 - confirm with the OK push button. The input is saved and the display returns to the auto mode.
  • Page 46: Menu: Options

    12 Menu: OPTIONS With the MENU push button request the main menu from the auto mode: Note: The external input is only featured for device types TR 611 top2/ TR 622 top2. 12.1 OPTIONS: OPERATING HOURS COUNTER "Operating hours" refers to the time that the relay and, therefore, the connected users are switched on (relay ON time), i.e.
  • Page 47: Options Menu: Show Operating Hours

    12.1.1 OPTIONS menu: show operating hours (OPTIONSMENUOPERATING HOURS COUNTER) Confirm by pressing OK. With the ◄ and ► push buttons select the desired channel and then press OK (only for the 2-channel devices). The respective operating hours are now displayed (max. 999 999.9 hours). Confirm the display with the OK push button.
  • Page 48: Options Menu: Operating Hours Service

    12.1.3 OPTIONS menu: Operating hours service The operating hours service is used for the improved monitoring and control of operating hours (to establish maintenance intervals). In the submenu service an hour quantity can be entered manually as well (max. 199 999 hours, typing in the figures individually respectively).
  • Page 49: Options: External Input (Only For Tr 611/622 Top2)

    12.2 OPTIONS: EXTERNAL INPUT (only for TR 611/622 top2) At the external time switch control input one switch or several push buttons per channel can be connected. Via the control input the following five functions can be requested: Permanent ON, permanent OFF, switching preselection, sequence timer and channel release (activation of the time switch).
  • Page 50: Inactive (Delivery Status)

    12.2.1 INACTIVE (delivery status) The external input has no function. If an external switch or push button is connected this can, if required, (e.g. open door day) be set to INACTIVE by software, i.e. be deactivated without having to disconnect the wire.
  • Page 51: Switch - Functions

    PUSH BUTTON - TIMER Function Confirm by pressing OK. With push button ► change to TIMER Confirm by pressing OK. With push buttons ◄ and ► an ON/OFF selection can now be made. The ON or OFF selection can be confirmed with the OK push button. Proceed to set the hours with the ►...
  • Page 52: External Input - Applications

    SWITCH - PERMANENT OFF function Confirm by pressing OK. With push button ► change to PERMANENT OFF. Confirm by pressing OK. The function of the External Input is activated. A return is now made to EXTERNAL INPUT. SWITCH - CHANNEL RELEASE function Confirm by pressing OK.
  • Page 53: External Input - Technical Information

    The manual switch-off prevents unnecessarily long ON switchings and, in the case of short ON switchings, an undesired "getting caught in the dark".  TIMER applications: The TIMER offers a wide variety of implementation options in the living and object area, e.g.
  • Page 54: Options: Language

     ALWAYS ON = background lighting is never switched off.  In the case of OFF AFTER 1 MINUTE the background lighting is switched off again 1 minute after the last time the push button was pressed. Note: In the battery mode (no mains) there is no LCD lighting. 12.4 OPTIONS: LANGUAGE In this case it is possible to change the language in the text line (per item number there are five different languages saved in the device).
  • Page 55 With the OK push button the input of the new PIN is achieved. The 4 digits are entered one after another from left to right and confirmed with the OK push button. The time switch is then immediately locked with the PIN code entered. With a push button pressed the PIN appears and the first digit can be entered.
  • Page 56: Options: Factory Settings

    Additional information: "Super PIN"  In each TR top2 time switch a super PIN code is stored individually for each device with which the time switch can be unlocked in spite of a set PIN. This super PIN specific to each device ensures that the time switch can be unlocked again if the PIN code has been forgotten.
  • Page 57: Options: Info

     Language selection (language in the delivery condition)  Date (unchanged)  Time (unchanged)  Sum-Win setting (setting as in the delivery condition)  Auto mode  The following device settings are reset to the delivery condition: Date format Time format LCD lighting Settings for the external inputs PIN is deactivated...
  • Page 58: Explanation Of The Priorities (From High To Low)

    Display1: Production year (07), week (33), designation (TR) and software version (01.23) A return is made to INFO with the OK push button. Displays 2, 3 and 4 are only visible by selecting push button ►: Press push button ► in order to access display 2 (battery hours). (in the example the time switch has run 6.3 hours on battery mode) Press push button ►...
  • Page 59: Obelisk Top2 Memory Card

     At PULSE pulse start and pulse end delete the manual switching  At CYCLE each modification to the channel status deletes the manual switching  Modification of the channel status through random switching  Permanent is activated (also via external input) ...
  • Page 60: Obelisk Menu

    however Loading OBELISK top2 with TR 611 top2 program  in TR 610 top2  is not possible  Loading OBELISK top2 with TR 610 top2 program  in another of the channels of a TR 612 top2  is not possible  ...
  • Page 61 COPYING OBELISK  TIME SWITCH continue with push button ► execute with OK START OBELISK PROGRAM (see 12.4 for description) continue with push button ► OBELISK REQUEST continue with push button ► If the OBELISK top2 is disconnected during the display of the OBELISK menu from the OBELISK interface the OBELISK menu is exited and after displaying ABORT briefly a return is made to auto mode.
  • Page 62: Start Obelisk Program

    OBELISK PROGRAM it is possible to suppress the execution of the switching commands saved in the time switch. 13.5. PC Software OBELISK top2 In the download area of the Theben homepage www.theben.de the PC software OBELISK top2 is available for download free of charge.
  • Page 63: Speech Obelisk

    If a channel program is copied from a 2-channel time switch and transferred to a single channel time switch the relevant channel must immediately be selected (see figure, blue circle). Note on the graphic programming of PULSE and CYCLE: When programming the pulse and cycle times it must be ensured that the pulse duration or pulse and pause duration are always entered on the table since otherwise "program contains errors"...
  • Page 64: What Does The Normal Obelisk Program Transfer

    A speech OBELISK only contains one language.  If a speech OBELISK is inserted in TR top2 time switch the OBELISK menu appears. The recommended menu items are now COPY OBELISK  TIME SWITCH and END. In all other cases OBELISK ERROR is displayed.
  • Page 65 Press a button to switch the clock back from auto mode to "BLUETOOTH". If a correct BLE connection code is received whilst the "BLUETOOTH" display is active, "BLUETOOTH ACTIVE" stays displayed. If the OK button is pressed in the OBELISK menu whilst the BLUETOOTH display is active, CONNECT BLUETOOTH appears and the system waits for a connection telegram from a BLE node.
  • Page 66: Top3 App

    The new top3 generation of Theben devices can be programmed and controlled from mobile end devices (smartphones and tablets) via an app. As well as transferring switching programs, you can also send direct switch and configuration commands to the device.
  • Page 67: Setting A Project Weekly Program

     Read out operating hours Setting a project weekly program A project always consists of a program (e.g. Monday to Friday, 8:00 AM ON and 8:00 PM OFF) and device settings. All data (program + device settings = project) can be transferred simultaneously. It is also possible to transfer just the program or just the settings.
  • Page 68: Creating A New Project

     First day of the week Monday Tuesday Wednesday Thursday Friday Saturday Sunday  Summer/winter rule Without summer/winter Europe Europe West Europe East Canada IRAN Free rule Fixed date  Holidays Not active  Hour counter Service interval  LCD lighting Off after 1 minute Always on Creating a new project...
  • Page 69: Editing Existing Projects On The Mobile Device

     TR 610 top3 – weekly program (1 channel)  TR 612 top3 – weekly program (2 channels) Depending on the device type selected, you can then define a weekly program, for example. Once you have made the required settings, the project is saved in the archive under a project name and can be transferred to the time switch over Bluetooth.
  • Page 70: Duplicating Existing Projects On The Mobile Device

    Duplicating existing projects on the mobile device You can duplicate an existing project in the archive (save it under a new project name). You can edit the duplicated project without overwriting the original project. Transferring an existing project from the mobile device to the time switch ...
  • Page 71: Sending Projects From The Mobile Device Via E-Mail

    After that, you can archive the project file on a PC, for instance, or edit it in the OBELISK PC software. The project file must be saved in the OT2 format specific to Theben for this to work. Theben AG will provide the OT2 file format specification.
  • Page 72: Sending The Time And Date To The Time Switch

    Sending the time and date to the time switch You can use this app function to correct or modify the time switch time over Bluetooth. There are two ways of doing this: 1. The mobile device time and date (system time) are transferred to the time switch. DD/MM/YYYY –...
  • Page 73: Entering/Deleting The Holiday Program

    If permanent switching is deactivated, the time switch executes the programmed switching program again. Entering/deleting the holiday program You can use this function to manually enter or delete the holiday program. A holiday program is active for a specific date range and is defined using the parameters below. ...
  • Page 74: Language

     First day of the week  Vibration/system tones  Help  Info Language You can select one of the following languages for the app user interface:  German  English  French  Italian  Spanish  Portuguese  Dutch ...
  • Page 75: Vibration/System Tones

    The app vibrates or emits tones to give the user feedback (e.g. data transferred successfully, no Bluetooth device found). If the user does not want any feedback, it can be deactivated. Help This section provides links to the relevant online guides on the Theben website. Info App-specific data is displayed: ...
  • Page 76 If a device is selected in the list, an image of the device appears in the selection window. Tap the "Cancel" button to go back to the home screen. Tap the "OK" button to go to the programming view. Tap the "Info" icon to display more details about the device. Page | 76...
  • Page 77: Programming Switching Times In The List View (See Also

    Programming switching times in the list view (see also page 66) In the list view, all existing switching times are shown in list format. Description: The list view displays the most important data relating to switching times (type > ON/OFF, switching time, week days when the switching time applies). Tap a switching time to go to editing mode (for editing a switching time).
  • Page 78 Enter the parameters (type, time, week day). The switching time can be entered either via the time picker or directly using the number pad. Page | 78...
  • Page 79: Copying Switching Times

    Copying switching times You can use the "Copy" icon to copy one or more switching times from the list. A selection box appears to the left of every switching time in the list, as does a "Select all" field above the list (which is used to select all switching times in the list).
  • Page 80: Deleting Switching Times

    Deleting switching times You can use the "Delete" icon to delete one or more switching times from the list. A dustbin symbol appears to the left of every switching time in the list, as does a "Delete all" field above the list (which is used to delete all switching times from the list).
  • Page 81: Programming Switching Times In The Graphical View (Optional)

    Programming switching times in the graphical view (optional) It is possible to define switching times by touching a graphical user interface. Example: Mon - Fri, 8:00 AM - 2:00 PM each day Sat and Sun, 6:30 AM - 12:00 PM With graphical programming, you can touch the screen to set the switching times for each channel in a grid.
  • Page 82 Page | 82...
  • Page 83: Transferring Switching Times From The App To The Time Switch

    Transferring switching times from the app to the time switch Tap the orange arrow symbol to start a transfer and search for all devices available over BLE in the vicinity. All the devices found appear in a list (devices with a Bluetooth dongle inserted). The device type and serial number (with the last four digits in bold) are displayed.
  • Page 84 Tip: Load the device project onto your smartphone/tablet first. You then have the correct device automatically. If the device type matches, the connection is established and the program (switching times) or project is transferred. Page | 84...
  • Page 85 Page | 85...
  • Page 86: Transferring Switching Times From The Time Switch To The App

    Transferring switching times from the time switch to the app You can export a project from a device to the app via the "Receive data" menu item. The app searches for all devices available over Bluetooth in the vicinity and displays them in a list. After selecting the required device, the connection is established and the project is transferred from the time switch to the app.
  • Page 87: If The Transfer Was Successful, The View Changes To Edit Mode And Shows The Switching Times

    If the transfer was faulty, you can try again or close the dialogue box. If the transfer was successful, the view changes to edit mode and shows the switching times. Accessing the time switch directly As well as transferring projects, it is also possible to send direct switch and data commands to the device over Bluetooth.
  • Page 88: Example Of App Usage

    You can now send various direct commands to the device from the overview screen. Example of app usage Goal: A TR 612 top3 time switch with a weekly program is to be programmed so an automatic coffee maker switches on in the morning and off again in the evening. 1) Tap the "+"...
  • Page 89 2) Back in the start menu, you can change or create the name. To do this, select the required project by tapping the pencil symbol. 3) Now tap the project to go to the settings. The required weekly and switching times can be set roughly in the menu that opens.
  • Page 90 5) Insert the Bluetooth OBELISK top3 into the time switch. "Bluetooth" appears on the display, along with the four-digit serial number of the time switch. 6) Pairing: once the program has been defined, the app now has to be connected to the time switch. Tap the "Send function"...
  • Page 91: General Application Examples

    14 General application examples Pause signals In schools, offices and production halls pause signals govern the smooth sequence of the class and working times. With the pulse program in the TR 611 top2 the times can, if required, be accurately set individually to the second.
  • Page 92: Technical Data

    Solution: Do not set ANY PIN. If the PIN number has been forgotten contact the Theben hotline. Return to the auto mode using the ESC push button (see pages 51-52) Problem/fault "When OBELISK top2 is inserted, the two left-hand push buttons do not behaviour: operate."...
  • Page 93: Service Address / Hotline

    20 min. Solution: In the MANUAL menu end the RANDOM function (see page 42) Service address / hotline Service address Theben AG Hohenbergstr. 32 72401 Haigerloch Germany Tel.: +49 74 74/6 92-0 Fax: +49 74 74/6 92-150 Hotline Tel.: +49 74 74/6 92-369...

This manual is also suitable for:

Tr top3Tr top2 seriesTr top3 seriesTr 610 top2Tr 611 top2Tr 622 top2 ... Show all

Table of Contents