
Related Manuals for EcoQuest Living Air Classic HEPA


Summary of Contents for EcoQuest Living Air Classic HEPA
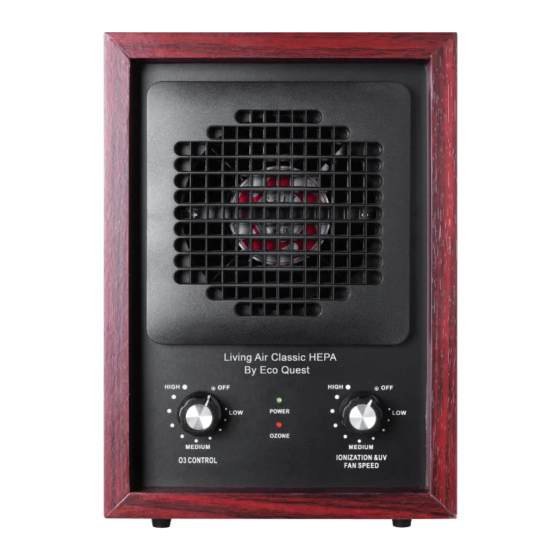
- Page 1 Living Air Classic HEPA By EcoQuest 6 Stages AIR PURIFIER INSTRUCTION MANUAL CAUTION: Read manual carefully for proper installation and proper operation.
-
Page 2: Table Of Contents
CONTENTS 1. Specifications…………………………………. ………………………………1 2. Introduction……………………………………………………….………………. 2 3. Features…………………………………………………………….…………….. 2 4. Applications…………………………………………………………….……………2 5. Installation……………………………………………………………….…………3 6. Back cover & Filter Removal……….. ………………………………….………… 3 7. Placing The Unit……………………………………………………….…………. 4 8. Settings And Adjustments…………………………………………….……………4 9. Maintenance………………………………………………………….…………… 5 10. Fan Blade And Front Grill…………………………………………………………5 11. -
Page 3: Specifications
1. Features: Specifications: • Negative Ion Generation Model: Living Air Classic HEPA Technology Rated Voltage: 110-120V/60Hz • Adjustable Ozone Generation • Activated carbon Deodorization Power Consumption: • UVC bulb & Photo-catalytic filter Fan Speed (non-grade): 1500-3000R/M to kill virus and bacteria ≥5 x 10... -
Page 4: Introduction
2. INTRODUCTION This air purifier reproduces the natural environment outdoors. It is not designed to create an artificial fresh environment, but rather make the indoor air purified as natural clean air through circulated purification, disinfection and sterilization to increase anion and ozone. 3. -
Page 5: Installation
5. INSTALLATION 1).Remove unit from shipping carton. 2).Remove all protective materials. 3).Check for shipping damage and loose or broken parts. 4).Read Owner’s Manual thoroughly prior to installation. 5).Fully insert cord into the power cord receptacle on the back of the unit. 6). -
Page 6: Placing The Unit
7. PLACING THE UNIT In order to maximize the purification function, the unit should be placed as higher as possible, or base something in the unit bottom to make the air blast window tilting upward so as to better oxidize and purify the floating bacteria and smog pollutants. -
Page 7: Maintenance
8.2 OZONE CONTROL. The ozone control can turn on, turn off or adjust ozone function without degrees. Keeping in mind the previous statement, adjust the purifier so that the odor of ozone fades into the environment after 15-30 seconds. ... -
Page 8: Replacing The Fuse
Then take front gill away in parallel. Reinstall After clean, first step put top latch of front grill in front panel slot then turn over down and push bottom latch of front grill in front parallel slot. Wipe off fan blade and front grill (if dirty) with damp washcloth. The fan requires no maintenance (with the exception of the first time it is used, when it may be necessary to give it a gentle push to get it started). -
Page 9: Troubleshooting
Troubleshooting - What to look for first. 1. I have plugged in the unit, turned the power switch to "On" and nothing happens. What's wrong? Make sure the electrical outlet is capable of providing power to the unit. Check the back cover located at the back of the unit to ensure that the safety switch activator clip is suppressed to get the power on. -
Page 10: Warranty Information
5. Unit does not operate Is the unit plugged in? Is the power cord fully inserted into the back of the unit? Are you sure the outlet is functioning normally? Is the unit turned on? Is the back grill installed properly to depress the safety switch forward? 6.
Need help?
Do you have a question about the Living Air Classic HEPA and is the answer not in the manual?
Questions and answers