Moog Curlin 6000 Series Clinician Instructions
Ambulatory infusion pump
Hide thumbs
Also See for Curlin 6000 Series:
- User manual ,
- Patient manual (12 pages) ,
- Worksheet (2 pages)

Related Manuals for Moog Curlin 6000 Series


Summary of Contents for Moog Curlin 6000 Series
- Page 1 MOOG Medical Devices Group Curlin 6000 Series ™ Ambulatory Infusion Pump CLINICIAN INSTRUCTIONS GETTING STARTED...
- Page 2 CAUTION: Previous RX must be cleared from the pump prior to new patient use. Refer to the “CURLIN 6000 TRAINING & QUICK REFERENCE GUIDE FOR BETWEEN PATIENT USE” (Contact Customer Service for information). INSTALLING/CHANGING THE BATTERIES 1. PAUSE the pump. 2.
- Page 3 PRIMING THE SET CAUTION: Disconnect set from patient’s access site before priming. NOTE: Review program settings prior to priming. NOTE: Filters must be primed in the upright position (do not invert). Refer to Instructions for Use in set package. BY GRAVITY: NOTE: To remove air from IV bag, turn bag upside down after attaching the set and gently squeeze bag while priming until air is eliminated from the bag.
- Page 4 MOOG Medical Devices Group Curlin 6000 Series ™ Ambulatory Infusion Pump CLINICIAN INSTRUCTIONS PROGRAMMING...
- Page 5 PROGRAMMING A CONTINUOUS THERAPY USING MANUAL PROGRAM MODE NOTE: When operating the pump on battery power, the LCD screen dims after a period of time to conserve battery power. Any keypress will illuminate the screen. NOTE: Use the UP/DOWN ARROW keys to move highlighter. Use the numeric keys for data entry. 1.
- Page 6 PROGRAMMING A CONTINUOUS THERAPY USING PROTOCOL LIBRARY MODE NOTE: When operating the pump on battery power, the LCD screen dims after a period of time to conserve battery power. Any keypress will illuminate the screen. NOTE: Use the UP/DOWN ARROW keys to move highlighter. Use the numeric keys for data entry. 1.
- Page 7 “RUN TO START” SCREEN 1. Press the NO key to review the program and/or change the RX (see CHANGING THE RX section for instructions). 2. Press the OPTIONS Key to review or change desired pump settings (see OPTIONS section for instructions).
- Page 8 OPTIONS FOR CONTINUOUS THERAPY NOTE: Press YES at each field to advance to the next field. Pressing YES to ACCEPT OPT at the end of the menu is mandatory to confirm all changes made in the OPTIONS menu. Lock: This is the security level setting. Press YES to accept or NO to change Lock Setting. Enter access code if prompted.
- Page 9 PROGRAMMING AN INTERMITTENT THERAPY USING MANUAL PROGRAM MODE NOTE: When operating the pump on battery power, the LCD screen dims after a period of time to conserve battery power. Any keypress will illuminate the screen. NOTE: Use the UP/DOWN ARROW keys to move highlighter. Use the numeric keys for data entry. 1.
- Page 10 PROGRAMMING AN INTERMITTENT THERAPY USING PROTOCOL LIBRARY MODE NOTE: When operating the pump on battery power, the LCD screen dims after a period of time to conserve battery power. Any keypress will illuminate the screen. NOTE: Use the UP/DOWN ARROW keys to move highlighter. Use the numeric keys for data entry. 1.
- Page 11 “RUN TO START” SCREEN 1. Press the NO key to review the program and/or change the RX (see CHANGING THE RX section for instructions). 2. Press the OPTIONS Key to review or change desired pump settings (see OPTIONS section for instructions).
- Page 12 OPTIONS FOR INTERMITTENT THERAPY NOTE: Press YES at each field to advance to the next field. Pressing YES to ACCEPT OPT at the end of the menu is mandatory to confirm all changes made in the OPTIONS menu. Lock: This is the security level setting. Press YES to accept or NO to change Lock Setting. Enter access code if prompted.
- Page 13 PROGRAMMING A PCA THERAPY USING MANUAL PROGRAM MODE NOTE: When operating the pump on battery power, the LCD screen dims after a period of time to conserve battery power. Any keypress will illuminate the screen. NOTE: Use the UP/DOWN ARROW keys to move highlighter. Use the numeric keys for data entry. 1.
- Page 14 PROGRAMMING A PCA THERAPY USING PROTOCOL LIBRARY MODE NOTE: When operating the pump on battery power, the LCD screen dims after a period of time to conserve battery power. Any keypress will illuminate the screen. NOTE: Use the UP/DOWN ARROW keys to move highlighter. Use the numeric keys for data entry. 1.
- Page 15 “RUN TO START” SCREEN 1. Press the NO key to review the program and/or change the RX (see CHANGING THE RX section for instructions). 2. Press the OPTIONS Key to review or change desired pump settings (see OPTIONS section for instructions).
- Page 16 OPTIONS FOR PCA THERAPY NOTE: Press YES at each field to advance to the next field. Pressing YES to ACCEPT OPT at the end of the menu is mandatory to confirm all changes made in the OPTIONS menu. Lock: This is the security level setting. Press YES to accept or NO to change Lock Setting. Enter access code if prompted.
- Page 17 PROGRAMMING A TPN THERAPY USING MANUAL PROGRAM MODE NOTE: When operating the pump on battery power, the LCD screen dims after a period of time to conserve battery power. Any keypress will illuminate the screen. NOTE: Use the UP/DOWN ARROW keys to move highlighter. Use the numeric keys for data entry. 1.
- Page 18 PROGRAMMING A TPN THERAPY USING PROTOCOL LIBRARY MODE NOTE: When operating the pump on battery power, the LCD screen dims after a period of time to conserve battery power. Any keypress will illuminate the screen. NOTE: Use the UP/DOWN ARROW keys to move highlighter. Use the numeric keys for data entry. 1.
- Page 19 CHANGING THE RX (BAG VOL, Vol TBI, INF RATE, UP Ramp, DN Ramp, TOT TIME, KVO) 1. Press the PAUSE key. 2. Press YES to RESUME. 3. Press NO to review. 4. Press YES to each field until the value to change is reached. 5.
- Page 20 PROGRAMMING A VARIABLE THERAPY USING MANUAL PROGRAM MODE NOTE: When operating the pump on battery power, the LCD screen dims after a period of time to conserve battery power. Any keypress will illuminate the screen. NOTE: Use the UP/DOWN ARROW keys to move highlighter. Use the numeric keys for data entry. 1.
- Page 21 PROGRAMMING A VARIABLE THERAPY USING PROTOCOL LIBRARY MODE NOTE: When operating the pump on battery power, the LCD screen dims after a period of time to conserve battery power. Any keypress will illuminate the screen. NOTE: Use the UP/DOWN ARROW keys to move highlighter. Use the numeric keys for data entry. 1.
- Page 22 “RUN TO START” SCREEN 1. Press the NO key to review the program and/or change the RX (see CHANGING THE RX section for instructions). 2. Press the OPTIONS Key to review or change desired pump settings (see OPTIONS section for instructions).
- Page 23 OPTIONS FOR VARIABLE THERAPY NOTE: Press YES at each field to advance to the next field. Pressing YES to ACCEPT OPT at the end of the menu is mandatory to confirm all changes made in the OPTIONS menu. Lock: This is the security level setting. Press YES to accept or NO to change Lock Setting. Enter access code if prompted.
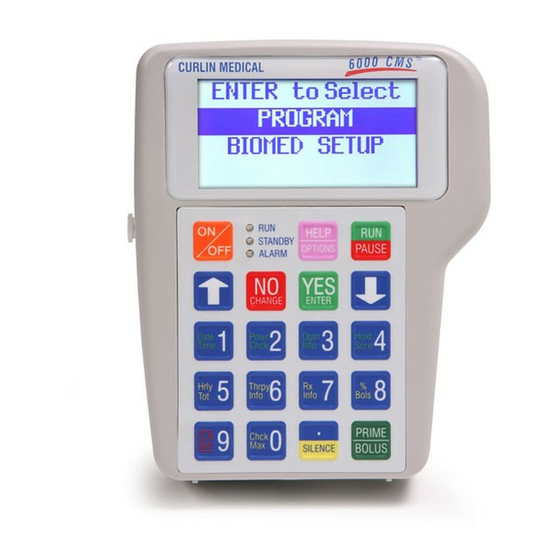
- Page 24 MOOG Medical Devices Group Curlin 6000 Series ™ Ambulatory Infusion Pump CLINICIAN INSTRUCTIONS KEYPAD & FUNCTIONS...
- Page 25 KEYPAD FUNCTION ON/OFF: Used to turn the pump on and off. When the pump is running, however, the PAUSE key must be used to stop the infusion first and then the OFF key can be pressed to turn the pump off. This requirement prevents the interruption of an infusion by a single accidental press of the OFF key.
- Page 26 Note: The Moog Curlin Infusion pump requires confirmation to each entry to move to the next field or screen. HELP/OPTIONS: Used to request a help screen when the pump is paused or at the “Infusion Complete” screen. Help screens correspond to words in the highlight bar. Use the UP/DOWN ARROW keys to highlight the selection needing HELP.
- Page 27 IOD FUNCTION FOR PCA THERAPY ONLY: 5. Hourly Total (HrlyTot): The information displayed here includes the hourly Total Infused (amount), the number of Bolus Given (BG) and the number of Bolus Attempted (BA) for up to 24 previous hours. The user can scroll up or down the screen to view the hourly infusion data by using the UP/DN ARROW keys.
- Page 28 MOOG Medical Devices Group Curlin 6000 Series ™ Ambulatory Infusion Pump CLINICIAN INSTRUCTIONS TROUBLESHOOTING...
- Page 29 TROUBLESHOOTING: NOTE: For all alarms except “INFUSION COMPLETE”, follow these instructions before proceeding to the RESOLUTION section below: To silence and exit Alarm/Alert screens, press the PAUSE key, press YES to RESUME, then resolve the alarm. When ready to resume the infusion, press RUN to start the infusion. LCD DISPLAY/RESOLUTION/POSSIBLE CAUSES Press PAUSE, attach new solution container, highlight REPEAT RX and press YES.
- Page 30 REFER TO USER’S MANUAL FOR DETAILED INSTRUCTIONS Clinical Support 1-800-970-2337 www.moog.com/medical Moog is a registered trademark of Moog, Inc. All trademarks indicated herein are the property of Moog, Inc. and/or its subsidiaries. © 2016 Moog, Inc. All rights reserved. MD 58386 Rev. B TROUBLESHOOTING...
Need help?
Do you have a question about the Curlin 6000 Series and is the answer not in the manual?
Questions and answers