Table of Contents
Advertisement
Operation, Parts, Repair
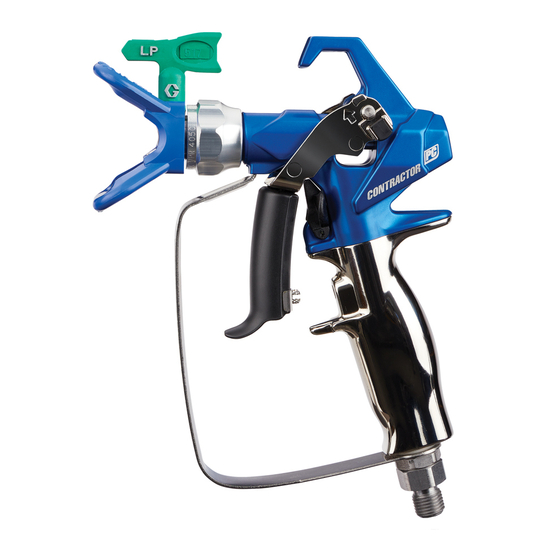
Contractor PC Spray Guns
For the application of architectural paints and coatings. For professional use
only.
3600 psi (24.8 MPa, 248 bar) Maximum Working Pressure
See page 2 for additional model information.
Important Safety Instructions
Read all warnings and instructions in this manual. Refer to your sprayer instruction
manual for Pressure Relief, priming and spray instructions. Save these instructions.
Important Medical Information
Read the medical alert card provided with the gun. It contains injection injury treatment
information for a doctor. Keep it with you when operating the equipment.
3A6285D
II 2 G Ex h IIB T6 Gb
EN
Advertisement
Table of Contents

Related Manuals for Graco Contractor PC


Summary of Contents for Graco Contractor PC
- Page 1 Operation, Parts, Repair 3A6285D Contractor PC Spray Guns For the application of architectural paints and coatings. For professional use only. 3600 psi (24.8 MPa, 248 bar) Maximum Working Pressure See page 2 for additional model information. Important Safety Instructions Read all warnings and instructions in this manual. Refer to your sprayer instruction manual for Pressure Relief, priming and spray instructions.
-
Page 2: Table Of Contents
Graco Standard Warranty ........ -
Page 3: Warnings
Warnings Warnings The following warnings are for the setup, use, grounding, maintenance, and repair of this equipment. The exclamation point symbol alerts you to a general warning and the hazard symbols refer to procedure-specific risks. When these symbols appear in the body of this manual or on warning labels, refer back to these Warnings. - Page 4 Do not kink or over-bend the hose. • Do not expose the hose to temperatures or to pressures in excess of those specified by Graco. • Do not use the hose as a strength member to pull or lift the equipment.
-
Page 5: Setup
Setup Setup Engage the trigger lock. If you suspect the spray tip or hose is clogged or that pressure has not been Pressure Relief Procedure fully relieved: Follow the Pressure Relief VERY SLOWLY loosen the tip Procedure whenever you see this guard retaining nut or the hose end symbol. -
Page 6: Trigger Adjustment
Setup Trigger Adjustment NOTE: If trigger is too difficult to slide, use a flat blade screwdriver to slide it down and The trigger can be adjusted to different apply grease to the location shown. lengths depending upon user preference. Relieve pressure. See Pressure Relief Procedure, page 5. -
Page 7: Install Tip And Tip Guard On Gun
Setup Install Tip and Tip Guard Verify spray tip and tip guard parts are assembled in the order shown. on Gun SPRAY (26) (24) RUBBER GASKET/METAL SEAL To avoid serious injury from skin injection do not put your hand in front of the spray tip GUARD (25) when installing or removing the spray tip... -
Page 8: Operation
Operation Operation Clear Spray Tip Clog In the event that particles or debris clog the spray tip, this gun is designed with a reversible spray tip that quickly and easily clears the particles without disassembling the Aligning Spray sprayer. Engage trigger lock (15). Rotate spray tip (26) to unclog position. -
Page 9: Parts
Parts Parts ti34245a Ref. Part Description Ref. Part Description 17Y466 TRIGGER, assy includes 17X496 HOUSING, assy 11, 12, 13a, 13b, 13c, 13d Includes 15, 16 TRIGGER, upper 17Y297 KIT, repair, cartridge, TRIGGER, lower includes 2a, 2b KNOB, adjustment 17W752 PACKING, o-ring CLIP, trigger 16H931 PACKING, o-ring 17Z690 TRIGGER, repair includes... -
Page 10: Tip And Guard
GUARD, RAC X 26† TIP, spray † For a list of all available tip sizes, talk to LTX517 TIP, spray 517, RAC X your local distributor or visit Models: 17Y042, www.graco.com. 17Y044, 826252 LTX515 TIP, spray 515, RAC X Model: 17Z644 3A6285D... -
Page 11: Maintenance
Maintenance Maintenance 6. Remove filter (8) through top of handle (10). 7. Clean filter (8). Use a soft brush to loosen and remove excess debris. To avoid injury always read all warnings in 8. Inspect filter (8) for damage to the this manual and the sprayer manual, filter mesh. -
Page 12: Cleaning Cartridge
Maintenance Cleaning Cartridge 4. Rinse out with hot running water, use a soft brush to clean out the This procedure is not considered routine internal passage of the cartridge maintenance. Perform only when there is a loss in performance that cannot be fixed by (2). -
Page 13: Repair/Replacement
Repair/Replacement Repair/Replacement 6. Unscrew cartridge (2) from front of gun (1). To avoid injury always read all warnings in this manual and the sprayer manual, before performing any repairs on the gun. Replacing Cartridge 1. Relieve pressure. See Pressure Relief Procedure, page 5. 2. -
Page 14: Aligning Handle
Repair/Replacement Aligning Handle 8. Install new cartridge (2) into the gun and tighten until it fully bottoms out. If when tightened securely, handle no There should be no gap in the longer matches up with housing, realign indicated area below (a). handle. -
Page 15: Technical Specifications
3A6309 Slovenian 3A6296 Portuguese 3A6310 Romanian 3A6297 Danish 3A6311 Bulgarian 3A6298 Finnish 3A6312 Chinese 3A6299 Swedish 3A6313 Japanese 3A6300 Norwegian 3A6314 Korean 3A6301 Russian 3A6318 German 3A6302 Estonian Translated manuals can be requested through a distributor or at www.graco.com. 3A6285D... -
Page 16: Graco Standard Warranty
With the exception of any special, extended, or limited warranty published by Graco, Graco will, for a period of twelve months from the date of sale, repair or replace any part of the equipment determined by Graco to be defective. This warranty applies only when the equipment is installed, operated and maintained in accordance with Graco’s written recommendations.
Need help?
Do you have a question about the Contractor PC and is the answer not in the manual?
Questions and answers
what is the designation PC on airless sprayer
The designation "PC" on the Graco Contractor PC airless sprayer stands for "ProConnect," which refers to a feature that allows fast on-the-job pump or gun rebuilds, enhancing ease of maintenance and reducing downtime.
This answer is automatically generated