Advertisement

Quick Links

Instructions, Parts
Contractor
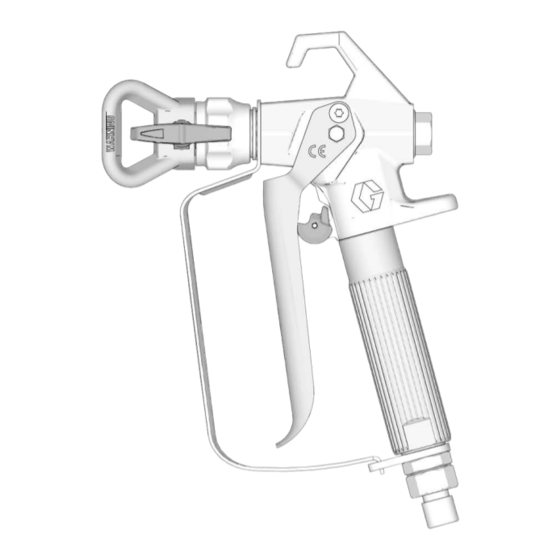
For the application of architectural paints and coatings. For professional use only.
3600 psi (24.8 MPa, 248 bar) Maximum Working Pressure
See page 3 for additional model information.
Important Safety Instructions
Read all warnings and instructions in this manual. Refer to your sprayer instruction
manual for Pressure Relief, priming and spray instructions. Save these instructions.
Important Medical Information
Read the medical alert card provided with the gun. It contains injection injury
treatment information for a doctor. Keep it with you when operating the equipment.
®
and FTx
FTx Gun
II 2 G EX h IIA T6 GB
®
Spray Guns
Contractor Gun
311861R
EN

Advertisement

Table of Contents
loading

Summary of Contents for Graco Contractor

  • Page 1 Important Medical Information Read the medical alert card provided with the gun. It contains injection injury treatment information for a doctor. Keep it with you when operating the equipment. Contractor Gun FTx Gun II 2 G EX h IIA T6 GB...
  • Page 2: Table Of Contents

    Graco Standard Warranty ........
  • Page 3: Models

    Models Models Contractor Gun Models Part No. Tip(s) Guard Filter Language Manuals Included 288420 LTX517 RAC X 60 Mesh English, Spanish, French 288421 517 RAC5 RAC 5 60 Mesh English, Spanish, French 288425 LTX517 RAC X 60 Mesh English, Spanish, French...
  • Page 4: Warnings

    Warnings Warnings The following warnings are for the setup, use, grounding, maintenance, and repair of this equipment. The exclamation point symbol alerts you to a general warning and the hazard symbols refer to procedure-specific risks. When these symbols appear in the body of this manual or on warning labels, refer back to these Warnings.
  • Page 5 Do not kink or over-bend the hose. • Do not expose the hose to temperatures or to pressures in excess of those specified by Graco. • Do not use the hose as a strength member to pull or lift the equipment.
  • Page 6: Grounding

    Grounding Grounding Ground Metal Pails: Connect a ground wire to the pail by clamping one end to the pail and the other end to a ground such as a water pipe. The equipment must be grounded to reduce the risk of static sparking. Static sparking can cause fumes to ignite or explode.
  • Page 7: Setup

    Setup Setup Pressure Relief Procedure 6. Engage the trigger lock. 7. If you suspect the spray tip or hose Follow the Pressure Relief is clogged or that pressure has not Procedure whenever you see this been fully relieved: symbol. a. VERY SLOWLY loosen the tip guard retaining nut or the hose end coupling to relieve pressure gradually.
  • Page 8: Install Tip And Tip Guard On Gun

    Setup Install Tip and Tip Guard 4. Insert tip (26) in guard (25). on Gun 5. Verify spray tip and tip guard parts are assembled in the order shown. To avoid serious injury from skin injection do not put your hand in front of the spray tip when installing or removing the spray tip and tip guard.
  • Page 9: Operation

    Operation Operation Clear Spray Tip Clog In the event that particles or debris clog the spray tip, this gun is designed with a reversible spray tip that quickly and easily clears the particles without Aligning Spray disassembling the sprayer. 1. Engage trigger lock (2). 1.
  • Page 10: Parts

    Parts Parts Ref. Part Description Ref. Part Description 13b 15J768 TRIGGER, Contractor Gun, 288812 HOUSING, assy., Contractor 4-finger 289914 HOUSING, assy., FTX 13c 15J769 TRIGGER, FTX Gun, 4-finger 287032 FILTER, 60 mesh 117602 SCREW, shoulder, pan hd 287033 FILTER, 100 mesh...
  • Page 11: Tip And Guard

    TIP, spray 515, RAC 5 286517 TIP, 517, RAC 5 † For a list of all available tip sizes, talk to your PAA517 TIP, spray, latex, RAC X local distributor or visit www.graco.com. (517), Europe PAA515 TIP, spray, latex, RAC X (515), Europe 311861R...
  • Page 12: Maintenance

    Maintenance Maintenance 4. Unscrew handle (7) from gun (1). To avoid serious injury from skin injection, follow the Pressure Relief Proceedure before perfroming any maintenance on the gun. Cleaning/Replacing Filter A plugged filter reduces gun performance. Clean filter after each use. 1.
  • Page 13: Repair/Replacement

    Repair/Replacement Repair/Replacement 9. Guide new needle (15b) through front of gun (1) making sure the flat sides (a) of the needle assembly face the sides of gun housing. To avoid serious injury from skin injection, 10. Install diffuser (15a). Torque dif- follow the Pressure Relief Proceedure fuser to 26-30 ft-lbs before repairing the gun.
  • Page 14: Technical Specifications

    312284 Slovenian 312271 Portuguese 312285 Romanian 312272 Danish 312286 Bulgarian 312273 Finnish 312287 Chinese 312274 Swedish 312288 Japanese 312275 Norwegian 312289 Korean 312276 Russian 312266 German 312277 Estonian Translated manuals can be requested through a distributor or at www.graco.com. 311861R...
  • Page 15: Graco Standard Warranty

    With the exception of any special, extended, or limited warranty published by Graco, Graco will, for a period of twelve months from the date of sale, repair or replace any part of the equipment determined by Graco to be defective. This warranty applies only when the equipment is installed, operated and maintained in accordance with Graco’s written recommendations.
  • Page 16: Graco Information

    For the latest information about Graco products, visit www.graco.com. For patent information, see www.graco.com/patents. TO PLACE AN ORDER, contact your Graco distributor or call 1-800-690-2894 to identify the nearest distributor. All written and visual data contained in this document reflects the latest product information available at the time of publication.

Table of Contents