Advertisement
Quick Links
1
I n s t r u c t i o n M a n u a l
Sr. Pan Tilt Head
(PT-SR)
All rights reserved
No part of this document may be reproduced, stored in a retrieval system, or transmitted by any form or by any means,
electronic, mechanical, photocopying, recording, or otherwise, except as may be expressly permitted by the applicable copyright
statutes or in writing by the publisher.
Advertisement

Related Manuals for PROAIM Sr. Pan Tilt Head


Summary of Contents for PROAIM Sr. Pan Tilt Head
- Page 1 I n s t r u c t i o n M a n u a l Sr. Pan Tilt Head (PT-SR) All rights reserved No part of this document may be reproduced, stored in a retrieval system, or transmitted by any form or by any means, electronic, mechanical, photocopying, recording, or otherwise, except as may be expressly permitted by the applicable copyright statutes or in writing by the publisher.
-
Page 2: Table Of Contents
At Proaim, our goal is to ensure 100% Customer Satisfaction in all that we do. We back our sales with a 1 year warranty from the date of purchase and work hard to resolve any problems in the unlikely event one should arise. -
Page 3: Foreword
Proaim family. By purchasing your Sr. Pan Tilt Head, you have just joined a host of designers, engineers, machinists, assembly, customer service and office staff that take great pride in all that they do. -
Page 4: Introduction
Introduction The combination of remote head and crane is highly helpful in achieving this goal. But if you directly mount the camera on the crane, it will restrict the movement of the camera and narrow the creative possibilities. The specially designed 2-Axis Junior Pan Tilt Head allows unrestricted 360°... -
Page 5: Safety Hints
Safety Hints ATTENTION: PLEASE READ THIS BEFORE USING TO PREVENT DAMAGE TO HEAD! APPROPRIATELY MOUNT THE HEAD The head must be attached securely with all knobs properly tightened, to avoid harm both to the equipment and crew. ALWAYS ESTABLISH THE CORRECT BALANCE If the camera is out of balance, both axis will not work. -
Page 6: Assembling
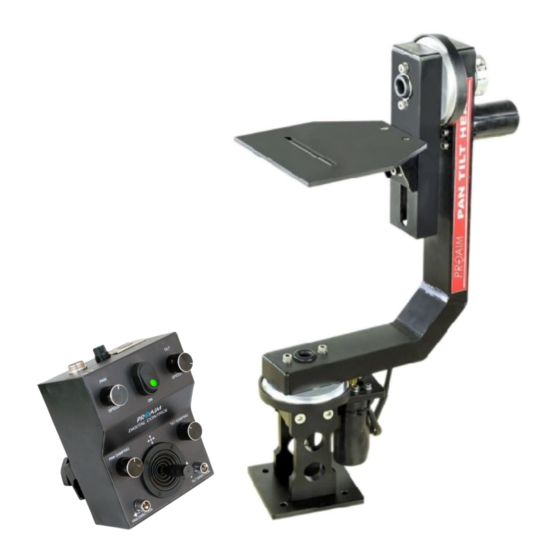
17. 12/24 V DC Input – 4 Pin XLR On/Off Switch Pan Speed 10. Tilt Speed Setup & Adjustment of Pan Tilt Head Attach Sr. Pan Tilt Head with jib Mounting Plate. Align the screw holes and tighten precisely to secure the head. - Page 7 Attaching the Joystick Controller The Pan Tilt Head circuitry is built entirely into the Joystick Controller. The only requirement is AC Power pack (Included) or Battery Power. The power pack can handle 90-240 volts. Users will need the appropriate plug adapter for local use. Install 12 volt DC power (4 pin XLR) in the socket of Joystick Box.
- Page 8 If the Joystick Control is opposite; undo the connectors of motors, rotate 180° and re-install. Attach & secure your camera on camera platform of Head with the help of provided chucknut. Functioning of Joystick Controller The Joystick is a 2-Axis Variable Speed Servo Controller. The further you move in one direction, the faster the output to that motor.
- Page 9 Tilt Direction Switch When the Pan-Tilt Head is used on a Tripod or Jib. When the head is shifted from Jib to Tripod, it needs reversal of direction as the location of head will be inverted. By switching “on” the tilt direction switch, we can immediately reverse the direction.
- Page 10 For inverted use, disconnect the leads to the motors, rotate the control box 180° and re-install. NOTE: Always watch the cables for binding. YOUR SR. PAN TILT HEAD ALL DRESSED UP AND READY TO GO! (SHOWN WITH OPTIONAL ACCESSORIES)
-
Page 11: Warranty
WARRANTY We offer a one year warranty for our products from the date of purchase. We will repair or replace your product, free of charge, in the event of a defect in materials or craftsmanship obtained during normal use or handling based on the user manual. Please note that we will not cover any shipping costs for returning the product to us.