Table of Contents
Advertisement
Quick Links
USER GUIDE
ATmega168 Xplained Mini User Guide
Introduction
®
This user guide describes how to get started with the Atmel
ATmega168
Xplained Mini board.
The ATmega168 Xplained Mini evalutation kit is a hardware platform to evaluate
the Atmel ATmega168 microcontroller. The evaluation kit comes with a fully
integrated debugger that provides seamless integration with Atmel Studio 6.2
(and later version). The kit provides access to the features of the ATmega168
enabling easy integration of the device in a custom design
42250A-MCU-02/2014
Advertisement
Table of Contents

Subscribe to Our Youtube Channel
Related Manuals for Atmel ATmega168


Summary of Contents for Atmel ATmega168
-
Page 1: Introduction
Atmel ATmega168 microcontroller. The evaluation kit comes with a fully integrated debugger that provides seamless integration with Atmel Studio 6.2 (and later version). The kit provides access to the features of the ATmega168 enabling easy integration of the device in a custom design... -
Page 2: Table Of Contents
Standalone Node ............3 1.4. Connecting the Kit ..............3 1.4.1. Atmel Studio ............3 1.4.2. Connect the ATmega168 UART to the mEBDG COM Port ................ 3 1.5. Programming and Debugging ..........3 1.5.1. Programming the Target Using mEDBG ......3 1.5.2. -
Page 3: Getting Started
1.3.3 Standalone Node The ATmega168 Xplained Mini board can be used as a standalone node - use the 4xAAA battery pack available in Atmel store to provide power. Connecting the Kit How to connect the evaluation board. -
Page 4: Debugging The Target Using Medbg
5. In the Debug menu click Start Debugging and Break. 6. Atmel Studio will display an error message if the DWEN fuse in the ATmega168 is not enabled, click YES to make Studio set the fuse using the ISP interface. -
Page 5: Programming The Atmega32U4 Using An External Programmer
1. Connect the External Programme to the PC. 2. Connect the External Programme to the board connector (J100). 3. Go to Atmel Studio: Tools/Device Programming, and select the External Programme connected as Tool, select Device = ATmega32U4, Interface = JTAG and click Apply. -
Page 6: How To Install The "Bootloader Pc Tool
How to Install the "Bootloader PC tool" How to install the Bootloader PC GUI tool, 1. Download the Flip "in system programming tool" installer from http://www.atmel.com/tools/FLIP.aspx 2. Run the Flip Installer. http://www.atmel.com/tools/FLIP.aspx ATmega168 Xplained Mini User Guide [USER GUIDE] 42250A-MCU-02/2014... - Page 7 3. Download the Atmel USB extension and run the installer. 4. Start Flip - if the USB stick is not recognized continue with step 5. 5. Update the USB DFU driver. ATmega168 Xplained Mini User Guide [USER GUIDE] 42250A-MCU-02/2014...
- Page 8 Clik the Update Driver button and select "Browse my computer-..." ATmega168 Xplained Mini User Guide [USER GUIDE] 42250A-MCU-02/2014...
-
Page 9: Available Example Code
Available Example Code The ATmega168 is preprogrammed with a demo program, ReMorse. Source code is available in Atmel Spaces When the CDC COM port is connected to a terminal window, the text you write will be transmitted via the LED in Morse code. -
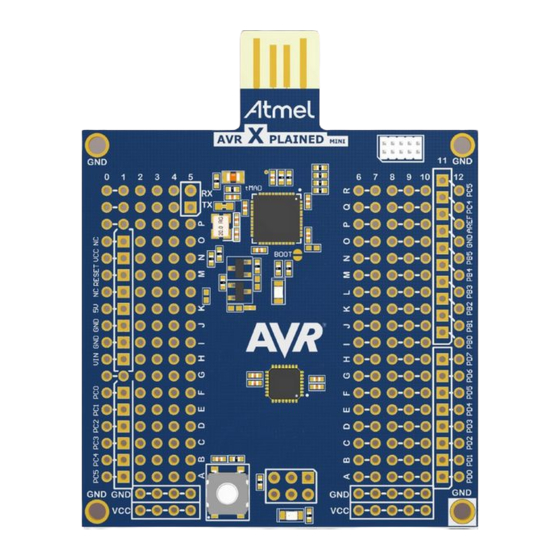
Page 10: Hardware User Guide
Hardware User Guide Board Overview Figure 2-1. ATmega168XMINIoverview.png Clock Distribution The ATmega32U4 (mEDBG) has an external 16MHz XTAL. The ATmega32U4 provides an external 16MHz clock to the ATmega168 (target). Headers and Connectors The board connectors. 2.3.1 JTAG (J100) J100 is the JTAG programming header typically used by the JTAGICE for programming of the ATmega32U4 (mEDBG). -
Page 11: Usb (J101)
1 - UART TXD TxD from ATmega32U4 2 - UART RXD TxD from ATmega168 2.3.4 ATmega168 Digital I/O (J200 and J201) J200 and J201 provide access to ATmega168 digital I/O pins. Table 2-4. J200 J200 pin & location ATmega168 pin J200-1/ I11 J200-2... -
Page 12: Atmega168 Analogue I/O (J203)
ATmega168 Vcc RESET ATmega168 Vcc. ATmega168 Vcc 2.3.7 ATmega168 ISP (J204) J204 enable direct connection to ISP for programming of the ATmega168 or to use the SPI bus to connect external equipment. Table 2-8. J204 J204 pin Function MISO VCC target (ATmega168) -
Page 13: Board Gui
Function D100 - Green mEDBG, will light during enumeration. D200 - Yellow ATmega168 pin 17 - PB5, also connected to mEDBG SCK for ISP programming, in 3-state when not used. 2.4.2 Button A button is available for general use by application SW. -
Page 14: Document Revision History
Document Revision History Document Date Comment revision 42250A 01/2014 Initial document release ATmega168 Xplained Mini User Guide [USER GUIDE] 42250A-MCU-02/2014... - Page 15 Corporation or its subsidiaries. Other terms and product names may be trademarks of others. Disclaimer: The information in this document is provided in connection with Atmel products. No license, express or implied, by estoppel or otherwise, to any intellectual property right is granted by this document or in connection with the sale of Atmel products.
- Page 16 Mouser Electronics Authorized Distributor Click to View Pricing, Inventory, Delivery & Lifecycle Information: Atmel ATMEGA168XMINI...
Need help?
Do you have a question about the ATmega168 and is the answer not in the manual?
Questions and answers