
Subscribe to Our Youtube Channel
Related Manuals for Alto-Shaam AR-7T


Summary of Contents for Alto-Shaam AR-7T
- Page 1 Operator’s Manual Rotisserie Oven AR-7T AR-7HT MN-39404-EN REV.01 1/19 alto-shaam.com...
-
Page 2: Manufacturer's Information
© Copyright 1/19 by Alto-Shaam, Inc. All rights reserved. This manual or any portion thereof may not be reproduced or used in any manner whatsoever without the express written permission of Alto-Shaam, Inc. Trademarks All trademarks referenced in this documentation are the property of their respective owners. -
Page 3: Foreword
Call 800-558-8744 to reach our 24-hour emergency service call center for immediate access to local authorized service agencies outside standard business hours. The emergency service access is provided exclusively for Alto-Shaam equipment and is available throughout the United States through Alto-Shaam’s toll free number. - Page 4 OREWORD Rot i ss er i e Op er a to r ’ s Ma n u al M N- 39 4 0 4 Rev 1 1/ 1 9 ▪ ▪ ▪ ▪...
-
Page 5: Table Of Contents
Foreword Enjoy your Alto-Shaam Rotisserie Oven! ....3 Extend Your Manufacturer’s Warranty ....3 Alto-Shaam 24/7 Emergency Repair Service . - Page 6 ABLE OF ONTENTS How to Change the Temperature Scale ....68 Maintenance Maintenance Schedule ......69 How to Run a Rinse Cycle .
-
Page 7: Safety
AFETY The Meaning of Signal Words This manual contains signal words where needed. These signal words must be obeyed to reduce the risk of death, personal injury, or equipment damage. The meaning of these signal words is explained below. DANGER Danger indicates a hazardous situation which, if not avoided, will result in serious injury or death. -
Page 8: Appliance Description And Intended Use
AFETY Appliance Description and Intended Use Appliance This Alto-Shaam rotisserie oven is an electric-powered oven with programmable Description touchscreen control that includes multi-level cooking for preheat, cooking, holding, and cool-down stages. It includes a self-cleaning wash system with built- in sanitizing cycle. Seven angled spits are included; a variety of spits are offered as options. -
Page 9: Safety Precautions
AFETY Safety Precautions Before you begin Read and understand all instructions in this manual. Electrical precautions Obey these electrical precautions when using the appliance: ▪ Various electrical configurations of the rotisserie are available. Always match the power source with the power rating on the rotisserie’s data tag. ▪... - Page 10 Keep this manual and all supplied instructions, diagrams, schematics, parts lists, notices, and labels with the appliance if the appliance is sold or moved to another location. ▪ Contact Alto-Shaam for additional training if needed. Operator Only trained personnel with the following operator qualifications are permitted qualifications to use the appliance: ▪...
- Page 11 Only trained personnel are permitted to service or repair the appliance. Repairs that are not performed by an authorized service partner or trained technician, or appliance the use of non-factory parts, will void the warranty and relieve Alto-Shaam of all liability. ▪...
- Page 12 AFETY This page intentionally left blank. Rot i ss er i e Op er a to r ’ s Ma n u al M N- 39 4 0 4 Rev 1 1/ 1 9 ▪ ▪ ▪ ▪...
-
Page 13: Labels
ABELS Label Locations AR-PHD-005651 Rot i ss er i e Op e ra to r ’ s Ma n u al M N- 39 4 0 4 Re v 1 1 /1 9 ▪ ▪ ▪ ▪... - Page 14 ABELS Made in U.S.A. WARNING Hot surface WARNING Caustic chemicals. Do not open door during cleaning cycle. Caustic chemicals. Do not open door during cleaning cycle. Productos químicos cáusticos. No abra la puerta durante el ciclo de limpieza. Produits caustiques. Ne pas ouvrir la porte durant le cycle de nettoyage.
- Page 15 ABELS WARNING WARNING / ADVERTENCIA / AVERTISSEMENT Burn hazard. Burn hazard. Always load liquids, or foods that can become liquid when heated, at an eye level where they can be seen. Peligro de quemaduras. Siempre coloque líquidos, o alimentos que Always load liquids, or foods that can become liquid se puedan volver líquidos cuando se calientan, a nivel de los ojos donde se puedan ver.
- Page 16 ABELS Treated, drinkable water connection point. LA-38909 Every Alto-Shaam product is precision calibrated prior to release from the factory to ensure accurate temperature control. Security seal Note: This label is only used on UL-certified appliances Use ______AWG for supply connec ons.
- Page 17 ABELS WARNING Electric Shock Hazard Appliances with permanent electrical connection that are mounted on casters must be secured to building structure. Read installation instructions. LA-39148 WARNING Electric Shock Hazard Use the correct fuse of the specified type, current, and voltage rating. F1, F2, F3 = 15A F4, F5 = 10A F6, F7 = 2A...
- Page 18 ABELS This page intentionally left blank. Rot i ss er i e Op er a to r ’ s Ma n u al M N- 39 4 0 4 Rev 1 1/ 1 9 ▪ ▪ ▪ ▪...
-
Page 19: Installation
NSTALLATION Dimension Drawings Flat glass door, reach-in Flat glass door, 32-1/2" (825mm) pass-through Curved glass door, 35-7/8" (911mm) 2-1/2" (63mm) reach-in Curved glass door, 32-1/4" (818mm) pass-through 35-3/8" (897mm) 36-5/8" (930mm) 20-5/16" (516mm) 32-5/8" (830mm) Leg package Height 17-3/4" (451mm) 4"- 6"... -
Page 20: How To Receive The Appliance
Alto-Shaam policy It is the policy of Alto-Shaam to assist customers in collecting claims that have been properly filed and actively pursued. Alto-Shaam cannot, however, file damage claims, assume the responsibilities for damage claims, or accept deductions in payment for damage claims. -
Page 21: How To Unpack The Oven
Examine the appliance for damage. If the appliance has been damaged, do not use the appliance until it has been inspected by an authorized service provider. Contact your carrier or Alto-Shaam customer service. Remove all protective film, packaging materials, and items from inside the appliance. -
Page 22: Installation Checklist
NSTALLATION Installation Checklist Installation of the oven is to be completed only by an authorized Alto-Shaam service partner. Place this form with the oven’s records. WARNING: Electric shock and arc flash hazard. Use caution when measuring line voltage and line current. - Page 23 NSTALLATION Continued from previous page Oven Clearances: Record Pass Fail Right side: Rear: Left side: Top: Yes/No Is the oven accessible for service? If NO, comment on the issue: Other comments: Water supply: Is there a minimum of two 3/4” cold water supply lines within 3’...
- Page 24 Can other accommodations for the drain be made? Comments If the drain cannot be moved, or other accommodations made, contact Alto-Shaam. Will all materials for drain plumbing be available at the time of installation? Are there any challenges for a successful installation? Rot i ss er i e Op er a to r ’...
-
Page 25: How To Connect The Wiring
NSTALLATION How to Connect the Wiring Before you begin Make sure the oven is disconnected from power. Procedure To connect the wiring, do the following. Step Action Remove the left side service panel. AR-TS-005554 Measure the diameter of the cord grip Remove the knock out from the connection panel. - Page 26 NSTALLATION Continued from previous page Install the cord through the cord grip and to the oven. AR-TS-005560 Connect the supply cord to the appropriate terminals (L1, L2, L3, N, etc.) in accordance with local codes and regulations. 208-240V 1Ph 208-240V 3Ph L2 L3 380-415V 3Ph L1L2 L3 N...
-
Page 27: How To Install The Water Supply And Drain
It is the responsibility of the operator to make sure the incoming water supply is tested and meets the compliance requirements with the published water quality standards listed below. Non-compliance could damage the oven and void the warranty. Alto-Shaam recommends using OptiPure products to treat the water. Contaminant Inlet water requirement Free Chlorine less than 0.2 ppm (mg/L) - Page 28 NSTALLATION Continued from previous page Installing the water To install the water supply, do the following. supply Step Action Flush the water line at the installation site. Install adequate backflow protection to comply with applicable federal, state, and local codes. pipe sealing tape (Teflon®) at all connection points.
- Page 29 NSTALLATION Continued from previous page Installing the water To install the water drain, do the following. drain Install the 45 degree elbow onto a piece of pipe. the pipe to a length that places the elbow in-line with the rear corner panel of the oven.
- Page 30 NSTALLATION Continued from previous page additional drain pipe to the floor drain. NOTE: The floor drain should be within 3’ (914mm) of the oven, not directly underneath of where the oven is installed. AR-TS-006085 Result The water supply and drain are now installed. Rot i ss er i e Op er a to r ’...
-
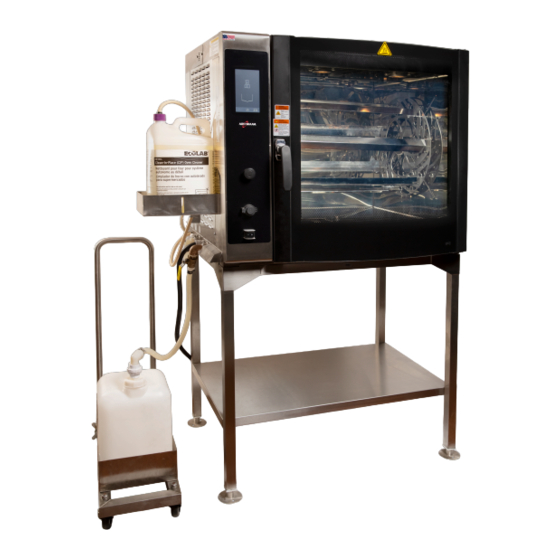
Page 31: How To Install The Liquid Cleaner
NSTALLATION How to Install the Liquid Cleaner Before you begin WARNING: Burn hazard. Wear protective gloves, protective clothing, eye protection, and face protection when handling oven cleaner. Procedure To install the liquid cleaner, do the following. Step Action Mount the cleaner support tray on the left exterior panel of the oven. Slide over the mounting the slotted openings on the cleaner support tray studs. -
Page 32: How To Install The Grease Collection System
NSTALLATION How to Install the Grease Collection System Before you begin The grease collection valve requires 6" (152mm) of vertical clearance. For counter-top installations, the legs should be set to a height of 6" (152mm). The handle of the grease collection valve must be parallel to the side of the oven. Use enough Teflon®... - Page 33 NSTALLATION Continued from previous page Loosen the radial nut on the grease collection container union. Insert the taped fitting on the grease collection hose into the union fitting and turn until tight. AR-TS-005590 Tighten the radial nut on the grease collection container. Place the hose holder bracket , if supplied, onto the pins on the side of the...
- Page 34 NSTALLATION This page intentionally left blank. Rot i ss er i e Op er a to r ’ s Ma n u al M N- 39 4 0 4 Rev 1 1/ 1 9 ▪ ▪ ▪ ▪...
-
Page 35: Operation
PERATION How to Turn On and Turn Off the Oven Before you begin The oven must be connected to electric power. Turning on the oven To turn on the oven, do the following. Step Action the power switch to the ON (l) position AR-TS-006091 The oven is now on. -
Page 36: How To Preheat The Oven For Professional Cooking Mode
PERATION How to Preheat the Oven for Professional Cooking Mode Before you begin Make sure: ▪ The oven is turned on. ▪ The oven door is closed. Procedure To preheat the oven, do the following. Step Action Touch the professional cooking mode icon . - Page 37 PERATION Continued from previous page Preheat progress The screen indicates the progress towards reaching its set temperature. AR-TS-005738 The screen displays the actual temperature and its set temperature. Touch the cancel icon to cancel the preheat process, if necessary. NOTE: If the oven door is open, the screen will display in reverse.
-
Page 38: How To Use Professional Cooking Mode
PERATION How to Use Professional Cooking Mode ▪ Before you begin the oven is preheated. See topic How to Preheat the Oven for Make sure Professional Cooking Mode. ▪ Be sure your food is prepared and ready to cook. Procedure To cook in professional cooking mode, do the following. - Page 39 PERATION Continued from previous page Touch the time setting Enter the cooking time using the number pad. Touch the green check mark. 1:00:00 1:00:00 AR-TS-005744 Touch Enter the hold temperature setting the hold temperature using Touch the number pad. the green check mark. 160°F 160°F AR-TS-005747...
- Page 40 PERATION Continued from previous page Touch the start icon to begin cooking. AR-TS-005750 During the cooking The remaining time appears next to the cook time icon. Touch the cook time icon process to view the set cook time. The set time displays in green for five (5) seconds. Press and hold the red stop icon before the time expires to stop the cooking process, if necessary.
-
Page 41: How To Load The Spits
PERATION How to Load the Spits Before you begin Make sure: ▪ The oven is turned on. ▪ The oven has completed preheating. ▪ You have food products ready to be cooked. Standard angled To load standard angled V-spits, do the following. V-spits Step Action... - Page 42 PERATION Continued from previous page Rotate the rotisserie spit assembly using the jog button Load the spits one at a time and as evenly spaced as possible. This is done to maintain balance within the rotisserie. AR-TS-005832 Optional piercing To load optional piercing spits, do the following. spits Load a maximum of three (3) 3-1/2 lb (1,6 kg) or four (4) 2-1/2 lb (1,1 kg)
- Page 43 PERATION Continued from previous page Optional basket spits To load optional basket spits, do the following. Insert the smooth pin end in first when inserting the basket. NOTE: Remove the machined pin first when removing the baskets. AR-TS-005841 Load the baskets one at a time and as evenly spaced as possible.
-
Page 44: How To Create A Recipe
PERATION How to Create a Recipe Before you begin Make sure: ▪ The oven is turned on. ▪ The oven is idle and not in cook or clean sequence. Creating a new To create a recipe, do the following. recipe Step Action Touch... - Page 45 PERATION Continued from previous page Adding a preheat To add a preheat step to the recipe, do the following. step Touch the preheat icon . The enter preheat screen displays. Enter preheat temperature using the number pad. Touch the green check mark icon. AR-TS-006134 ...
- Page 46 PERATION Continued from previous page Touch the time setting Enter the cooking time using the number pad. Touch the green check mark. 1:00:00 1:00:00 AR-TS-006140 Touch the hold temperature setting Enter the hold temperature using the number pad. Touch the green check mark. 160°F 160°F AR-TS-006143...
- Page 47 PERATION Continued from previous page Programing a multi- To program a multi-stage recipe, do the following. stage recipe Touch the multi-stage icon Select a stage. the time, temperature, and browning level for each stage. Touch the cancel icon to return to the single stage recipe settings. 425°F 425°F 0:45:00...
-
Page 48: How To Cook With Programmed Recipes
PERATION How to Cook with Programmed Recipes Before you begin Make sure: ▪ The oven is turned on. ▪ There is a recipe saved on the oven. ▪ Be sure your food is prepared and ready to cook. Procedure To cook using a programmed recipe, do the following. Step Action Touch... - Page 49 PERATION Continued from previous page During the cooking The screen displays the details on the current cook setting. process AR-TS-005762 ▪ Touching and holding the back arrow stops the cooking process. Result You are now cooking using a programmed recipe. Rot i ss er i e Op e ra to r ’...
-
Page 50: How To Cool Down The Oven
PERATION How to Cool Down the Oven Before you begin The cool down feature allows you to lower the temperature of the oven cavity at an accelerated rate. This is useful when you want to change from a high temperature cooking function to a lower temperature function or to prepare for cleaning. - Page 51 PERATION Continued from previous page Cool down progress The screen indicates the progress towards reaching the cool down temperature. AR-TS-005765 The screen displays the actual temperature and its set temperature. Touch the cancel icon to cancel the cool down process. ...
-
Page 52: How To Delete A Recipe
PERATION How to Delete a Recipe Before you begin Make sure: ▪ The oven is turned on. ▪ The oven is idle and not in cook or clean sequence. Procedure To delete a saved recipe, do the following. Step Action Touch the cookbook icon . - Page 53 PERATION Continued from previous page Touch the recipe you want to delete. Touch the delete icon Touch the save icon AR-TS-005771 Touch the home icon to return to the home screen. Result The recipe is now deleted. Rot i ss er i e Op e ra to r ’...
-
Page 54: How To Upload Or Download Recipes
PERATION How to Upload or Download Recipes Before you begin Make sure: ▪ The oven is turned on. ▪ The oven is idle and not currently in a cook or clean sequence. ▪ You have a USB drive. Procedure To upload or download recipes, do the following. Step Action Touch... - Page 55 PERATION Continued from previous page Insert the USB drive into the port AR-TS-005774 Touch the upload recipes icon or the download recipes icon The oven uploads or downloads the recipes for a few seconds. AR-TS-005606 NOTE: Downloaded recipes will overwrite existing recipes.
-
Page 56: How To Update The Software
PERATION How to Update the Software Before you begin Make sure ▪ The oven is turned on. ▪ The oven is idle and not currently in a cook or clean sequence. ▪ You have a USB drive. Procedure To update the software, do the following. Step Action Touch... - Page 57 PERATION Continued from previous page Insert the USB drive into the port AR-TS-005774 Touch the download new software icon for the full oven update. touch To update only the interface board, the interface board icon ▪ touch To update only the control board, the control board icon ▪...
-
Page 58: How To Calibrate The Screen
PERATION How to Calibrate the Screen Before you begin the oven is turned on. Make sure Procedure To calibrate the screen, do the following. Step Action Touch the utilities icon . The utilities screen displays. AR-TS-005599 Touch the settings icon . - Page 59 PERATION Continued from previous page Touch the calibrate screen icon . The calibrate screen displays. AR-TS-005628 Touch the green check mark icon . The second calibrate screen displays. Touch the plus sign icon as it appears in each corner of the screen. When all four corners have been touched, the start-up screen will appear briefly, then the display will return to the home screen.
-
Page 60: How To Restore Factory Defaults
PERATION How to Restore Factory Defaults Before you begin the oven is turned on. Make sure Procedure To restore factory defaults, do the following. Step Action Touch the utilities icon . The utilities screen displays. AR-TS-005599 Touch the settings icon . - Page 61 PERATION Continued from previous page Touch the restore factory defaults icon . The restore factory defaults screen displays. AR-TS-005633 Touch the green check mark icon NOTE: All saved recipes will be deleted. The screen will go blank for a moment. The start-up screen will appear briefly, then the display will return to the Home screen.
-
Page 62: How To Select The Cleaning Method
PERATION How to Select the Cleaning Method Before you begin the oven is turned on. Make sure Procedure To select the cleaning method, do the following. Step Action Touch the utilities icon . The utilities screen displays. AR-TS-005599 Touch the settings icon . -
Page 63: How To Change The Sound Settings
PERATION How to Change the Sound Settings Before you begin the oven is turned on. Make sure Turning the sound To turn the sound on/off, do the following. on/off Step Action Touch the utilities icon . The utilities screen displays. AR-TS-005599 Touch the settings icon... - Page 64 PERATION Continued from previous page Touch the one sound tone icon . This sounds one alert when the cooking process is complete. AR-TS-006104 Touch the multiple sound tones icon . This sounds multiple alerts when the cooking process is complete. Touch the green check mark icon.
-
Page 65: How To Sort Recipes
PERATION How to Sort Recipes Before you begin the oven is turned on. Make sure Procedure To sort the recipes, do the following. Step Action Touch the utilities icon . The utilities screen displays. AR-TS-005599 Touch the settings icon . The settings screen displays. Touch the sort recipes A-Z icon to sort recipes by alphabetical order. -
Page 66: How To Turn On And Turn Off The Holding Cabinet
PERATION How to Turn On and Turn Off the Holding Cabinet Before you begin The holding cabinet must be connected to electric power. Turning on the To turn on the holding cabinet, do the following. holding cabinet Step Action the power switch to the ON (l) position AR-TS-006158 The holding cabinet is now on. -
Page 67: How To Operate The Holding Cabinet
PERATION How to Operate the Holding Cabinet Before you begin The holding cabinet must be connected to electric power and turned on. Procedure To operate the holding cabinet, do the following. Step Action the temperature using the arrow buttons NOTE: The temperature set-point range is 200°F –... -
Page 68: How To Change The Temperature Scale
PERATION How to Change the Temperature Scale Procedure To change the temperature scale from °F to °C and vice versa, do the following. Step Action Press and hold the temperature recall button and down arrow button at the same time for five (5) seconds. ... -
Page 69: Maintenance
▪ Inspect the oven for scale buildup. Monthly For monthly maintenance, do the following. ▪ Descale the oven using Alto-Shaam’s ScaleFree descaling powder. ▪ Inspect the drain piping for leaks. ▪ Inspect the touch screen for damage. Rot i ss er i e Op e ra to r ’... -
Page 70: How To Run A Rinse Cycle
AINTENANCE How to Run a Rinse Cycle Before you begin WARNING: Burn hazard. Wear protective gloves, protective clothing, eye protection, and face protection when handling oven cleaner. Do not open the oven door during the wash or rinse cycle. Do not use steel pads, wire brushes, or scrapers when NOTICE cleaning. - Page 71 AINTENANCE Continued from previous page Touch the rinse icon . The rinse screen displays. Touch the green check mark icon to begin the rinse cycle. NOTE: The rinse cycle takes approximately 2–3 minutes before the water begins to spray. 0:30:00 AR-TS-005862 The rinse cycle takes 30 minutes to complete.
-
Page 72: How To Clean The Oven Using Liquid Cleaner
AINTENANCE How to Clean the Oven Using Liquid Cleaner Before you begin WARNING: Burn hazard. Wear protective gloves, protective clothing, eye protection, and face protection when handling oven cleaner. Do not open the oven door during the wash or rinse cycle. Do not use steel pads, wire brushes, or scrapers when NOTICE cleaning. - Page 73 AINTENANCE Continued from previous page Touch the wash icon . The wash screen displays. Touch the green check mark icon to begin the wash cycle. NOTE: The wash cycle takes approximately 2–3 minutes to heat the water before the water begins to spray. 2:59:59 AR-TS-005865 The wash cycle takes 2:59:59 to complete.
-
Page 74: How To Clean The Oven Using Tablets
AINTENANCE How to Clean the Oven Using Tablets Before you begin WARNING: Burn hazard. Wear protective gloves, protective clothing, eye protection, and face protection when handling oven cleaner. Do not open the oven door during the wash or rinse cycle. Do not use steel pads, wire brushes, or scrapers when NOTICE cleaning. - Page 75 AINTENANCE Continued from previous page Insert six (6) CombiClean® CombiTabs™ tablets into the cavity drain Make sure the drain screen is closed before starting the wash cycle. NOTICE Do not place the cleaning tablets on the top of the drain or the bottom of the oven. The tablets will not dissolve and could damage the interior of the oven.
- Page 76 AINTENANCE Continued from previous page Touch the wash icon . The wash screen displays. Touch the green check mark icon to begin the wash cycle. NOTE: The wash cycle takes approximately 2–3 minutes to heat the water before the water begins to spray. 2:59:59 AR-TS-005911 The wash cycle takes 2:59:59 to complete.
-
Page 77: How To Descale The Oven
See topic How to Clean the Oven Using Liquid Cleaner or How to Clean the Oven Using Tablets. Place 7 oz. (198 g) of Alto-Shaam ScaleFree Descaling Powder into the cavity drain Close the drain screen. - Page 78 AINTENANCE Continued from previous page a rinse cycle. See topic How to Run a Rinse Cycle. a wash cycle. See topic How to Clean the Oven Using Liquid Cleaner or How to Clean the Oven Using Tablets. Result The oven is now descaled. Rot i ss er i e Op er a to r ’...
-
Page 79: How To Clean The Door Gasket And Glass
AINTENANCE How to Clean the Door Gasket and Glass Before you begin WARNING: Burn hazard. Wear protective gloves, protective clothing, eye protection, and face protection when handling oven cleaner. Do not use steel pads, wire brushes, or scrapers when NOTICE cleaning. -
Page 80: How To Clean The Convection Fan Box
AINTENANCE How to Clean the Convection Fan Box Before you begin WARNING: Burn hazard. Wear protective gloves, protective clothing, eye protection, and face protection when handling oven cleaner. Do not open the oven door during the wash or rinse cycle. Do not use steel pads, wire brushes, or scrapers when NOTICE cleaning. - Page 81 AINTENANCE Continued from previous page Clean hard deposits with a plastic scouring pad, if necessary. Clean grease deposits accumulated in the area surrounding the convection element and fan blade using a damp sponge and a plastic scouring pad. NOTICE Use caution to avoid bending the convection element or the blade.
- Page 82 AINTENANCE This page intentionally left blank. Rot i ss er i e Op er a to r ’ s Ma n u al M N- 39 4 0 4 Rev 1 1/ 1 9 ▪ ▪ ▪ ▪...
-
Page 83: Troubleshooting
ROUBLESHOOTING Error Codes Code Description Possible Cause PROG Fatal error, call service. Programmer error. EADC Microprocessor on the CB may be failing. May ADC is out of range. have cold solder joint on the CB. E-BC Bootloader Chip is bad. Software updates cannot be Chip may have cold solder joint or other performed. - Page 84 ROUBLESHOOTING E-80 Control settings have been reset to factory defaults Software has new features installed (post because EEPROM checksum was incorrect. updated, this may be expected after the first restart and is normal). Continuous E-80 may be failing EEPROM. E-83 EEPROM is not responding.
-
Page 85: Warranty
ARRANTY Warranty Introduction Alto-Shaam, Inc. warrants to the original purchaser only, that any original part found to be defective in material or workmanship will be replaced with a new or rebuilt part at Alto-Shaam's option, subject to provisions hereinafter stated. - Page 86 No person except an officer of Alto-Shaam, Inc. is authorized to modify this warranty or to incur on behalf of Alto-Shaam any other obligation or liability in connection with Alto-Shaam equipment.
- Page 88 ARRANTY Rot i ss er i e Op er a to r ’ s Ma n u al M N- 39 4 0 4 Rev 1 1/ 1 9 ▪ ▪ ▪ ▪...
Need help?
Do you have a question about the AR-7T and is the answer not in the manual?
Questions and answers