Table of Contents
Advertisement
Quick Links
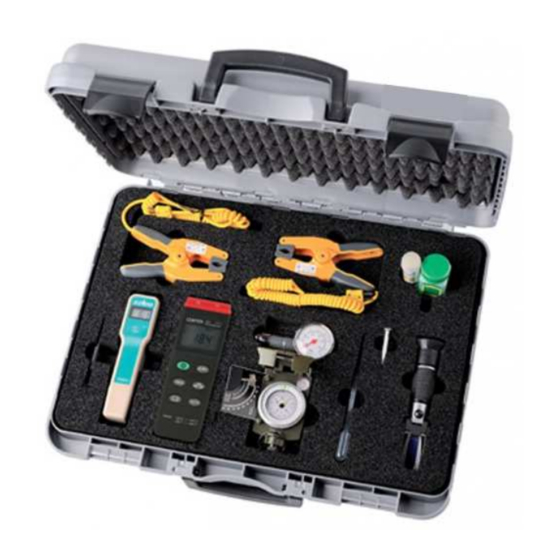
INSTALLATION AND MAINTENANCE SUITCASE
FOR SOLAR THERMAL SYSTEMS
OVERVIEW
This suitcase is specifically designed for installing and
performing maintenance on solar thermal systems.
The suitcase contains:
A digital pH-meter complete with screwdriver and
calibration solution (pH 7@25°C)
A
handheld
refractometer
screwdriver, plastic dropper and prism cleaning
cloth
A digital thermometer with 2 inputs for Tc-K probes
Two Tc-K clamp temperature probes with fiberglass
3M sticking tape.
A pressure gauge (range 0÷4.5 bar)
A clinometer compass
A package of litmus paper strips
HOW TO USE THE DIGITAL PH-METER
Technical features
Power supply:
Measuring range:
Resolution:
Accuracy:
Calibration:
Electrode:
Operating temperature range: 0°C to ~50°C
Dimensions:
Weight:
Preparation
a. Insert the 9V battery (supplied) and press the ON/OFF button to turn
on the instrument.
1 Point manual calibration
b. Remove the protective cap and pull out the electrode; if necessary
adjust the electrode's length (max. 8 cm).
c. Rinse the electrode with clean water and dry it. Dip the electrode in
the test solution (supplied), which has a known pH of 7 (25°C). Gently
stir the solution for a few seconds until the value on the display
stabilizes.
d. Set the pH to 7.0 (25°C) by using the screwdriver (supplied) to turn
the trimmer, located on the right-hand side of the instrument and
indicated by CAL► on the front.
e. After calibrating the instrument, wash the electrode in clean water and dry it.
Operation
Note: The instrument does not need to be calibrated before every use. Calibrate the instrument the first time you
use it and then recalibrate it every two weeks or after every 10 measurements.
f. Dip the electrode in the solution to be measured. Stir the solution and wait a few seconds for the value on the
display to stabilize.
g. Wash the electrode after every use and put on the protective cap. The sponge material inside the protective
cap must be kept moist at all times; add some clean water if necessary.
Changing the battery
If the instrument does not turn on or the display shows the values incorrectly, the battery needs to be changed.
- Remove the cover of the battery compartment on the back of the instrument.
- Replace the 9VDC battery with a new battery.
- Put back the cover.
complete
with
9VDC
0.00÷14.00 pH
0.10 pH
±0.20 pH
1 point
pull-out electrode, max. 8 cm
40x158x34 mm (W x H x D)
~120 g
1
LCD Display
Calibration
trimmer
ON/OFF button
Max. level of
immersion
Sensor electrode
Advertisement
Table of Contents

Related Manuals for Seitron PORVAL0112


Summary of Contents for Seitron PORVAL0112
- Page 1 INSTALLATION AND MAINTENANCE SUITCASE FOR SOLAR THERMAL SYSTEMS OVERVIEW This suitcase is specifically designed for installing and performing maintenance on solar thermal systems. The suitcase contains: A digital pH-meter complete with screwdriver and calibration solution (pH 7@25°C) A handheld refractometer complete...
- Page 2 WARNING: If some instability is noticed in the measurements reading and/or if the instrument has not been used for a long time, or anyway periodically, it is necessary to perform the REACTIVATION of the instrument sensible bulb, according to the following procedure: •...
- Page 3 Sample Rate: 0.6 times per second Dimension: 184×64×30mm Weight: 210g Approx.(7.4oz) Accessory: K Type Bead Probe, Battery, Carrying Case, Instruction Menu. Option: Soft Ware Package ( Program, RS232 Connection Cable) , AC Adapter. Power requirement: 9 Volt Battery, NEDA 1604 or JIS 006P or IEC6F22 Battery Life: Approx.
- Page 4 AC power adapter connector Tripod connector Battery cabinet cover OPERATION INSTRUCTIONS: Power-Up Press the '4' key to turn the thermometer On or OFF. Connection the Thermocouples For measurement, plug the thermocouple into the input connectors. Selecting the Temperature Scale When the meter was first power on, the default scale setting is set at Celsius (°C) scale. The user may change it to Fahrenheit (°F) by pressing “...
- Page 5 Command K: Return 4 bytes. For example, when sends command "K" to meter, it will return "3","0","1", ASCII(13). Command D: Return data of main window. Range: T1, T2, T1-T2 (7bytes), the unused characters is left as space ASC(13). Data: ±9999.9,-OL,OL ( 7bytes include polarity and decimal point), Unit: C,F(5bytes) When the meter receive the D command, it will send: Range, Data, Unit.
- Page 6 bit3:1→ sub window value is OL 0→ not OL bit4:1→ sub window value is minus, 0→ sub window value is plus. bit5:1→ 6th byte and 7th byte represent #### 0→ 6th byte and 7th byte represent ###.# bit7 bit6: 00→ Main window is T1-T2,sub window is T1 01→...
- Page 7 Technical features Measuring range: Battery fluid: 1.10÷1.40 kg/l Ethylene glycol (G11/G12): -50 °C÷0 °C Propylene glycol (G13): -50 °C÷0 °C Windscreen fluid: -40 °C÷0 °C Resolution: Battery fluid: 0.01 kg/l Ethylene glycol (G11/G12): 5 °C Propylene glycol (G13): 5 °C Windscreen fluid: -5 °C Accuracy:...
- Page 8 HOW TO USE THE LITMUS PAPER a. Briefly dip a strip of litmus paper in a sample of thermal fluid. If the colour does not stabilize immediately, leave the strip in the fluid until the colour remains stable. b. Take the strip out and compare the colour of the two segments on the strip with the chart printed on the package.
Need help?
Do you have a question about the PORVAL0112 and is the answer not in the manual?
Questions and answers