Table of Contents
Advertisement
Quick Links
Advertisement
Table of Contents

Related Manuals for V-ZUG VS60144


Summary of Contents for V-ZUG VS60144
- Page 1 Operating instructions VS60144 Vacuum drawer...
- Page 2 The product family (model number) corresponds to the first alphanumerics on the identification plate. These operating instructions apply to: Type Product family VS60144 36001 VS60144c Variations depending on the model are noted in the text. © V-ZUG Ltd, CH-6301 Zug, 2017...
-
Page 3: Table Of Contents
Contents 2 1 Safety precautions 5 Symbols used ...................... 5 General safety precautions ................. 6 Appliance-specific safety precautions............... 7 Before using for the first time ................ 7 Using for the first time.................. 9 2 Disposal 10 3 Appliance description 11 Construction...................... 11 Operating and display elements .............. 12 Explanation of the displays ................ 12... - Page 4 Dehumidifying ...................... 31 10 Trouble-shooting 32 10.1 What to do if … .................... 32 11 Accessories and spare parts 36 12 Technical data 38 13 Index 39 14 Notes 41 15 Service & Support 43...
-
Page 5: Safety Precautions
Safety precautions Symbols used Denotes important safety precautions. Failure to observe said precautions can result in injury or in damage to the appliance or fittings! Information and precautions that should be observed. Information on disposal Information about the operating instructions ▸... -
Page 6: General Safety Precautions
1 Safety precautions General safety precautions ▪ Read the operating instructions before using the appliance for the first time! ▪ This appliance can be used by children aged 8 and above and by persons with reduced physical, sensory or mental cap- abilities, or lack of experience and/or knowledge, provided they are supervised or have been instructed on the safe use of the appliance and have understood the hazards involved. -
Page 7: Appliance-Specific Safety Precautions
1 Safety precautions Appliance-specific safety precautions The sealing bar gets hot during use. Care should be taken. Avoid touching the sealing bar. Burns hazard. Other accessible parts can get hot during use. Keep young children away from the appliance. ▪ Do not use aggressive or abrasive detergent or sharp metal scrapers for cleaning the glass lid of the appliance as they could scratch the surface. - Page 8 1 Safety precautions ▪ Retain these operating instructions for future reference. If you sell the appli- ance or pass it on to a third party, please ensure these operating instruc- tions accompany the appliance, together with the installation instructions. In this way, the new owners can inform themselves about how to use the appli- ance correctly and read the pertinent safety precautions.
-
Page 9: Using For The First Time
1 Safety precautions ▪ Made from glass, the appliance lid is under tension. Damage to the surface of the glass may cause it to shatter. The appliance must not be operated if the lid is cracked or broken. Contact Customer Services. Caution: Risk to life ▪... -
Page 10: Disposal
Disposal Packaging ▪ All packaging materials (cardboard, plastic film (PE) and polystyrene (EPS)) are marked and should, if possible, be collected for recycling and disposed of in an environmentally friendly way. Disconnection ▪ Disconnect the appliance from the mains. With a fixed appliance, this is to be carried out by a qualified electrician! Safety ▪... -
Page 11: Appliance Description
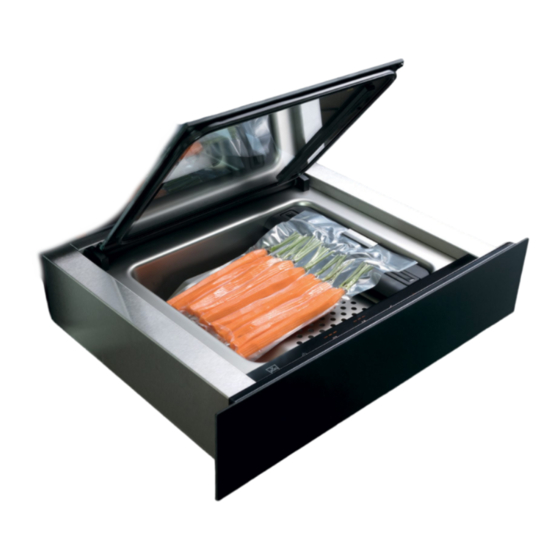
Appliance description * Depending on the software version Food can be vacuum sealed in bags in the vacuum drawer. The vacuum- packed food can be cooked gently in a steam cooker (Vacuisine) or in a water bath. Vacuum sealing can also prolong the shelf life of certain foodstuffs. Construction 13 14 Appliance lid made from glass... -
Page 12: Operating And Display Elements
3 Appliance description Operating and display elements Displays A Vacuuming level B Sealing time Buttons 1 On/off 2 Vacuuming level 3 Sealing time 4 External vacuuming* 5 Start 6 Stop 7 Dehumidifying 8 Maintenance Explanation of the displays Inactive (no displays, dark) Preselection (number of selected levels, illumin- ated) -
Page 13: Vacuum Sealing Food
Overpressure can otherwise develop and cause the vacuum bag to burst. If bags other than V-ZUG vacuum bags are used for sous-vide cooking, these could become soft, the sealing seam may not hold or may melt. Only use other bags for vacuum sealing and adjust the sealing time to the material of the bag. - Page 14 4 Vacuum sealing food Vacuum- Food category with ex- Tips and uses ing level amples with dis- play ▪ Very fragile and delicate Very fragile and delicate food is only (sealing food, e.g. crisps and sealed and therefore keeps its shape only) salad.
-
Page 15: Selecting The Level For Sealing Time
Selecting the level for sealing time If using original V-ZUG vacuum bags, set the sealing time to level 2. If using non-original bags, the sealing time must be adjusted to the material of the bag. -
Page 16: Food Handling
Food handling Vacuum sealing food can generally extend its shelf life. Quality and hygiene The initial bacterial content of food determines how long a product can be preserved. The higher the bacterial content, the shorter the maximum storage time. In order to preserve food for as long as possible, only vacuum seal food that is in perfect condition. -
Page 17: Storage
Vacuisine © Vacuum-sealed food can be steamed at a low temperature in a steam cooker using the sous-vide method. At V-ZUG, we call this method Vacuisine. Only use original V-ZUG vacuum bags for the Vacuisine method. For detailed information and Vacuisine recipes, go to... -
Page 18: Overview Of Applications
Overview of applications * Depending on the software version All possible applications are described below. See also the advice in the Tips and tricks (see page 26) section. Vacuuming and sealing This is the standard application of the vacuum drawer. The process starts and an underpressure is created inside the vacuum tank. -
Page 19: Vacuuming Only
6 Overview of applications Vacuuming only Jars with screw-top lids, containing e.g. nuts or kernels, can be vacuumed and sealed airtight at the same time using this application. Only use jars with intact screw-top lids. Check that the jars are not too tall before closing the appliance lid. -
Page 20: Sealing Only
6 Overview of applications Sealing only Using this application, a bag can be closed airtight without creating a vacuum. Despite the setting, a minimum underpressure is created in the bag, and this is necessary to create a successful seal. The vacuum drawer must be ready for operation. ▸... -
Page 21: External Vacuuming
6 Overview of applications External vacuuming* Using this application, air can be evacuated out of glass bottles of oil and wine, for instance, to prevent the contents reacting with the oxygen. This func- tion can also be used to vacuum commercially available vacuum containers. Make sure that the vacuum containers are safe for use with food and can be connected to the vacuum drawer tube, which has a 3 mm internal diameter, using a suitable adapter. - Page 22 6 Overview of applications To evacuate wine bottles, only use external vacuuming on level 1 as otherwise the gas in the wine will be affected. ▸ Start external vacuuming with the button.
-
Page 23: Operating The Appliance
Operating the appliance Opening the appliance (push-and-pull opening and closing mechanism) ▸ Touch the drawer front at the top in the middle. – The drawer opens. Closing the appliance The appliance lid must be closed. ▸ Push the drawer front at the top in the middle to close. –... - Page 24 7 Operating the appliance Inserting the bag ▸ Put the food into the vacuum bag. ▸ Push the opening of the bag under the bag clip 1. Use the bag tray 2 supplied for smaller amounts of food. Settings ▸ Select the vacuuming level with the button and the sealing time with the button.
- Page 25 7 Operating the appliance End of operation – An acoustic signal is emitted when the process is finished. ▸ Open the appliance lid and remove the vacuum-sealed product. Aborting or switching off before time Press the button to interrupt the vacuuming process while it is running. The bag is not sealed.
-
Page 26: Tips And Tricks
Tips and tricks Here are a few tips to make using your vacuum drawer even easier. ▪ The opening of the bag must lie completely flat on the sealing bar, without any overlap or wrinkles. ▪ Fold the top of the bag down before filling it so as to keep the area where it is to be sealed clean. -
Page 27: Care And Maintenance
Care and maintenance General notes The drawer must be switched off for cleaning. Incorrect handling can result in damage to the appliance! ▪ Do not use any abrasive cleaning agents, metal scrapers that are sharp or scratch, steel wool, abrasive scouring pads, etc. to clean the appliance, as they will damage the surface. - Page 28 9 Care and maintenance Inside ▸ Remove the sealing bar 1 incl. sealing bar cover 2 from the appliance. ▸ Remove any soiling or excess cleaning agent immediately. ▸ Clean the surfaces with a soft cloth dampened with water and a little wash- ing-up liquid –...
-
Page 29: Replacing The Sealing Bar
9 Care and maintenance Replacing the sealing bar ▸ Remove the sealing bar 1 together with the sealing bar cover 2 from the appliance. ▸ Put the sealing bar cover 2 in place in the appliance. ▸ Position the new sealing bar 1 on the two locating pins in the appli- ance. -
Page 30: Replacing The Seal Pad
9 Care and maintenance Replacing the seal pad The seal pad 4 is located on the un- derside of the appliance lid. ▸ Take the damaged seal pad 4 out of its holder 5. ▸ Insert the new seal pad 4 in the holder 5. - Page 31 9 Care and maintenance Dehumidifying Dehumidification is necessary when the oil in the vacuum pump con- tains too much water (from frequently vacuuming moist foodstuffs). If the buttons illuminate … … the oil in the vacuum pump can be dehumidified. ▸...
- Page 32 Trouble-shooting 10.1 What to do if … * Depending on the software version This section lists faults that can be solved simply by following the instructions given. If another fault is displayed or the fault cannot be remedied, please call Customer Services.
- Page 33 10 Trouble-shooting … insufficient vacuum in the bag Possible cause Solution ▪ The vacuuming level se- ▸ Select the next highest level. lected was too low for the particular foodstuff used. ▪ The suction inlet of the va- ▸ Ensure the bag is not obstructing the suc- cuum pump is obstructed.
- Page 34 10 Trouble-shooting … the vacuum bag is incorrectly sealed Possible cause Solution ▪ The sealing time set was ▸ Select the next highest level for sealing insufficient for the vacu- time. uming level selected. ▪ The vacuum bag is not ▸...
- Page 35 10 Trouble-shooting … the maintenance button illuminates Possible cause Solution ▪ The appliance cannot ▸ Hold the appliance lid down well when start- reach the desired under- ing the vacuuming process. pressure. ▸ Check the appliance lid gasket and the con- tact surface of the gasket and clean if ne- cessary.
- Page 36 Accessories and spare parts * Depending on the software version Please give model number of the appliance and exact designation of the ac- cessory or spare part when ordering parts. ▪ Bag tray: For vacuum sealing flat foodstuffs ▪ Appliance lid gasket ▪...
- Page 37 11 Accessories and spare parts ▪ Suction inlet adapter* ▪ Adapter for vacuum stopper* ▪ Tube* ▪ Vacuum stopper*...
- Page 38 Technical data Type VS60144 / VS 60144c Device dimensions External dimensions 142 × 596 × 547 (mm) (height x width x depth) Capacity of vacuum chamber 95 × 350 × 285 (mm) (height x width x depth) Volume of vacuum chamber 7.83 dm³...
- Page 39 Index Accessories ........... 36 Operating elements ........12 Appliance description ........11 Operation............23 Appliance lid gasket Aborting.......... 25 Replacing.......... 29 Inserting bag ........ 24 Applications ........... 18 Starting process ........ 24 Switching off before time .... 25 Before using for the first time ....... 7 Packaging ............
- Page 40 Vacuuming ..........18, 19 Vacuuming levels Recommended ........ 13 Selecting .......... 13 Validity............... 2 Warranty extensions ........43...
- Page 41 Notes...
- Page 43 V‑ZUG service centre. Technical questions, accessories, warranty extensions V-ZUG is happy to help you with any general administrative or technical queries, to take your orders for accessories and spare parts and to inform you about our progressive ser- vice agreements.
- Page 44 ▸ Press down the appliance lid and start the process with the button. To switch the appliance off ▸ Press the button. ▸ Close the vacuum drawer. J36001352-R04 V-ZUG Ltd, Industriestrasse 66, CH-6301 Zug info@vzug.com, www.vzug.com...
Need help?
Do you have a question about the VS60144 and is the answer not in the manual?
Questions and answers