Advertisement
ROSTRA ACCESSORIES INC.
3056 NC HWY 5
ABERDEEN NC. 28315
800-782-3379
All instructions, warranties and other collateral documents are
subject to change at the sole discretion of Rostra Accesories, Inc.
For the latest available information or product literature,
visit www.rostra.com and click on the support tab.
WWW.ROSTRA.COM
ALL RIGHTS RESERVED 7/30/2018
250-8290 QUAD VIEW MONITOR
BEFORE INSTALLATION PLEASE READ THIS MANUAL, AFTER
INSTALLATION LEAVE WITH THE VEHICLE FOR THE END USER.
Advertisement
Table of Contents

Subscribe to Our Youtube Channel
Related Manuals for Rostra 250-8290


Summary of Contents for Rostra 250-8290
- Page 1 ABERDEEN NC. 28315 800-782-3379 All instructions, warranties and other collateral documents are subject to change at the sole discretion of Rostra Accesories, Inc. 250-8290 QUAD VIEW MONITOR For the latest available information or product literature, visit www.rostra.com and click on the support tab.
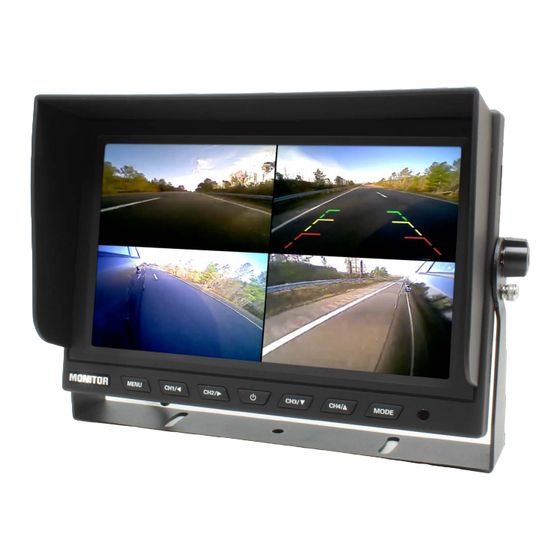
- Page 2 Controls & Features Wiring Connections 1: Removable Sun Shade 2: Locking Screws 3: U-Bracket 4: 9" LCD Panel 5: MENU Button RED + 12-24 Vdc 6: CH1 / Left Select Button BLACK - Ground 7: CH2 / Right Select Button BROWN CH1 Trigger - Front GREEN CH2 Trigger - Rear 8: Power On/Off Button...
- Page 3 Menu Options Specifications Press the MENU button to enter the OSD. Press MENU again to move to the next Option Screen. Use the UP/Down Arrow buttons to select a option. Use the Right/Left Arrow buttons to increase or decrease the selected option.
- Page 4 - Optional Mount 250-8132 Not Included 1: Find a location for the mount, Rostra does not recommend using mounts with double sided 1: Remove the U-Bracket from the Monitor. Find a location that is desired for proper viewing. tape on 9" monitors. The Monitor may come loose and be a hazard or get damaged. If Before mounting the bracket insure the Monitor doe not block any safety device or the drivers view.
- Page 5 OF MANY SAFETY FEATURES AND THE DRIVER HAS THE RESPONSIBILITY TO ALWAYS INSURE SAFE OPERATION OF THE VEHICLE. ALWAYS CONSULT A PROFESSIONAL INSTALLATION TECHNICIAN TO INSURE THE INSTALLATION MEETS ALL LOCAL AND FEDERAL LAWS . SEE WWW.ROSTRA.COM FOR WARRANTY INFORMATION.
Need help?
Do you have a question about the 250-8290 and is the answer not in the manual?
Questions and answers