Table of Contents
Advertisement
7" DUAL INPUT MONITOR
250-8220 Installation/User Instructions
Parts Identification / Specifications
System Controls
System Menu Options / Wiring
Installation
Warranty
Before operating the monitor, please read this manual
thoroughly and retain it for future reference.
REARSIGHT
Page 1
Page 4
Page 5
Page 6
Page 8
Advertisement
Table of Contents

Subscribe to Our Youtube Channel
Related Manuals for Rostra 250-8220


Summary of Contents for Rostra 250-8220
- Page 1 REARSIGHT 7” DUAL INPUT MONITOR 250-8220 Installation/User Instructions Parts Identification / Specifications Page 1 System Controls Page 4 System Menu Options / Wiring Page 5 Installation Page 6 Warranty Page 8 Before operating the monitor, please read this manual thoroughly and retain it for future reference.
-
Page 2: Parts Identification
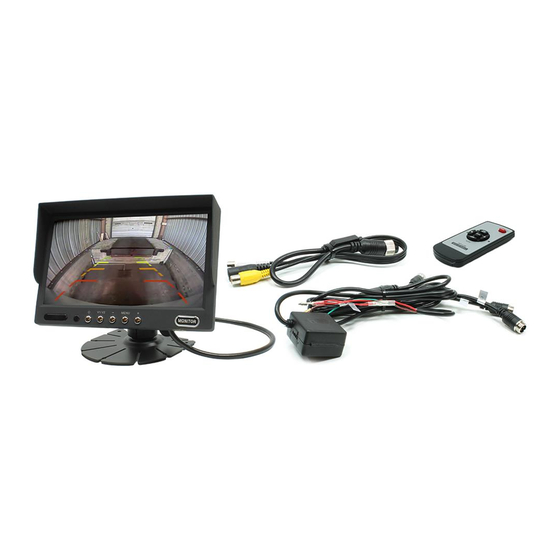
Parts Identification Contents Quantity 7” Monitor W/ Standard Mounting Base Power Cable / Video Input Adapter Cable Remote Control Installation / User’s Manual MONITOR BASE HARNESSES REMOTE CONTROL INSTALL MANUAL... -
Page 3: Specifications
Specifications Screen Size/Ratio 7”, 16:9 Screen backlight LED, 300cd/㎡ Resolution 800x480 Compatible system NTSC & PAL (automatically) Color, Brightness, Contrast, Volume, Language OSD control (English, Deutsch, French, Spanish, Portugal, Italian, Dutch, Simplify Chinese) Hor. L(60) R(60) Ver. UP(40) Viewing angle DOWN(60) Image reversion UP/Down and Left/Right... - Page 4 Warning: Always obey Federal, State and local laws when installing and using this product. Rostra Precision Controls is not responsible for damages, accident, theft, or other situations caused by improper use or installation. NOTE: In Extreme cold weather the LCD panel may look darker when powered on.
-
Page 5: Monitor Controls
Monitor Controls 1: Power Indicator 2: Remote Control Receiver 3: Power ON/OFF 4: Video Input Selection 5: Decrease Menu Selection / Decrease Volume 6: Menu 7: Increase Menu Selection / Increase Volume Remote Control 1: Power 2: Video Input Selection 3: Increase Menu Selection 4: Menu 5: Decrease Menu Selection... -
Page 6: Menu Options
Menu Options Select Options by pressing “MENU” then use “+” or “- “to adjust the value. Brightness: Adjusts screen brightness Contrast: Adjusts the contrast of the image Color: Adjusts the color of the image Volume: Adjusts the audio volume of the camera (if equipped) Zoom: Changes the viewing Aspect from 16:9 to 4:3 TCON: Rotates Screen Orientation for specialty applications Parkset: Selects Parking line display ON/OFF (Note: Some... -
Page 7: Monitor Installation
Monitor Installation 1. The Base may be attached by either using the double sided adhesive tape already attached or mounting with screws to a secure location. Our recommendation is to use the screw method shown. 2. Slide the clasp into the notch at the back of the monitor. 3. - Page 8 5. Adjust the monitor angle and tighten the thumb screw in the base. NOTE: Alternative style mounting brackets are available from Rostra Precision products for applications such as on-glass mounting and severe vibration situations. Contact Rostra for further details or see us at www.rostra.com...
- Page 9 Warranty The Company (Rostra Precision Controls) warrants that should this product or any part thereof, under normal use, be proven defective in material or workmanship within 36 months from the date of original purchase, such defect(s) will be repaired or replaced with a new or reconditioned product (at the Company's option) without charge for parts and repair labor.
- Page 10 Limitations THE EXTENT OF THE COMPANY'S LIABILITY UNDER THIS WARRANTY IS LIMITED TO THE REPAIR OR REPLACEMENT PROVIDED ABOVE AND, IN NO EVENT, SHALL THE COMPANY'S LIABILITY EXCEED THE PURCHASE PRICE PAID BY PURCHASER FOR THE PRODUCT. This Warranty is in lieu of all other express warranties or liabilities. ANY IMPLIED WARRANTIES, INCLUDING ANY IMPLIED WARRANTY OF MERCHANTABILITY, SHALL BE LIMITED TO THE DURATION OF THIS WRITTEN WARRANTY.
Need help?
Do you have a question about the 250-8220 and is the answer not in the manual?
Questions and answers