Advertisement
Quick Links
CONTENTS
FEATURES
The package contains the following:
Front, Rear, and Side Camera Inputs
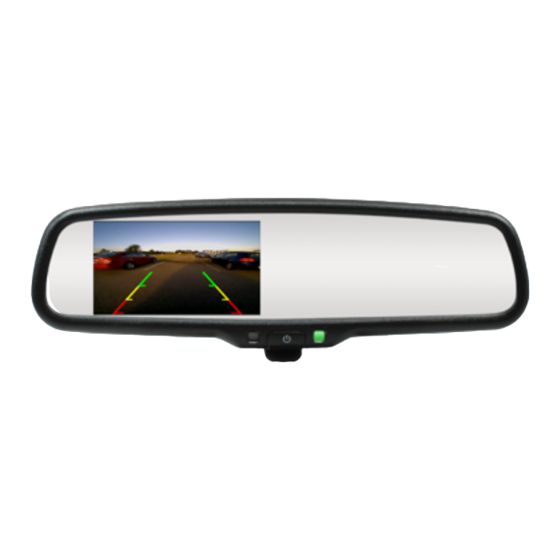
01 Rearview mirror monitor
One Touch Front Camera Viewing
02 wire harness
Automatic LCD Brightness Adjustment
03 User's manual
01
04 wire cover
Ultra High Brightness Screen
05 Remote control
Adjustable Back up Guide Line
SPECIFICATIONS
Screen Brightness: 1000CD/m
Display Type: TFT-LCD
Screen Size: 4.3 inch
Compatiable Systems: PAL / Auto / NSTC
02
Resolution: 480(H) X 272(V)
Working Voltage: 12V DC
DISPLAY OPERATION
REVERSE IMAGE:
03
04
05
1.The Reverse Camera input will always take priority over all other cameras.
When the vehicle is placed into reverse gear the camera image will automat-
ically be shown on the mirror display. While viewing the rear camera you
may adjust the panel brightness by pressing the center button on the mirror.
Each press will increase the brightness, keep pressing to return to the
starting level.
LEFT OR RIGHT LANE:
Left
Left
Right
Right
2
2. Blindspot cameras mounted on the sides of the vehicle are triggered by
the turn signals. When the driver signals to turn or change lanes the image
will be shown on the monitor. ( Blind Spot Cameras optional)
FRONT:
Front
Front
Back
Back
3. The front input can be controlled 2 ways depending on the installation.
1: By pressing the button on the front of the monitor it will display the front
camera for 20 seconds and then reset. 2: By using the trigger method the
monitor will show the input as long as the trigger is active. Note: The rear
camera will always override any input.
Main button use:
While in reverse mode: Press to adjust Brightness level UP.
While in stand-by mode: Show Front view camera for 20 seconds.
AUTOMATIC NIGHT TIME SCREEN DIMMING
HOW TO INSTALL MIRROR MONITOR
Removing the original mirror
In dark environments or at night the screen will automatically reduce the
brightness level for better viewing. This level can be adjusted in the settings
CAUTION:
menu.
FROM THE WINDSHIELD MOUNT. THE WINDSHIELD BUTTON MAY SEPARATE
FROM THE WINDSHIELD OR THE WINDSHIELD MAY BREAK IF FORCED.
In daytime and bright environments the screen will increase the brightness
automatically for better viewing.
NOTE: There are several versions of mirror mount systems. If unfamiliar with
mirror removal, seek professional assistance.
Note: When direct sunlight or headlamps shine into the mirror this may wash
out the picture and the ability to see your image.
Screw mount mirror removal.
Using a Philips screwdriver or #20 Torx bit, loosen the screw in the base of
the mirror.
After loosening screw, gently lift upward to slide mirror off of mirror mount.
The monitor automatically detects the light level with
the photo sensor on the left side of the control
Wedge mount mirror removal procedure: (Common for screw less mount).
button. Do not block this sensor or this function will
not work correctly.
Using a mirror tool or small 1/8" (4 mm) flat-blade screwdriver, insert the
flat end into the opening at the bottom of the mirror mount at the windshield.
Slide the screwdriver into the center of the mirror mount until resistance is
felt.
Gently apply a small amount of additional upward force to lift away locking
spring in the mount.
While still applying upward pressure with the screwdriver, grasp the mirror
REAR VIEW NIGHT TIME DIMMING FUNCTION
bracket and wiggle side to side. Lift mirror up toward the headliner and off
the windshield mount button.
The control under the mirror allows the driver to adjust the re ection from
high beam headlamps of vehicles approaching from behind. Flip the switch
Mirror Installation.
at the bottom of the mirror forward to change the mirror angle and dim the
Installation will vary depending on the mounting foot you use for the vehicle.
mirror as needed.
The mount pre-installed on the mirror is for a standard wedge mount foot. If
To return to normal view, ip the switch towards the rear of the vehicle.
you need to use a different foot, change the foot by removing the Philips
head screw in the center of the foot. Attach the required foot to the mounting
arm with the included screw.
NOTE: Check to insure the center screw in the mounting foot is tight before
installation to the windshield. The center screw should be tightened to 15
in-lb. If changing the mount, we recommend using Loctite Threadlocker to
insure the mount will not loosen over time. Install the mirror by reversing the
removal process.
NOTE: Always use caution, DO NOT force the mount. Rostra Precision
Controls, Inc. will not be responsible for broken windshields. If you are not
sure how to remove or re-install the mirror seek trained, qualified help.
MENU SETTING
Remote control
The menu is accessed and set by using the remote control.
DO NOT USE EXCESSIVE FORCE WHEN REMOVING MIRROR
Enter the menu
Menu parameter decreases
Guide line up
Guide line left
Enter guide line
adjustment
Guide line clockwise
Guide line anti-clockwise
Menu setting guidance
Short press "
", you can switch among "PICTURE", "SYSTEM", or exit
out. When you enter either, press "
"
" and "
" are used to change the setting of each option.
PICTURE
BRIGHTNESS
CONTRAST
COLOR
Picture: These settings will
adjust the picture attributes.
Menu parameter
increases
Guide line right
Guide line down
" to switch among the items.
SYSTEM
50
SCALE
ON
50
REAR TRI
ON
50
PRESET
OFF
System: These setting effect operational
features.
SCALE: Turns parking lines ON/ OFF.
REAR TRI: Turns the rear cam trigger
ON/OFF. If off the monitor will show the
image when present, when on the trigger
wire must be used.
PRESET: Returns all settings to factory
default.
Advertisement

Subscribe to Our Youtube Channel
Related Manuals for Rostra RearSight 250-8243


Summary of Contents for Rostra RearSight 250-8243
- Page 1 REAR TRI: Turns the rear cam trigger Each press will increase the brightness, keep pressing to return to the Main button use: NOTE: Always use caution, DO NOT force the mount. Rostra Precision ON/OFF. If off the monitor will show the starting level.
- Page 2 ADJUSTABLE GUIDE LINE in the center of the 4 directional keys on the remote control. Rostra Precision Controls, Inc. (“the Company”) is committed to quality and customer service, and are pleasedto offer you this Warranty. Please read it thoroughly. For the right side press the button again to select (XR).
Need help?
Do you have a question about the RearSight 250-8243 and is the answer not in the manual?
Questions and answers