Table of Contents
Advertisement
Advertisement
Table of Contents

Related Manuals for Carrier i-Vu Open Link


Summary of Contents for Carrier i-Vu Open Link
- Page 1 CARRIER CORPORATION ©2017 A member of the United Technologies Corporation family · Stock symbol UTX · Catalog No. 11-808-462-01 · 2/6/2017...
- Page 2 Verify that you have the most current version of this document from www.hvacpartners.com or your local Carrier office. Important changes are listed in Document revision history at the end of this document. CARRIER CORPORATION ©2017. All rights reserved throughout the world. i-Vu is a registered trademark of Carrier...
-
Page 3: Table Of Contents
Contents Introduction .................................. 1 What is a i-Vu® Open Link? ..........................1 Specifications ................................ 2 Safety considerations............................3 Installing the i-Vu® Open Link ............................ 4 Mounting the i-Vu® Open Link..........................4 Wiring the i-Vu® Open Link for power ....................... 5 To wire for power ........................... -
Page 5: Introduction
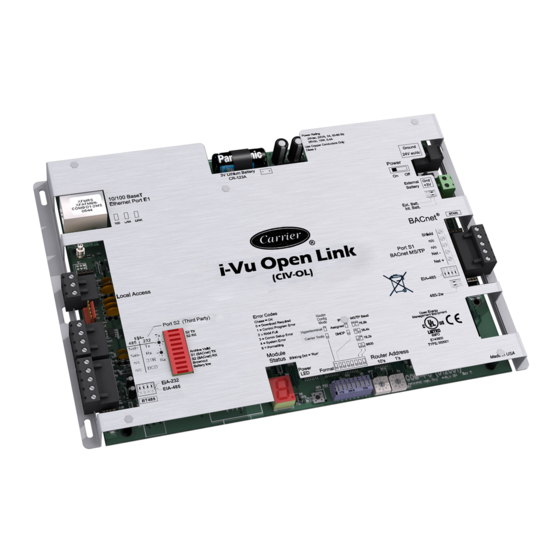
MS/TP bus, and one jumper-configurable EIA-232/EIA-485 port for connecting to a Modbus or LonWorks network. It also has one 10/100 Base-T Ethernet port for connecting to the building LAN and integrating to third-party IP control networks. i-Vu Open Link Carrier Proprietary and Confidential CARRIER CORPORATION ©2017... -
Page 6: Specifications
A low battery is indicated by the Battery Low LED or a low battery alarm in the i-Vu® or Field Assistant application, a touchscreen device, and Field Assistant. i-Vu Open Link Carrier Proprietary and Confidential CARRIER CORPORATION ©2017... -
Page 7: Safety Considerations
Safety considerations WARNING Disconnect electrical power to the i-Vu® Open Link before wiring it. Failure to follow this warning could cause electrical shock, personal injury, or damage to the controller. i-Vu Open Link Carrier Proprietary and Confidential CARRIER CORPORATION ©2017... -
Page 8: Installing The I-Vu® Open Link
Screw the i-Vu® Open Link into an enclosed panel using the mounting slots on the cover plate. Leave about 2 in. (5 cm) on each side of the controller for wiring. i-Vu Open Link Carrier Proprietary and Confidential CARRIER CORPORATION ©2017... -
Page 9: Wiring The I-Vu® Open Link For Power
The i-Vu® Open Link is powered by a Class 2 power source. Take appropriate isolation measures when mounting it in a control panel where non-Class 2 circuits are present. • Carrier controllers can share a power supply as long as you: • Maintain the same polarity. -
Page 10: To Set The I-Vu® Open Link Address On The Open Network
10's Turn on the i-Vu® Open Link's power. CAUTION The factory default setting is 00 and must be changed to successfully install your i-Vu® Open Link. i-Vu Open Link Carrier Proprietary and Confidential CARRIER CORPORATION ©2017 Installation and Start-up Guide... -
Page 11: To Choose An Ip Addressing Scheme
A computer with a USB port • A USB Link cable — See To communicate through the Local Access port with a USB Link (page 12) i-Vu Open Link Carrier Proprietary and Confidential CARRIER CORPORATION ©2017 Installation and Start-up Guide... - Page 12 Device Manager > Ports (Com & LPT). The COM port number is beside Silicon Labs CP210x USB to UART Bridge. Speed (baud) 115200 Data Bits Stop Bits None Parity Flow Control None i-Vu Open Link Carrier Proprietary and Confidential CARRIER CORPORATION ©2017 Installation and Start-up Guide All rights reserved...
-
Page 13: Wiring For Communications
BACnet MS/TP EIA-485 DIP Switch selectable: Open network connection (2-wire) • 9600 bps • 19.2 kbps • 38.4 kbps • 76.8 kbps (default) i-Vu Open Link Carrier Proprietary and Confidential CARRIER CORPORATION ©2017 Installation and Start-up Guide All rights reserved... -
Page 14: Ethernet, Bacnet Ms/Tp, And Arc156 Wiring Specifications
Set the MS/TP baud rate DIP switches 7 and 8 to match the baud rate of the Open network. The default is 76.8k. Connect the i-Vu® Open Link's Port S1 to the Open MS/TP network. Use the same polarity throughout the network segment. i-Vu Open Link Carrier Proprietary and Confidential CARRIER CORPORATION ©2017 Installation and Start-up Guide... -
Page 15: To Wire To A Bacnet Arc156 Network
...to third-party Set the port's jumper(s) port... terminal... device terminal on i-Vu® Open Link EIA-232 EIA-232 Signal Ground EIA-485, Net+ EIA-485 2-wire Net- 2-wire i-Vu Open Link Carrier Proprietary and Confidential CARRIER CORPORATION ©2017 Installation and Start-up Guide All rights reserved... -
Page 16: Communicating Through The Local Access Port With A Usb Link
For the i-Vu® or Field Assistant application to communicate with the controller, the controller must have been downloaded with at least its driver. • Laptop with USB port • USB Link (Part #USB-L) i-Vu Open Link Carrier Proprietary and Confidential CARRIER CORPORATION ©2017 Installation and Start-up Guide All rights reserved... -
Page 17: To Communicate Using Putty
NOTE The USB Link driver is installed with an i-Vu® or Field Assistant v5 or later system. But if needed, you can get the latest driver from http://www.silabs.com/products/mcu/Pages/USBtoUARTBridgeVCPDrivers.aspx. Install the driver before you connect the USB Link to your computer. i-Vu Open Link Carrier Proprietary and Confidential CARRIER CORPORATION ©2017 Installation and Start-up Guide... - Page 18 Device Manager > Ports (Com & LPT). The COM port number is beside Silicon Labs CP210x USB to UART Bridge. Speed (baud) 115200 Data Bits Stop Bits Parity None Flow Control None i-Vu Open Link Carrier Proprietary and Confidential CARRIER CORPORATION ©2017 Installation and Start-up Guide All rights reserved...
-
Page 19: Configuring Bacnet Device Instance And Network Number
The i-Vu® Open Link's rotary address setting determines the automatic BACnet addressing scheme for the connected Open network. Legend 16 = Carrier's BACnet Vendor ID xx = i-Vu® Open Link's rotary switch address (BACnet Device Instance address) yy = Open controller's rotary switch address (MS/TP MAC address) For the i-Vu®... - Page 20 BACnet MS/TP Network Number = 200 BACnet Device Instance Number = 200yy BACnet Device Instance Name = device200yy BACnet MS/TP MAC Address = yy i-Vu Open Link Carrier Proprietary and Confidential CARRIER CORPORATION ©2017 Installation and Start-up Guide All rights reserved...
-
Page 21: To Set Up Bacnet Broadcast Management Devices (Bbmds)
Allow controllers on one subnet to communicate with controllers on other subnets • Enable the i-Vu® application to see, upload, or configure controllers on different subnets i-Vu Open Link Carrier Proprietary and Confidential CARRIER CORPORATION ©2017 Installation and Start-up Guide... - Page 22 Assign an IP address, subnet mask, and default gateway for each i-Vu® Open Link on the IP network. See Addressing the i-Vu® Open Link (page 5). Acquire the BBMD Configuration Tool from the Tech Tools DVD or from the Carrier Control Systems Support Site http://www.hvacpartners.com/. This is a stand-alone executable file and no installation is necessary.
- Page 23 NOTE To clear the BBMD entries from a router, follow the steps above using an empty (blank) .bdt file. A cleared BBMD table contains just the router’s IP address without entries in the BBMD table, as shown below. i-Vu Open Link Carrier Proprietary and Confidential CARRIER CORPORATION ©2017...
-
Page 24: Configuring I-Vu® Open Link Driver Properties
TIP Use an occupied date and time (such as a Tuesday at 10 a.m.) so the equipment does not operate in unoccupied mode if the controller loses power during occupancy. i-Vu Open Link Carrier Proprietary and Confidential CARRIER CORPORATION ©2017... -
Page 25: Device
The default is 10 and should be ideal for the majority of applications. In cases where the i-Vu® Open Link is the target of many requests, this number could be increased as high as 100 or 200. i-Vu Open Link Carrier Proprietary and Confidential CARRIER CORPORATION ©2017... -
Page 26: Notification Classes
Change for third-party devices that use a BACnet Process Identifier other than 1. The i-Vu® or Field Assistant application processes alarms for any 32-bit Process Identifier. i-Vu Open Link Carrier Proprietary and Confidential CARRIER CORPORATION ©2017 Installation and Start-up Guide... -
Page 27: Calendars
Clear these checkboxes to disable Alarm or Return to normal messages of this type from this controller. Notification Class Do not change this field. i-Vu Open Link Carrier Proprietary and Confidential CARRIER CORPORATION ©2017 Installation and Start-up Guide All rights reserved... -
Page 28: Bacnet Router Properties
Alarm Store/Forward On the Alarm Store and Forward page, you can change alarm delivery settings for the i-Vu® Open Link used to store and forward alarms from a remote dial-up site. i-Vu Open Link Carrier Proprietary and Confidential CARRIER CORPORATION ©2017... -
Page 29: Configuring Properties Using The Equipment Touch
Configuring Properties using the Equipment Touch View or configure the i-Vu® Open Link using the Equipment Touch touchscreen device. Refer to the Equipment Touch Installation and Setup Guide for details. i-Vu Open Link Carrier Proprietary and Confidential CARRIER CORPORATION ©2017... -
Page 30: Troubleshooting
Troubleshooting Troubleshooting If you have problems mounting, wiring, or addressing the i-Vu® Open Link, contact Carrier Control Systems Support. NOTE To help you troubleshoot, obtain a Module Status (Modstat) from the controller and review the System Error and Warning details. -
Page 31: To Get The Serial Number
To restore factory defaults CAUTION This erases all archived information and user-configuration settings. You will have to reconfigure all custom settings. It is recommended to restore the factory defaults only under the guidance of Carrier Control Systems Support. i-Vu Open Link Carrier Proprietary and Confidential CARRIER CORPORATION ©2017... -
Page 32: To Take The I-Vu® Open Link Out Of Service
Insert the new battery into the controller, matching the polarity of the battery you removed. Push the black clip back onto the battery until you hear both sides click in place. Download the i-Vu® Open Link. i-Vu Open Link Carrier Proprietary and Confidential CARRIER CORPORATION ©2017... -
Page 33: Compliance
Compliance of listed products to requirements of ASHRAE Standard 135 is the responsibility of BACnet International. BTL ® is a registered trademark of BACnet International. i-Vu Open Link Carrier Proprietary and Confidential CARRIER CORPORATION ©2017 Installation and Start-up Guide All rights reserved... -
Page 34: Appendix A: Bacnet Protocol Implementation Conformance Statement
Appendix A: BACnet Protocol Implementation Conformance Statement Appendix A: BACnet Protocol Implementation Conformance Statement The PIC statements are updated regularly. Please refer to the BACnet website http://www.bacnetinternational.net/catalog/index.php?m=28 for the latest information. i-Vu Open Link Carrier Proprietary and Confidential CARRIER CORPORATION ©2017 Installation and Start-up Guide... -
Page 35: Document Revision History
Added new driver property: Touchscreen Schedule Edit Enable C-D-LJ Properties > Driver Restore factory defaults Added information on using the Factory Defaults button C-D-LJ-E-RD * For internal use only i-Vu Open Link Carrier Proprietary and Confidential CARRIER CORPORATION ©2017 Installation and Start-up Guide All rights reserved... - Page 38 CARRIER CORPORATION ©2017 A member of the United Technologies Corporation family · Stock symbol UTX · Catalog No. 11-808-462-01 · 2/6/2017...
Need help?
Do you have a question about the i-Vu Open Link and is the answer not in the manual?
Questions and answers