Table of Contents
Advertisement
Available languages
Available languages
Quick Links
Advertisement
Table of Contents

Related Manuals for PCE Instruments PCE-VA 11


Summary of Contents for PCE Instruments PCE-VA 11
- Page 1 Bedienungsanleitung User Manual PCE-VA 11 thermo anemometer / Thermo-Anemometer User manuals in various languages (français, italiano, español, português, nederlands, türk, polski, русский, 中文) can be downloaded here: www.pce-instruments.com Letzte Änderung / last change: 26 October 2016 v1.0...
-
Page 2: Table Of Contents
Anschlüsse ........................4 Display ..........................4 Funktionstasten ........................ 5 Vorbereitung ..................6 Stromversorgung ......................6 Betrieb ....................7 Messen ..........................7 Weitere Messfunktionen ....................7 Einstellungen ........................9 Software ........................... 9 Garantie ....................12 Entsorgung ..................12 © PCE Instruments... - Page 3 System description ................15 Device ..........................15 Interfaces ........................16 Display ..........................16 Function keys ........................17 Getting started ..................18 Power supply ........................18 Operation ..................... 18 Measurement ........................18 Further functions ......................19 Settings ...........................20 Software ..........................21 Warranty ....................23 Disposal ....................23 © PCE Instruments...
-
Page 4: Sicherheitsinformationen
Bei Fragen kontaktieren Sie bitte die PCE Deutschland GmbH. Die Kontaktdaten finden Sie am Ende dieser Anleitung. Sicherheitssymbole Sicherheitsrelevante Hinweise, deren Nichtbeachtung zu Schäden am Gerät oder zu Verletzungen führen kann, sind zusätzlich mit einem Sicherheitssymbol gekennzeichnet. Symbol Bezeichnung / Beschreibung Warnung vor Laserstrahl Nichtbeachtung kann zu Augenverletzungen führen. © PCE Instruments... -
Page 5: Spezifikationen
MAX, MIN, AVG, HOLD Speicher 8 Querschnittsflächen 20 Punkte Durchschnittswert Stromversorgung 9 V Batterie Lieferumfang 1 x Thermo-Anemometer PCE-VA 11 1 x Flügelradsonde 1 x 9 V Batterie 1 x USB Kabel 1 x Software 1 x Tragekoffer © PCE Instruments... -
Page 6: Systembeschreibung
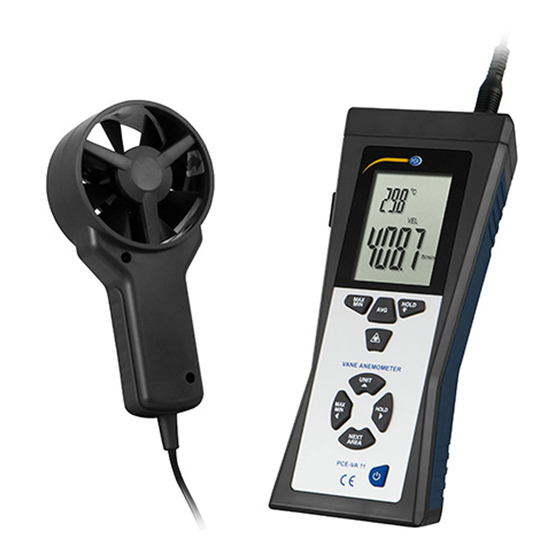
Systembeschreibung Gerät Infrarotsensor Anschluss für Flügelradsensor Flügelradsensor mit Lufttemperaturmesser Display USB-Schnittstelle Bedienfeld © PCE Instruments... -
Page 7: Anschlüsse
Anschlüsse Anschluss für Flügelradsensor Laser-Zielhilfe für Infrarotsensor Infrarotsensor USB-Schnittstelle Display Anzeige für Lufttemperatur Anzeige für Luftgeschwindigkeit, Luftmenge und IR-Temperatur © PCE Instruments... -
Page 8: Funktionstasten
Halten Sie die Taste gedrückt, um die Temperatur mit dem IR-Sensor zu messen. Drücken Sie die Taste, um den Modus und die Maßeinheit UNIT ▲ der unteren Anzeige auszuwählen. Im FLOW Modus zeigt das Gerät die Luftmenge an. Im VEL Modus zeigt das © PCE Instruments... -
Page 9: Vorbereitung
Öffnen Sie die Batterieklappe auf der Rückseite des Geräts mit einem Kreuzschlitz- Schraubendreher und ersetzen Sie die 9 V Batterie. Schließen Sie anschließend das Batteriefach. Das Gerät schaltet sich nach 15 Minuten Inaktivität automatisch ab. Diese Funktion ist bei der Luftmengenmessung (CFM, CMM) und im Durchschnittswert-Modus (AVG) deaktiviert. © PCE Instruments... -
Page 10: Betrieb
Platzieren Sie den Flügelradsensor vor der Strömungsquelle. Drücken Sie die MAX/MIN ◄ Taste, bis „REC“ und „MAX“ bzw. „MIN“ unten auf dem Display zu sehen ist. Auf der unteren Anzeige können Sie nun den MAX- bzw. MIN-Wert seit dem Aktivieren der Funktion ablesen. © PCE Instruments... - Page 11 Drücken Sie die MAX/MIN (Temperatur) Taste. Oben auf dem Display erscheint nun „REC“ und „MAX“ bzw. „MIN“. Die obere Anzeige zeigt nun den MAX- bzw. MIN-Wert der Lufttemperatur seit dem Aktivieren der Funktion an. Um die Funktion wieder zu verlassen, halten Sie die MAX/MIN (Temperatur) Taste gedrückt. © PCE Instruments...
-
Page 12: Einstellungen
32 Bit Betriebssystem verwenden. (Wenn Sie sich nicht sicher sind, klicken Sie mit der rechten Maustaste auf Arbeitsplatz/Computer und wählen Sie „Eigenschaften“ aus. Nun können Sie bei „Systemtyp“ sehen, um was für ein Betriebssystem es sich handelt. © PCE Instruments... - Page 13 Diesen können Sie im Geräte-Manager sehen (Systemsteuerung -> Geräte- Manager): Klicken Sie in der Menüleiste auf „COM Port“ und wählen Sie den korrekten COM Port aus oder tragen Sie diesen mit Hilfe des Menüpunktes „Other COM“ selber ein. © PCE Instruments...
- Page 14 Menüleiste auf „File(f)“ und dann auf „Save“. Es erscheint ein Speicherfenster, in dem Sie den Dateinamen und den Speicherort festlegen können. Die gespeicherten Daten können mit dem Windows-Texteditor geöffnet werden. Die gespeicherten Graphen können mit der Software geöffnet werden. © PCE Instruments...
-
Page 15: Garantie
Zur Umsetzung der ElektroG (Rücknahme und Entsorgung von Elektro- und Elektronikaltgeräten) nehmen wir unsere Geräte zurück. Sie werden entweder bei uns wiederverwertet oder über ein Recyclingunternehmen nach gesetzlicher Vorgabe entsorgt. Alternativ können Sie Ihre Altgeräte auch an dafür vorgesehenen Sammelstellen abgeben. WEEE-Reg.-Nr.DE69278128 © PCE Instruments... -
Page 16: Safety Notes
We expressly point to our general guarantee terms which can be found in our general terms of business. If you have any questions please contact PCE Instruments. The contact details can be found at the end of this manual. Safety symbols Safety-related instructions the non-observance of which can cause damage to the device or personal injury carry a safety symbol. -
Page 17: Specifications
Memory 8 cross-section areas 20 points average Power supply 9 V battery Delivery contents 1 x thermo anemometer PCE-VA 11 1 x vane probe 1 x 9 V battery 1 x USB cable 1 x software 1 x carrying case... -
Page 18: System Description
System description Device Infrared sensor Vane probe connector Vane probe with air temperature sensor Display USB interface Control panel © PCE Instruments... -
Page 19: Interfaces
Interfaces Vane probe connector Laser pointer for aiming Infrared sensor USB interface Display Display for air temperature Display for air velocity, air flow and IR temperature © PCE Instruments... -
Page 20: Function Keys
In FLOW mode, the device measures UNIT ▲ the air flow. In VEL mode, the device measures the air velocity. Press and hold the key to change the measuring unit on the © PCE Instruments... -
Page 21: Getting Started
(air velocity or air flow) is active by looking at the indications on the display. If air velocity mode is active, the display shows “VEL”. If air flow mode is active, the display shows “FLOW”. © PCE Instruments... -
Page 22: Further Functions
To resume the recording, press the HOLD ► key again. To exit MAX/MIN/AVG mode, press and hold the MAX/MIN ◄ key. The device beeps two times. Now you can release the key and you get back to normal measuring mode. © PCE Instruments... -
Page 23: Settings
Press the AREA key to go to the next cross-section area. You can store up to 8 different areas to the device. Press and hold the AREA key to confirm the settings and to take the selected cross- section area for the current measurement. The device returns to normal measuring mode. © PCE Instruments... -
Page 24: Software
Wait for the Windows autoplay window to appear and click on “Run setup.exe” or double-click on the CD-ROM drive. Follow the instructions on the screen. 5.4.2 Operation Turn on the device, connect it to your PC and start the software. Now you see the main screen: © PCE Instruments... - Page 25 “Save”. A save window appears where you can select the file name and the saving location. The saved data can be viewed with the Windows Text Editor. The saved graphs can be viewed with the software. © PCE Instruments...
-
Page 26: Warranty
For countries outside the EU, batteries and devices should be disposed of in accordance with your local waste regulations. If you have any questions, please contact PCE Instruments. © PCE Instruments... - Page 27 PCE Instruments contact information Germany France Spain PCE Deutschland GmbH PCE Instruments France EURL PCE Ibérica S.L. Im Langel 4 76, Rue de la Plaine des Bouchers Calle Mayor, 53 D-59872 Meschede 67100 Strasbourg 02500 Tobarra (Albacete) Deutschland France España Tel.: +49 (0) 2903 976 99 0...
- Page 28 User manuals in various languages (français, italiano, español, português, nederlands, türk, polski, русский, 中文) can be downloaded here: www.pce-instruments.com Specifications are subject to change without notice. © PCE Instruments...
Need help?
Do you have a question about the PCE-VA 11 and is the answer not in the manual?
Questions and answers