Advertisement
Advertisement
Table of Contents

Related Manuals for Victrola VPRO-3100


Summary of Contents for Victrola VPRO-3100
- Page 1 USB Turntable Model: VPRO-3100 Instruction Manual PLEASE READ THIS INSTRUCTION MANUAL CAREFULLY BEFORE USE AND KEEP IT FOR FUTURE REFERENCE.
-
Page 2: Table Of Contents
CONTENTS SAFETY INSTRUCTIONS .................. SPECIFICATIONS ....................TURNTABLE LAYOUT..................5 ASSEMBLY OF THE DUST COVER.............. TURNTABLE OPERATION ................. SET UP......................BASIC OPERATION ..................AUTO RETURN RESET ................HOW TO REPLACE THE NEEDLE .............. IF THE BELT BECOMES LOOSE..............TIPS FOR BETTER TURNTABLE USE ............ -
Page 3: Safety Instructions
SAFETY INSTRUCTIONS 1. Read these instructions – All the safety and operating instructions should be read before this product is operated. 2. Keep these instructions – The safety and operating instructions should be retained for future reference. 3. Heed all warnings – All warnings on the appliance and in the operating instructions should be adhered to. -
Page 4: Specifications
This equipment is a Class II or double insulated electrical appliance. It has been designed in such a way that it does not require a safety connection to electrical earth. CAUTION RISK OF ELECTRIC SHOCK DO NOT OPEN CAUTION: TO PREVENT The exclamation point within an equilateral The lightning flash with arrowhead within an triangle is intended to alert the user to the... -
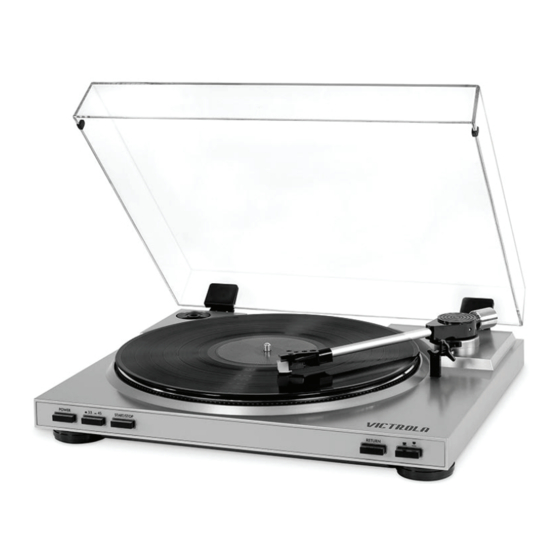
Page 5: Turntable Layout
TURNTABLE LAYOUT 6 7 8 14 15 Turntable Platter Tone Arm Return Button (Eject) Tone Arm Tone Arm Lift Lever ( 45 RPM Adaptor Dust Cover Hinges Tone Arm Lock Dust Cover Phono Stylus Cartridge USB Output Jack Power Button Power Adaptor Jack Speed Change Button RCA Output Jack. -
Page 6: Assembly Of The Dust Cover
ASSEMBLY OF THE DUST COVER 1. Remove protective plastic film from the DUST COVER. 2. Align the DUST COVER (#12) to the DUST COVER HINGES (#11), on the back of the unit. Then, push down the dust cover gently to clip into the hinges. TURNTABLE OPERATION SET UP An AC/DC adaptor with an output of 12V/1.0A is included with the USB Turntable. -
Page 7: Auto Return Reset
AUTO RETURN RESET It is recommended to reset the Auto Return when you move this product. The mechanism of Auto Return will rotate irregularly when moving and it will cause the malfunction of Auto Return. The following steps will reset the Auto Return. 1. -
Page 8: If The Belt Becomes Loose
IF THE BELT BECOMES LOOSE The belt and turntable platter have been installed properly during production, but the belt may have become loose during transportation. If so, follow the below procedures to re install the belt drive: 1. Remove the rubber mat from the turntable platter and carefully unclip the small E ring from the turntable shaft (using tweezers or pliers), Then release the turntable platter from the shaft. -
Page 9: Fcc Statement
State of California to cause cancer. For more information go to www.P65Warnings.ca.gov. WARRANTY Victrola is a registered trademark of Innovative Technology Electronics LLC. Innovative Technology Electronics LLC. Limited Warranty: 90 Days Labor, One Year Parts Innovative Technology Electronics LLC. - Page 10 To obtain service, the purchaser MUST present an original sales receipt / proof of purchase. Please contact us at www.victrola.com to request an RMA (Return Material Authorization) number to return products for service or replacement. Returns without an RMA number on the package will be refused and returned to sender.
Need help?
Do you have a question about the VPRO-3100 and is the answer not in the manual?
Questions and answers