Table of Contents
Advertisement
Quick Links
Advertisement
Table of Contents

Related Manuals for Agilent Technologies AssayMAP Bravo


Summary of Contents for Agilent Technologies AssayMAP Bravo
- Page 1 AssayMAP Bravo Platform Installation Guide Original Instructions ...
- Page 2 Further, to the max- A WARNING notice denotes a prior agreement and written consent from imum extent permitted by applicable Agilent Technologies, Inc. as governed by hazard. It calls attention to an law, Agilent disclaims all warranties, United States and international copyright...
-
Page 3: Table Of Contents
Running the Shutdown utility ..............98 AssayMAP Bravo Platform Installation Guide... - Page 4 Adjusting the teachpoint for the red PCR plate insert ..........103 AssayMAP Bravo Platform Installation Guide...
-
Page 5: Before You Start
AssayMAP Bravo Platform Installation Guide Before you start • “About this guide” on page 2 • “Related guides and where to find them” on page 2 • “Service documentation” on page 4 • “Safety information” on page 4 ... -
Page 6: About This Guide
This installation guide is intended for use by qualified and authorized Agilent Technologies service personnel who possess an in- depth service background and have received training in the installation of the AssayMAP Bravo Platform. What this guide covers This guide describes the following software versions: •... - Page 7 To access the VWorks Knowledge Base, do one of the following: • From within VWorks software, select Help > Knowledge Base or press F1. • From the Windows desktop, select Start > Agilent Technologies > VWorks Knowledge Base. • Go to the online VWorks Knowledge Base at www.agilent.com/chem/askb...
-
Page 8: Safety Information
Any customer who does not use the supplied safety equipment or who modifies the supplied safety equipment assumes full responsibility for providing an appropriate level of safety for its operators and for providing the applicable safety compliance marking and documentation. AssayMAP Bravo Platform Installation Guide... -
Page 9: Installing The Platform
AssayMAP Bravo Platform Installation Guide Installing the platform • “Overview of the hardware components” on page 2 • “Computer requirements” on page 3 • “Installation workflow for standard configuration” on page 4 • “Installing the Bravo risers” on page 5 •... -
Page 10: Overview Of The Hardware Components
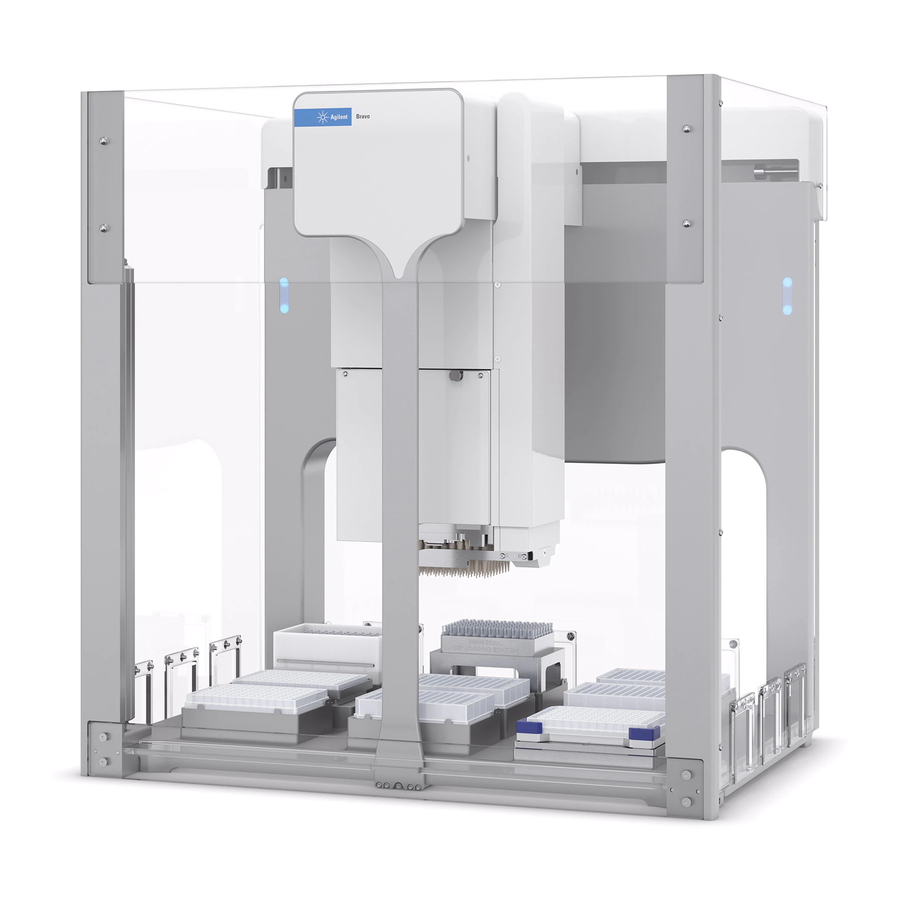
Installing the platform Overview of the hardware components Overview of the hardware components The following figure and table show the components of the AssayMAP Bravo Platform, which is required for running the AssayMAP protocols. Figure AssayMAP Bravo Platform components Item... -
Page 11: Computer Requirements
The software user interface for the AssayMAP applications is optimized for a monitor with a resolution of 1920 x 1080 (full HD). For a full list of the computer requirements, see the software release notes. AssayMAP Bravo Platform Installation Guide... -
Page 12: Installation Workflow For Standard Configuration
AssayMAP profiles. Verify the gripper offset in every page 57 profile. Install the Bravo shields and Light Curtain. Bravo Platform Safety and Installation Guide Verify the installation and setup. “Verifying the installation and setup” on page 79 AssayMAP Bravo Platform Installation Guide... -
Page 13: Installing The Bravo Risers
Bravo back plate before tilting the Bravo Platform backwards. To install the risers: Place the foam pad on the work table behind the Bravo Platform. AssayMAP Bravo Platform Installation Guide... - Page 14 Tighten the screws at the top first, and then tighten the screws at the bottom, as the following figures show. Tighten the screws until snug, and ensure that the risers are flush to the base of the Bravo deck. Figure Top screw located at inner hole AssayMAP Bravo Platform Installation Guide...
- Page 15 Ensure that the instrument and riser assembly does not wobble and that it sits flat on the table. If the Bravo Platform has any wobble or the risers have uneven seating, replace or realign and tighten the risers. AssayMAP Bravo Platform Installation Guide...
-
Page 16: About Installing The Assaymap Head
Platform Safety and Installation Guide. CAUTION If the tip-box stripper pins are extended, the pins will crash into the wash station during syringe washing. To prevent potential equipment damage, ensure that the pins are always retracted during use. AssayMAP Bravo Platform Installation Guide... - Page 17 When the pin is properly seated, rotate it counterclockwise no more than ° until it locks. Repeat this procedure for the other pins. AssayMAP Bravo Platform Installation Guide...
-
Page 18: Installing The 96Am Wash Station And Pump Module
Pump Module” on page 10 deck location 1. Set up the tubing “Tubing connections for 96AM configuration. Wash Station” on page 14 Connect the tubing and the “Routing the tubing” on page 16 Pump Module power and communication cables. AssayMAP Bravo Platform Installation Guide... - Page 19 Good condition chimneys and consistent chimney height are critical for proper wash station function. To replace damaged chimneys, see the AssayMAP 96AM Wash Station Maintenance Guide. Figure Close up views of 96AM Wash Station chimneys Good condition chimneys Damaged chimneys AssayMAP Bravo Platform Installation Guide...
- Page 20 At deck location 1, remove the standard platepad, if installed, and then install the bracketed platepad. Use the supplied screw to secure the platepad to the deck. Ensure the platepad crosshairs are oriented towards the northwest corner of the deck, as the following figure shows. AssayMAP Bravo Platform Installation Guide...
- Page 21 Ensure that both brackets remain engaged as you tighten the bracket screws. Ensure that the wash station sits level on the platepad and that both brackets are holding the wash station securely in place. AssayMAP Bravo Platform Installation Guide...
- Page 22 Figure 96AM Wash Station secured with platepad brackets Tubing connections for 96AM Wash Station The following figure shows the AssayMAP Bravo tubing connections for the 96AM Wash Station. As the figure shows, the upper pump (A) is for the fill line and the lower pump (B) is for the empty line.
- Page 23 Inline pump Removes the particulates that can clog the chimneys in the wash station. filter 3- way Enables one tube to branch into two tubes at the input and output ports connector on the wash station. AssayMAP Bravo Platform Installation Guide...
- Page 24 10- inch) length of 1/4- inch tubing, and insert quick- connect fittings on both ends. Place this tubing assembly within the top pump head, as follows: 00306 Lift up the flip- top cover on the pump head so that it is fully open. AssayMAP Bravo Platform Installation Guide...
- Page 25 Connect quick- disconnect fittings (c) to the free end of each 1/4- inch tubing section. Place this tubing assembly within the bottom pump head. Refer to step 3 for the detailed procedure. 00306 AssayMAP Bravo Platform Installation Guide...
- Page 26 Place the appropriate quick- disconnect fitting on each end on this tubing. Connect one end of the tubing to the output port of the waste carboy, and connect the other end to the tubing assembly in the bottom pump (outlet line). AssayMAP Bravo Platform Installation Guide...
- Page 27 50/60Hz 1.5 Amps Connect the Pump Module power cord between the AC connector on the Pump Module and an AC outlet with a grounded circuit. For detailed installation instructions, see the Pump Module User Guide. AssayMAP Bravo Platform Installation Guide...
-
Page 28: Installing The Standard Platepads
Secure the platepad to the deck using the screw provided. Ensure that the setscrews in the platepad tabs are recessed and not protruding into the plate nest. Use a 1.5- mm hex wrench to back out any protruding setscrews. AssayMAP Bravo Platform Installation Guide... -
Page 29: Installing The Peltier Thermal Station
• Inheco STC Controller, power and communication cables, and Inheco user documentation for the STC Controller Carefully handle the cable of the Peltier Thermal Station during removal from the box, as the following figure shows. AssayMAP Bravo Platform Installation Guide... - Page 30 Remove the platepad from the deck. Remove the cutout cover. Use a hex driver to uninstall the four M3 screws that attach the cutout cover to the deck. Figure Cutout cover on the Bravo deck AssayMAP Bravo Platform Installation Guide...
- Page 31 Figure Bracket, Peltier Thermal Station assembly, and deck cutout Carefully slide the cable into the cutout hole first before you place the Peltier Thermal Station assembly into the cutout. AssayMAP Bravo Platform Installation Guide...
- Page 32 Bravo deck. Use a hex driver to install the four M3 bolts that secure the bracket to the deck. Figure Securing the Peltier Thermal Station to the deck AssayMAP Bravo Platform Installation Guide...
- Page 33 Install the M3 screw in the center of the plate nest to secure it to the Peltier Thermal Station. Figure Installing the custom plate nest Connect the cable from the Peltier Thermal Station to the Inheco STC controller. AssayMAP Bravo Platform Installation Guide...
-
Page 34: Installing And Connecting The Orbital Shaking Station
Set the controller power switch to the On (|) position. Installing and connecting the Orbital Shaking Station The following figure shows the Orbital Shaking Station, which has its own control module. Figure Orbital Shaking Station with control module and adapter pad AssayMAP Bravo Platform Installation Guide... - Page 35 Place the Orbital Shaking Station atop the adapter pad so that the cable is towards the back of the Bravo deck. Make sure the station is completely centered on top of the adapter pad and sits level. AssayMAP Bravo Platform Installation Guide...
- Page 36 The Orbital Shaking Station can shift slightly when tightening. Ensure that the sides of the Orbital Shaking Station are parallel to the sides of the adapter plate. If the Orbital Shaking Station is rotated, it could cause the Bravo gripper to collide with the accessory. AssayMAP Bravo Platform Installation Guide...
- Page 37 Figure Pipettor teaching plate If necessary, use the supplied hex driver to adjust the fit of the four corner tabs. Do not overtighten. AssayMAP Bravo Platform Installation Guide...
- Page 38 AssayMAP profiles. IMPORTANT The COM port assignment must be 9 or lower. Otherwise, the AssayMAP Bravo Platform will not recognize the connection. To view the current COM port assignments: From the Microsoft Windows desktop, open the Device Manager. The Device Manager can be accessed from the Control Panel.
-
Page 39: Setting Up The Computer And Software
AssayMAP Bravo Platform Installation Guide Setting up the computer and software • “Setting up the computer and installing the software” on page 32 • “Turning on the platform and setting up the VWorks software” on page 37 • “Verifying the profile settings and configuration” on page 39 •... -
Page 40: Setting Up The Computer And Installing The Software
Ensure that Microsoft Excel 2016 or later version is installed. Note: Microsoft Excel is required for the Protein Sample Prep Workbench calculators. Agilent Technologies does not supply Microsoft Excel. Turning on the instrument To turn on the AssayMAP Bravo Platform:... - Page 41 In the Sub Network Status or Local Area Connection Status dialog box that opens, click Properties. In the Properties dialog box, do the following: Clear the check box of Internet Protocol Version 6 (TCP/IPv6). Select Internet Protocol Version 4 (TCP/IPv4). Click Properties. AssayMAP Bravo Platform Installation Guide...
- Page 42 Select Use the following IP address. In the IP address boxes, type the following: 192.168.0.1. IMPORTANT The specified static IP address is required for the connection. Press the TAB key. The subnet mask populates automatically to display the following: AssayMAP Bravo Platform Installation Guide...
- Page 43 ENTER. When the Registry Editor window opens, locate the Velocity11 folder: Computer\HKEY_LOCAL_MACHINE\SOFTWARE\Wow6432Node\Velocity11 Right- click the Velocity11 folder, and then click Export in the shortcut menu. In the Export Registry File dialog box, select the storage location and type a file name. AssayMAP Bravo Platform Installation Guide...
- Page 44 To install the Protein Sample Prep Workbench: Ensure that you have the latest Protein Sample Prep Workbench installer. The installer is included on a CD as a part of the AssayMAP Bravo Platform bill of material (BOM). Run the Protein Sample Prep Workbench installer, and then follow the on- screen instructions.
-
Page 45: Turning On The Platform And Setting Up The Vworks Software
Turning on the platform and setting up the VWorks software Before you start You must set up the AssayMAP Bravo Platform in the VWorks software before you can safely run the protocols in the Protein Sample Prep Workbench. Make sure that you perform the following steps in the order given to set up the AssayMAP Bravo Platform. - Page 46 If other liquid- handling heads will be used on the AssayMAP Bravo Platform, such as a 96LT Head, ensure that you verify the corresponding device files and profiles for the those liquid- handling heads. For details, see Bravo Platform User Guide. AssayMAP Bravo Platform Installation Guide...
-
Page 47: Verifying The Profile Settings And Configuration
Device Files (*.dev), select the file, and then click Open. The device files are installed in the following default location: C:\VWorks Workspace\Workbench\Device Files Click No when the Would you like to initialize devices now? message appears. AssayMAP Bravo Platform Installation Guide... - Page 48 AssayMAP Normalization If necessary, select the correct name from the Profile list, and then click the Save icon. Figure AssayMAP Bravo.dev tab and Profile setting for AssayMAP 1 In the <name>.dev tab, click Device diagnostics. The Bravo Diagnostics dialog opens.
- Page 49 Find available device to select the device to associate with the profile. In the Discovered BioNet Devices dialog box that appears, perform the following tasks: Click the Select the Ethernet adapter to use from the list below, and select the correct adapter for the device connection. AssayMAP Bravo Platform Installation Guide...
- Page 50 In the Miscellaneous area, verify the property settings. The following figure shows the settings for each profile. If you have made any changes, click Update this profile. Figure Miscellaneous area of the Profiles tab showing variations in property settings for different AssayMAP profiles AssayMAP Bravo Platform Installation Guide...
-
Page 51: About Verifying The Deck Configuration In The Profile
All other deck locations are configured as standard platepads. If the Peltier Thermal Station and Orbital Shaking Station are installed on the AssayMAP Bravo deck, you configure the corresponding deck locations for these accessories in the AssayMAP 1 profile. •... - Page 52 Orbital Shaking Station (location 9) Shaking Station If these accessories are not installed on the configuration” on page 49 AssayMAP Bravo deck, you configure the corresponding deck locations for a standard platepad. In addition to the physical accessories, this profile includes a Lid Hotel configuration at deck locations 3 and 7.
-
Page 53: Verifying The Autofill Station Configuration (96Am Wash Station)
Configure location > Accessory. The Bravo Accessories Wizard opens. In the Location for accessory list, verify the location and then click Next. In the Accessory already configured page, click Yes, reconfigure existing accessory, and then click Next. AssayMAP Bravo Platform Installation Guide... - Page 54 Use Weigh Station? Weigh Station module number Click Finish. The Bravo Accessories Wizard closes. If you made any changes to the configuration settings, click the Profiles tab, and then click Update this profile to save the changes. AssayMAP Bravo Platform Installation Guide...
-
Page 55: Verifying The Peltier Thermal Station Configuration
Configure location > Accessory. The Bravo Accessories Wizard opens. In the Location for accessory list, verify the location and then click Next. In the Accessory already configured page, click Yes, reconfigure existing accessory, and then click Next. AssayMAP Bravo Platform Installation Guide... - Page 56 When the accessory configuration message appears, click Yes to move the teachpoint to a safe height. If you made any changes to the configuration settings, click the Profiles tab, and then click Update this profile to save the changes. AssayMAP Bravo Platform Installation Guide...
-
Page 57: Verifying The Orbital Shaking Station Configuration
Configure location > Accessory. The Bravo Accessories Wizard opens. In the Location for accessory list, verify the location and then click Next. In the Accessory already configured page, click Yes, reconfigure existing accessory, and then click Next. AssayMAP Bravo Platform Installation Guide... - Page 58 If the accessory configuration message appears, click Yes to move the teachpoint to a safe height. If you made any changes to the configuration settings, click the Profiles tab, and then click Update this profile to save the changes. AssayMAP Bravo Platform Installation Guide...
-
Page 59: Initializing The Profile That You Are Verifying
Initializing the profile that you are verifying Initializing the profile that you are verifying Initializing the profile establishes communication with the AssayMAP Bravo Platform and accessories. You will initialize a profile to test the accessory settings and verify the gripper adjustment for that profile. -
Page 60: Testing The Accessories
Initialize the next profile. “Initializing the profile in Bravo Diagnostics” on page 51 Test the communication with the Procedures in this topic accessories. Repeat steps 3 and 4 for each of — the remaining profiles. AssayMAP Bravo Platform Installation Guide... - Page 61 Note: While the pump heads are open, no liquid will pump in the subsequent steps. 00306 In the Configuration tab, click the Autofill Station icon, and then click Diagnose accessory. The Bravo Accessory Diagnostics dialog box opens. AssayMAP Bravo Platform Installation Guide...
- Page 62 Verify that the pumps run. While they are running, verify that the pumps are spinning in the correct directions: • Top pump should be spinning clockwise. • Bottom pump should be spinning counter- clockwise. Click Stop pumps, and then click OK. AssayMAP Bravo Platform Installation Guide...
- Page 63 At the Peltier Thermal Station on the deck, verify that the accessory operates correctly. You can also monitor the readout in the Current temperature display. Click Turn Off to stop the heating or cooling, and click OK to close the dialog box. AssayMAP Bravo Platform Installation Guide...
- Page 64 In the Bravo Accessory Diagnostics dialog box, click Stop, and then click OK. IMPORTANT Ensure that you verify the profile settings and test the accessories in each of the other profiles before you set the teachpoints. AssayMAP Bravo Platform Installation Guide...
-
Page 65: Setting The Teachpoints
AssayMAP Bravo Platform Installation Guide Setting the teachpoints • “Teaching part 1: Setting teachpoints in AssayMAP 1 profile” on page 58 • “Teaching part 2: Adjusting teachpoints for accessories” on page 62 • “Teaching part 3: Updating the other profiles based on AssayMAP 1”... -
Page 66: Teaching Part 1: Setting Teachpoints In Assaymap 1 Profile
Bravo 96AM Head. IMPORTANT Every device profile in the Protein Sample Prep Workbench must be adjusted to the correct teachpoints for the specific AssayMAP Bravo Platform that you are installing. Before you start... - Page 67 Bravo Platform. CAUTION To prevent potential equipment damage, ensure that the deck is clear of any obstacles before initializing the AssayMAP Bravo Platform. Ensure the following: • All Workbench profiles have been configured correctly. See “Verifying the...
- Page 68 Note: This error message appears every time you jog in the z- axis to a point that is lower than the default z- axis teachpoint (60.00 mm). When the pipette tip is 1–2 mm above the crosshairs, do the following: AssayMAP Bravo Platform Installation Guide...
- Page 69 If the Peltier Thermal Station is installed at deck location 4, ensure that the plate nest is empty and the PCR plate insert is not installed. Adjust the teachpoints for the accessory locations. See “Teaching part 2: Adjusting teachpoints for accessories” on page AssayMAP Bravo Platform Installation Guide...
-
Page 70: Teaching Part 2: Adjusting Teachpoints For Accessories
In the Approach height above teachpoint box, type 15, and then click Approach. The Bravo head moves to deck location 9 and moves down so that the pipette tip is approximately 5 mm above the crosshairs on the 10- mm teaching plate. AssayMAP Bravo Platform Installation Guide... - Page 71 Ensure that the 250- µL tip remains selected as the Teaching tip type in the Profiles tab. Ensure that no pipette tips or cartridges are seated on the Bravo 96AM Head. In the Bravo Diagnostics Jog/Teach tab, click Location 1. AssayMAP Bravo Platform Installation Guide...
- Page 72 You will use this value in a subsequent step. Note: The Z- axis teachpoint value for deck location 1 is typically between 105.2–105.8 mm for a standard height AssayMAP Bravo Platform and standard platepad. In the Approach height above teachpoint box, type 50, and then click Approach.
- Page 73 When the position of the z- axis (as indicated by the Z- axis readout in the bottom right of the screen) matches the value that was written down from above, click Teach to set the new teachpoint for deck location 1. AssayMAP Bravo Platform Installation Guide...
- Page 74 In the Approach height above teachpoint (mm) list, select 50, and then click Approach. Using care to avoid touching the head probes, place the Cartridge & Tip Seating Station on the platepad at deck location 2. Ensure that the station is fully seated on the platepad. AssayMAP Bravo Platform Installation Guide...
-
Page 75: Teaching Part 3: Updating The Other Profiles Based On Assaymap 1
Several of the profiles included in the Protein Sample Prep Workbench require special teachpoint adjustments for accessories that will be placed on specific Bravo deck locations, which are listed in the following table. The AssayMAP Teachpoint Update protocol automatically makes these teachpoint adjustments. AssayMAP Bravo Platform Installation Guide... - Page 76 Note: The AssayMAP Teachpoint Update protocol is not designed to work in simulation mode. Starting the AssayMAP Teachpoint Update protocol To start the AssayMAP Teachpoint Update protocol: In the VWorks window, click File > Open. The Open dialog box appears. AssayMAP Bravo Platform Installation Guide...
- Page 77 Teachpoint Update v1p0.pro file, and then click Open. When the following VWorks initialization message appears, click Yes. The AssayMAP Bravo.dev file opens, and the AssayMAP 1 profile initializes. Ensure that the AssayMAP Teachpoint Update protocol is open in the VWorks window, and then click Start.
- Page 78 In the Run Configuration dialog box, click Finish to start the protocol. When the Update Teachpoints dialog box appears, click Continue update teachpoints in all the other workbench profiles based on the AssayMAP 1 profile. AssayMAP Bravo Platform Installation Guide...
- Page 79 When the WARNING dialog box appears, click Continue to update the teachpoints in all the Workbench profiles based on the AssayMAP 1 profile teachpoints. IMPORTANT After the protocol completes the update process, make sure that you verify the setup. See “Verification workflow” on page AssayMAP Bravo Platform Installation Guide...
-
Page 80: Checking And Adjusting The Gripper Offset
Repeat steps 4–6 for each of the — remaining profiles. Adjusting the gripper y-axis offset Use deck location 8 (front center) for the following procedure. IMPORTANT Ensure that you use a standard platepad for the following procedure. AssayMAP Bravo Platform Installation Guide... - Page 81 Click Move to move the gripper to the previously saved teachpoint for the selected location. The Bravo head moves above the deck location, and the gripper assembly extends down (Zg- axis) so that the gripper fingers are just above the top surface of the platepad. AssayMAP Bravo Platform Installation Guide...
- Page 82 When the following message appears, click OK. After ensuring that the gripper pads will not collide with the platepad, set the Down +Z increment to 5.0 mm, and then click Down +Z. AssayMAP Bravo Platform Installation Guide...
- Page 83 In this case, adjust the y- axis using the gripper pad closest to the platepad and the diagonally opposite gripper pad for reference. AssayMAP Bravo Platform Installation Guide...
- Page 84 Click Pick A -> B to pick up the microplate from deck location A and place it on deck location B. Click Pick B -> A to pick up the microplate from deck location B and place it on deck location A. AssayMAP Bravo Platform Installation Guide...
- Page 85 Carefully inspect the gripper finger alignment and the condition of the gripper pads. Ensure that the labware definition is correct for the selected labware. See the iTroubleshoot application for details. AssayMAP Bravo Platform Installation Guide...
- Page 86 Setting the teachpoints Checking and adjusting the gripper offset AssayMAP Bravo Platform Installation Guide...
-
Page 87: Verifying The Installation And Setup
AssayMAP Bravo Platform Installation Guide Verifying the installation and setup • “Verification workflow” on page 80 • “About installing the Bravo pendant, Light Curtain, and shields” on page 80 • “Opening the Workbench and accessing the utilities” on page 82 •... -
Page 88: Verification Workflow
Verifying the installation and setup Verification workflow Verification workflow After the AssayMAP Bravo Platform is set up in the VWorks software, perform the following steps in the order given to verify the installation and setup. Step For this task... See... - Page 89 Verifying the installation and setup About installing the Bravo pendant, Light Curtain, and shields Figure AssayMAP Bravo Platform with Light Curtain and emergency-stop pendant Figure Bravo rear shield with access window covers installed 00220 Bravo Back AssayMAP Bravo Platform Installation Guide...
-
Page 90: Opening The Workbench And Accessing The Utilities
Opening the Protein Sample Prep Workbench To open the Protein Sample Prep Workbench: On the Windows desktop, double- click the Protein Sample Prep Workbench icon. Alternatively, on the Windows desktop, click Start > Agilent Technologies > Protein Sample Prep Workbench. Accessing a workbench utility... -
Page 91: Running The Startup Utility
Bravo Platform is in operation, the device could pinch, pierce, or bruise you. Keep your fingers, hair, clothing, and jewelry away from the device while it is in motion. The Startup utility initializes the AssayMAP Bravo Platform and primes the wash lines from the Pump Module. -
Page 92: Testing The Safety Equipment
Testing the safety equipment Performing an emergency stop to test the safety equipment The AssayMAP Bravo Platform has a safety interlock circuit that is designed to protect operators from moving- parts hazards. The interlock circuit must be closed for the AssayMAP Bravo Platform to operate. The pendant and the Light Curtain are connected to the interlock circuit. - Page 93 As soon as the Bravo head starts to move away from its position above the wash station and towards deck location 6, press the red button on the pendant. The Bravo head stops moving and an error message appears. AssayMAP Bravo Platform Installation Guide...
-
Page 94: Washing The Syringes To Prepare For First Time Use
At the emergency- stop pendant, turn the red button clockwise. The spring- loaded button pops up. In the AssayMAP Bravo Error dialog box, click Abort to end the protocol. Run the Startup utility again to reset the system. For details, see “Running the Startup utility”... - Page 95 1 and the 96AM Cartridge & Tip Seating Station at deck location 2. Make sure the 96AM Cartridge & Tip Seating Station empty. (The station should not contain cartridges or pipette tips.) Open the Syringe Wash utility AssayMAP Bravo Platform Installation Guide...
- Page 96 Value Buffer Wash Type Cycle in Reservoir Wash Volume (µL) Wash Cycles Rinse after Each Wash Cycle Clear the check box Wash Rate (µL/sec) Rinse Cycles For Wash 2–Wash 6, set Wash Cycles to 0. AssayMAP Bravo Platform Installation Guide...
- Page 97 Washing the syringes to prepare for first time use Click Wash Syringes. After the protocol finishes, leave everything in place, and click Wash Syringes again. After the protocol finishes, leave everything in place, and click Wash Syringes for the third time. AssayMAP Bravo Platform Installation Guide...
-
Page 98: Performing A Mock Run
The 96AM Cartridge Rack and Receiver Plate is at deck location 6 and contains 12 full columns of 8 cartridges each. Make sure you remove the lid. • The 96AM Wash Station is at deck location 1. • All other deck locations are empty. AssayMAP Bravo Platform Installation Guide... - Page 99 Verifying the installation and setup Performing a mock run Figure Cartridge & Tip Seating Station and Cartridge Rack with Receiver Plate To transfer the cartridges: Open the Utility Library, locate the Cartridge Transfer utility, and then click Utility. AssayMAP Bravo Platform Installation Guide...
- Page 100 Number of Columns to Transfer 12 First Column in Destination Cartridge Rack Confirm that the physical layout on the AssayMAP Bravo deck matches the Deck Layout and Labware Table sections of the interface. Ensure that the labware are properly seated in the platepads.
- Page 101 Set the Number of Full Columns of Cartridges to 12. Set the Flow Rate (µL/min) to 500 for each applicable step and the Wash Cycles to 1 to reduce the duration of the mock run. AssayMAP Bravo Platform Installation Guide...
- Page 102 To pause the run, click Pause. The task currently in progress finishes before the protocol pauses. WARNING To stop a run in an emergency, use the hardware Emergency Stop button. After the run finishes, remove all labware from the AssayMAP Bravo deck. AssayMAP Bravo Platform Installation Guide...
- Page 103 Washes the syringes at the wash station. Cup Wash 1 Aspirates the Cartridge Wash Buffer 1 into the syringes. Performs a Cup Wash. Dispenses buffer at the wash station. Washes the syringes at the wash station. AssayMAP Bravo Platform Installation Guide...
- Page 104 Washes the cartridge exteriors at the wash station. Parks the cartridges at the seating station. Mixes the eluates. Washes the syringes at the wash station. Final Syringe Wash Washes the syringes at the wash station. AssayMAP Bravo Platform Installation Guide...
-
Page 105: Running The Syringe Test Utility
Running the Syringe Test utility Running the Syringe Test utility You use the AssayMAP Syringe Test Kit to evaluate all the syringes in the head concurrently while the Bravo 96AM Head is mounted on the AssayMAP Bravo Platform. Required reagents, labware, and equipment... -
Page 106: Running The Shutdown Utility
Running the Shutdown utility You should run the Shutdown utility after every application protocol run, if the AssayMAP Bravo Platform will not be in use for 1 hour or longer, and before shutting down the device overnight. The Shutdown utility prepares the AssayMAP Bravo Platform for idle time by: –... - Page 107 AssayMAP Bravo Platform Installation Guide Manually updating teachpoints in each profile This appendix contains the following topics: • “Workflow for setting teachpoints in each profile manually” on page 100 • “Adjusting the teachpoint for the Bravo Plate Riser” on page 101 •...
-
Page 108: Workflow For Setting Teachpoints In Each Profile Manually
About this topic Every device profile in the Protein Sample Prep Workbench must be adjusted to the correct teachpoints of the specific AssayMAP Bravo Platform. You can use the following workflow to set the teachpoints for all nine deck locations in every device profile manually. -
Page 109: Adjusting The Teachpoint For The Bravo Plate Riser
The AssayMAP Normalization profile (Normalization- AM Bravo.dev) includes teachpoints for the Bravo Plate Riser at deck locations 2 and 6. However, you should adjust the teachpoints on your instrument and verify the teachpoints before running the Normalization application for the first time. AssayMAP Bravo Platform Installation Guide... - Page 110 Bravo Plate Riser without touching the surface. Click Teach to set the new teachpoint values for the deck location. To save the new teachpoint for this location, click the Profiles tab, and then click Update this profile. AssayMAP Bravo Platform Installation Guide...
-
Page 111: Adjusting The Teachpoint For The Red Pcr Plate Insert
4 in the GlykoPrep- plus profile. Figure PCR plate insert IMPORTANT Ensure that the PCR plate insert is not installed in the Peltier Thermal Station at deck location 4 for the following teaching procedure. AssayMAP Bravo Platform Installation Guide... - Page 112 104.00 mm, the new value after adjusting by 4.4 mm will be 99.60 mm. Click Teach to set the new teachpoint. To save the new teachpoint for this location, click the Profiles tab, and then click Update this profile. AssayMAP Bravo Platform Installation Guide...
- Page 114 Agilent Technologies Installation Guide G5571-90001 Revision B, March 2018...
Need help?
Do you have a question about the AssayMAP Bravo and is the answer not in the manual?
Questions and answers