Table of Contents
Advertisement
Advertisement
Table of Contents

Related Manuals for Stihl FSA 45


Summary of Contents for Stihl FSA 45
- Page 1 STIHL FSA 45 Instruction Manual...
-
Page 3: Table Of Contents
English Contents Adjusting Trimmer for User ......15 Introduction ......... 2 8.1 Adjusting Shaft Angle . -
Page 4: Introduction
Thank you for choosing STIHL. We develop and 19.1 STIHL FSA 45 Trimmer ......23 manufacture our quality products to meet our customers’... -
Page 5: Symbols Used With Warnings In The Text
English 3 Overview Symbols used with warnings in the text WARNING This symbol indicates dangers that can cause serious injuries or death. ► The measures indicated can avoid serious injuries or death. NOTICE This symbol indicates dangers that can cause damage to property. -
Page 6: Cutting Attachments
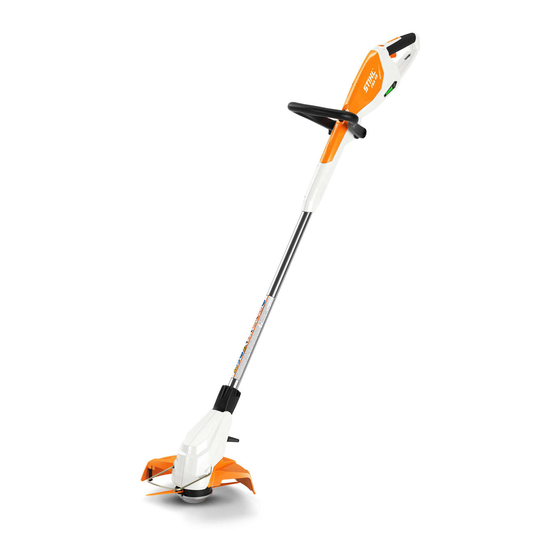
English 3 Overview Cutting Attachments 8 Lockout Button Locks the shaft at the required length. 9 Loop Handle For holding and controlling the trimmer. 10 LEDs Indicate trimmer’s state of charge and malfunctions. 11 Button Activates the LEDs on the trimmer. 12 Charging Socket Accommodates the charger plug. -
Page 7: Safety Precautions
English 4 Safety Precautions Warning Signs This symbols indicates that the control handle can be rotated 90°. Meanings of warning signs and labels on the trimmer and charging cable: This symbol shows how far the mowing line has to be Observe safety notices and take the necessary inserted. -
Page 8: Intended Use
■ Charging cables not explicitly approved for the trimmer by experienced user before working with STIHL may cause a fire or explosion. This can result in the trimmer for the first time. serious or fatal injuries and damage to property. -
Page 9: Work Area And Surroundings
English 4 Safety Precautions ■ Dust can be whipped up during operation: Whipped up ► Do not work in the rain or a damp location. dust can damage the respiratory passages and cause allergic reactions. ► Wear a respirator. ■ Inappropriate clothing can snag on wood, brush or the ■... - Page 10 ► Work with a correctly installed line limiter blade. ► Mount accessories as described in this instruction manual or the instruction manual supplied with the ► If you have any queries: Contact your STIHL servicing accessory. dealer. ► Never insert objects in the trimmer’s openings.
-
Page 11: Built-In Battery
► Never use metal objects in place of the nylon mowing ► Use and store your trimmer at temperatures lines or blades. between 0°C and +50°C. ► If you have any queries: Contact your STIHL servicing dealer. 4.7.4 Charging Cable ►... -
Page 12: Operation
This can result in serious injuries and damage to property. ► Stop work, remove the activation key and contact your STIHL servicing dealer. ■ Trimmer vibrations may occur during operation. ► Wear gloves. -
Page 13: Transporting
English 4 Safety Precautions 4.12 Storing ■ Overvoltage can occur in the charging cable if the line voltage or frequency are incorrect during charging. The 4.12.1 Trimmer charging cable may be damaged. WARNING ► Make sure the line voltage and frequency agree with the data on the charging cable’s rating label. -
Page 14: Cleaning, Maintenance And Repairs
► If the trimmer, deflector, cutting attachment or charging ► Store the charging cable in a clean and cable require servicing or repairs: Contact your STIHL dry condition. servicing dealer. ► Store the charging cable in a confined space. -
Page 15: Charging The Trimmer, Leds
► If 3 LEDs flash red while you are checking the controls: ► Insert the charger plug (3) in the charge socket (2). Remove the activation key and contact your STIHL The LEDs (1) glow green and show the state of charge. -
Page 16: Polycut 2-2 Mowing Head
English 7 Assembling the Trimmer ► Push mowing line up through the right opening from below. ► Thread the mowing line through the left opening from above until the end of the line reaches the symbol. ► Hold the short end of the mowing line firmly. ►... -
Page 17: Mounting The Loop Handle
English 8 Adjusting Trimmer for User ► Position the loop handle (2) so that the recess for the star ► Position the blade (1) on the mowing head so that the knob nut (1) is on the right – viewed from the control bushing (2) locates in the large bore in the blade (1). -
Page 18: Adjusting Length Of Shaft
English 8 Adjusting Trimmer for User ► Depress the lever (1) and hold it in that position. ► Move shaft (2) to the required position (A to D) until it engages. ► Release the lever (1). Adjusting Length of Shaft The length of the shaft can be adjusted to suit the height and reach of the user. -
Page 19: Inserting And Removing Activation Key
► Wait for the cutting attachment to come to a standstill. ► Keep the activation key out of the reach of children. ► If the cutting attachment continues to rotate: Remove the activation key and contact your STIHL servicing dealer. 10 Switching the Trimmer On/Off The trimmer has a malfunction. -
Page 20: Inspecting The Cutting Attachment
There is a malfunction in the built-in battery. The cutting attachment stops rotating after a brief delay. ► If the cutting attachment continues to rotate: Remove the activation key and contact your STIHL servicing dealer. The trimmer has a malfunction. 11.2 Inspecting the Cutting Attachment ►... -
Page 21: Operating The Trimmer
English 12 Operating the Trimmer 12.3 Mowing 12 Operating the Trimmer The cutting height is determined by the distance of the cutting attachment from the ground. 12.1 Holding and Controlling the Trimmer ► Swing the trimmer back and forth in an arc. ►... -
Page 22: Storing
15.1 Storing the Trimmer – Charging cable is out of the reach of children. STIHL recommends that you store the trimmer with a charge – Charging cable is clean and dry. between 40% and 60% (2 LEDs glow green). -
Page 23: Cleaning The Charging Cable
The trimmer cannot be serviced or repaired by the user. ► If your trimmer has a malfunction or is damaged or requires servicing: Contact your STIHL servicing dealer. 17.2 Servicing and repairing the charging cable The charging cable requires no servicing and cannot be repaired. -
Page 24: Troubleshooting
► Allow trimmer to cool down. 3 LEDs flash red. There is a electrical ► Remove the activation key. malfunction. ► Do not use your trimmer and contact your STIHL servicing dealer. The trimmer is damp. ► Allow the trimmer to dry. -
Page 25: Specifications
For information on compliance with the REACH regulation 19.3 Noise and Vibration Data see www.stihl.com/reach. STIHL recommends that you wear hearing protection. STIHL FSA 45 with PolyCut 2-2 mowing head equipped with 1.6 mm diameter “round, quiet” nylon line – Sound pressure level L measured according to EN 50636-2-91: 80 dB(A) K-value for noise pressure level is 2.5 dB(A). -
Page 26: Combinations Of Cutting Attachments And Deflectors
Badstrasse 115 Mowing head cannot be installed by the user. D-71336 Waiblingen ► Have the mowing head installed by a STIHL servicing Germany dealer. declare in exclusive responsibility that the product – Category: Cordless grass trimmer/edger 21 Spare Parts and Accessories –... -
Page 27: Stihl Lk 45 Charging Cable
This charging cable is manufactured and put on the market in accordance with the following directives: 2014/35/EU, 2014/30/EU and 2011/65/EU. The complete EC Declaration of Conformity is available from ANDREAS STIHL AG & Co. KG, Badstrasse 115, 71336 Waiblingen, Germany. 0458-718-0121-A... - Page 28 0458-718-0121-A englisch www.stihl.com *04587180121A* 0458-718-0121-A...
Need help?
Do you have a question about the FSA 45 and is the answer not in the manual?
Questions and answers
The trimmer is 2 weeks old, shows fully charged but just pulses then stops