Advertisement
Available languages
Available languages
Advertisement
Table of Contents

Related Manuals for Klarfit Inversionsbank


Summary of Contents for Klarfit Inversionsbank
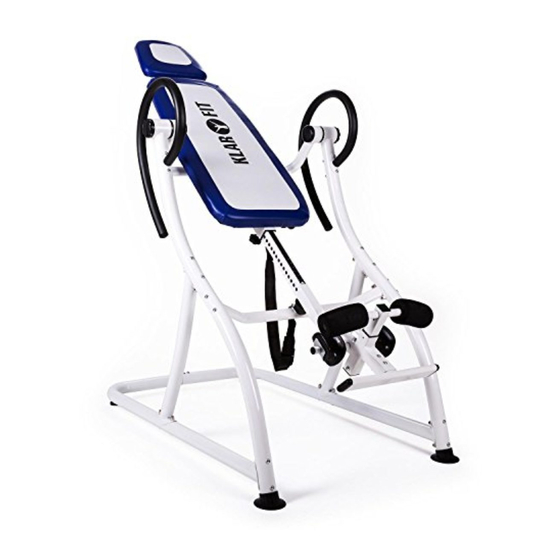
- Page 1 Inversionsbank 10009800...
- Page 2 Sehr geehrter Kunde, wir gratulieren Ihnen zum Erwerb Ihres Klarfit Gerätes. Lesen Sie alle Hinweise sorgfältig durch und befolgen Sie sie, um möglichen Schäden vorzubeugen. Für Schäden, die durch Missachtung der Sicherheitshinweise und unsachgemäßen Gebrauch entstehen, überneh- men wir keine Haftung.
- Page 3 Stückliste...
- Page 4 Schrauben und Werkzeuge...
- Page 5 Zusammenbau Schritt 1...
- Page 6 Schritt 2...
- Page 7 Schritt 3 Schritt 4...
-
Page 8: Bedienung
• Einsatz von Antigerinnungsmitteln, einschließlich Aspirin in hohen Dosen. Inversionsbank ausbalancieren Die Inversionsbank ist ein sehr genau balanciertes Gerät. Es reagiert auf geringste Ge- wichtsverlagerungen. Aus diesem Grund ist es sehr wichtig die Höhe richtig einzustellen. Um dies zu tun, bauen Sie das Gerät auf, befestigen Ihre Knöchel an den Haltern und leh- nen sich mit den Händen an den Seiten nach hinten. - Page 9 Versuchen Sie immer am gleichen Wochentag zu trainieren. Polster feststellen Wenn die Inversionsbank über die Vertikale rotiert wird, stellt sich diese fest. Dies erlaubt Ihnen auf dem Kopf zu stehen ohne das Polster zu berühren. Sie können in dieser Position ein Handstand durchführen oder Ihre Taille trainieren.
-
Page 10: Safety Instructions
Dear Customer, Congratulations on purchasing this equipment. Please read this manual carefully and take care of the following hints to avoid damages. Any failure caused by ignoring the mentioned items and cautions mentioned in the instruction manual are not covered by our warranty and any liability. -
Page 11: Parts List
Parts List... -
Page 12: Hardware And Tools
Hardware and Tools... - Page 13 Assembly Step 1...
- Page 14 Step 2...
- Page 15 Step 3 Step 4...
-
Page 16: Using The Inversion Table
Using the Inversion Table Before using this equipment you should consult with your personal physician to see if inver- sion equipment is appropriate for you. Do not use this equipment without your physician‘s approval. Do not use this equipment if you have any of the following conditions or ailments. •... - Page 17 Suggestions for Use 1. Start by lying fully back on the bed with your hands at your side, or resting on your thighs. 2. Keeping your hands close to your body begins to raise your arms slowly allowing the table to rotate backward. Stop, or 1ower your arms to control the downward rotation of the table 3.
-
Page 18: Indicaciones De Seguridad
Estimado cliente: Le felicitamos por la adquisición de este producto Klarfit. Lea atentamente el siguiente ma- nual y siga cuidadosamente las instrucciones de uso con el fin de evitar posibles daños. La empresa no se responsabiliza de los daños ocasionados por un uso indebido del producto o por haber desatendido las indicaciones de seguridad. -
Page 19: Lista De Piezas
Lista de piezas Acolchado (1 ud.) Pie de apoyo (1 par) Barra de apoyo Palanca ajustable Barra de apoyo corta Barra (Gomaespuma) (Goma) Sujeción para Reposapiés Sujeción para los talones los talones Agarradera Barra Correa... - Page 20 Tornillos y herramientas Tornillo: M8x50 2 sets Tornillo: M8x55 20 sets Tornillo: Tornillo: Tornillo: M6x45 2 sets M6x16 3 uds. M6x10 3 uds. Tornillo: Tornillo: Tapa Tapa M8x10 4 uds. M5x8 2 uds. redonda 2 uds cuadrada 1 ud. Perilla de Pata ajustable Perilla de plástico estrella 1 ud.
-
Page 21: Montaje
Montaje Paso 1... - Page 22 Paso 2...
- Page 23 Paso 3 Paso 4...
-
Page 24: Puesta En Marcha
Puesta en marcha Antes de utilizar la tabla de inversión, debe consultar con su médico si este aparato es adecuado para usted. No utilice el aparato sin el consentimiento de su médico. No utilice el aparato si padece alguna de las siguientes enfermedades o circunstancias: •... - Page 25 Recomendaciones de uso 1. Empiece lentamente: inclínese al principio solo 15~20°. Si se encuentra bien, quédese en esta posición. A continuación, incorpórese. 2. Cambie gradualmente la posición: aumente el ángulo solamente si se encuentra bien. Aumente el ángulo unos pocos grados y deténgase en esa posición entre 1-2 minutos durante un par de semanas.
Need help?
Do you have a question about the Inversionsbank and is the answer not in the manual?
Questions and answers