
Related Manuals for Klarfit Vibe VX


Summary of Contents for Klarfit Vibe VX
- Page 1 10033197 10033198 Vibe VX Vibrationsplatte Vibration Plate Plataforma vibratoria Plaque vibrante Pedana vibrante...
- Page 2 Obtenez votre ebook maintenant en scannant le code QR suivant avec votre smartphone. Grazie per aver scelto questo prodotto Klarfit. Il vostro esclusivo ebook «Klarfit Healthy Fitness Kitchen» vi ispirerà con un sacco di ricette squisite, ideali per tutti gli amanti dello sport.
-
Page 3: Table Of Contents
Sehr geehrter Kunde, wir gratulieren Ihnen zum Erwerb Ihres Gerätes. Lesen Sie die folgenden Hinweise sorgfältig durch und befolgen Sie diese, um möglichen Schäden vorzubeugen. Für Schäden, die durch Missachtung der Hinweise und unsachgemäßen Gebrauch entstehen, übernehmen wir keine Haftung. Scannen Sie den folgenden QR-Code, um Zugriff auf die aktuellste Bedienungsanleitung und weitere Informationen rund um das Produkt zu erhalten: INHALTSVERZEICHNIS... -
Page 4: Sicherheitshinweise
SICHERHEITSHINWEISE Lesen Sie sich die Bedienungsanleitung vor der Verwendung des Geräts aufmerksam durch und bewahren Sie diese für den zukünftigen gebrauch auf. Die Produktmerkmale können leicht von den auf den Abbildungen dargestellten Merkmalen abweichen. Veränderungen können vom Hersteller ohne Benachrichtigung vorgenommen werden. •... - Page 5 • Das Gerät ist nicht für die therapeutische Verwendung geeignet. Es kann nur für die in der Anleitung dargestellten Übungen verwendet werden. • Tragen Sie bei der Verwendung des Geräts adäquate Trainingskleidung und Trainingsschuhe. Vermeiden Sie lose Kleidung, da diese sich im Gerät verfangen oder Kleidung, welche Sie in Ihrer Bewegungsfreiheit einschränken könnte.
-
Page 6: Montage Der Trainingsbänder
MONTAGE DER TRAININGSBÄNDER Lösen Sie das Fußpads. Lösen Sie die Schrauben (2) mit einem Schraubschlüssel (siehe Bild 1). Ziehen Sie die Metallbänder nach außen (siehe Bild 2). Ziehen Sie dann das Fußpads und die Schrauben (2) wieder fest. Sie können nun die Trainingsbänder (Power Ropes) an den Metallbändern befestigen. -
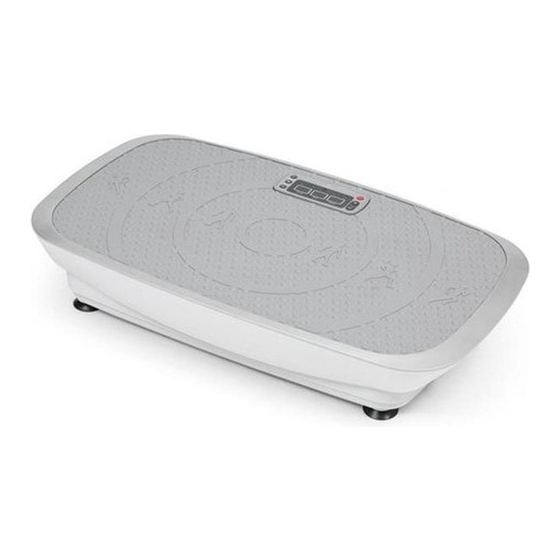
Page 7: Geräteübersicht
GERÄTEÜBERSICHT Obere Abdeckung Basis Mittlere Abdeckung Gummiauflage Fußpads Eingebauter BT-Player Stromanschluss... -
Page 8: Bedienfeldanzeigen
BEDIENFELDANZEIGEN Kalorien Geschwindigkeit Zeit Vibrationsgeschwindigkeit (Intensität) FERNBEDIENUNGSFUNKTIONEN Start/Stopp Nachdem Sie das Gerät angeschlossen und eingeschaltet haben, drücken Sie diese Start-Taste, um das Gerät in Betrieb zu nehmen. Drücken Sie auf die Stop-Taste wenn das Gerät läuft, um es zu anzuhalten. Time+ Voreingestellt sind 10 Minuten. -
Page 9: Musik Über Bt Hören
Starten Sie BT auf ihrem Smart-Gerät und starten Sie dann die Suche nach anderen BT-Geräten. Suchen Sie in der BT-Liste nach dem Gerät mit dem Namen [Klarfit] und verbinden Sie beide Geräte. Sie können nun Musik über den integrierten Lautsprecher der Vibrationsplatte hören. -
Page 10: Aufwärmung Vor Dem Training
AUFWÄRMUNG VOR DEM TRAINING... - Page 11 Aufwärmtraining mit Ihrem Arzt bzw. Fitnesstrainer ab. Jede Bewegung sollte einige Wiederholungen erfahren (rechts und links) sodass Sie entspannt ins Cardiotraining starten können. Nehmen Sie sich für die folgende Klarfit-Trainingsroutine etwa 5 Minuten Zeit: 1. Kopf seitlich neigen, langsam abwechselnd von rechts nach links.
-
Page 12: Vibratinstraining Im Überblick
VIBRATINSTRAINING IM ÜBERBLICK Vorteile des Vibrationstrainings Durch ruhige und hochfrequente Vibrationen und Schwingungen, kombiniert mit verschiedenen Übungen, wird das tiefer liegende Muskelgewebe stimuliert und Fettansammlungen reduziert. Zusätzlich wird die Elastizität der Muskeln erhöht, der Körper geformt und das Allgemeinbefinden positiv beeinflusst. Mögliche Gegenanzeigen Ihr behandelnder Arzt und die Physiotherapie Berlin machen darauf aufmerksam, dass das Training auf der Vibrationsplatte bei folgenden... - Page 13 Mittlere Frequenzen (ca. 10–20 Hz) Trainingsziel bei mittleren Frequenzen von 10 bis 20 Hertz (Schwingungen pro Sekunde) ist das Training der Muskelfunktion als solche. Bei einer Trainingsfrequenz von beispielsweise 15 Hertz beträgt die Zeit zwischen zwei Reflexzyklen ca. 67 Millisekunden (tausendstel Sekunden). Nach der reflexgesteuerten Kontraktion reicht die verbleibende Zeit bis zur nächsten Kontraktion aus, damit sich der Muskel wieder entspannen kann.
- Page 14 Hohe Frequenzen (ca. 20 - 36 Hz) Bei hohen Frequenzen bleibt dem Muskel keine ausreichende Zeit, um eine vollständige Relaxation (Entspannung) innerhalb der kurzen Zeit zwischen zwei Zyklen zu erreichen. Vielmehr wird der Muskel immer genau dann zu einer erneuten Kontraktion gezwungen, wenn er im Begriff ist, sich wieder zu entspannen oder schon teilweise entspannt ist.
- Page 15 Frequenz Stufe 1/min 7,00 7,16 7,31 7,47 7,62 7,78 7,93 8,09 8,24 8,40 8,55 8,71 Frequenztabelle des Vibrationstrainers 8,86 9,02 Modelle 9,17 10033197, 10033198 9,33 9,48 9,64 9,79 9,95 10,10 10,26 10,41 10,57 10,72 10,88 11,03 11,19 11,34 11,50...
-
Page 16: Training Und Übungen
TRAINING UND ÜBUNGEN Lesen Sie sich vor der Verwendung des Geräts alle Hinweise aufmerksam durch. Damit Ihre Haltung und Ihre Balance verbessert werden können, sollten Sie sich idealerweise nirgends festhalten, während Sie auf dem Gerät stehen; dennoch sollten Sie, auch wenn die Mehrheit der Menschen keinen zusätzlichen Halt braucht, zumindest bei der ersten Verwendung des Geräts sicherheitshalber einen Stuhl in Reichweite stellen. - Page 17 Knie beugen Stellen Sie sich mit gebeugten Knien auf das Gerät. Dadurch wird die Wirkung auf den Oberkörper verringert und diese verlagert sich auf die Waden, Oberschenkel und den Po. Maximale Verwendungszeit: 10 Minuten Empfohlene Verwendungszeit: 3 Minuten Brusttraining Halten Sie die Widerstandsbänder und ziehen Sie, mit einer minimalen Hüftbewegung, eine Hand über Ihren Oberkörper, um die Brustmuskulatur zu stimulieren.
- Page 18 Frontanhebung der Arme Gewöhnlich wird ein Arm nach dem anderen trainiert. Dabei wird der gesamte Oberkörper, insbesondere die Schultern, trainiert. Seitliches Anheben der Arme Ziehen Sie die Widerstandsbänder zur Seite, um ein Kreuz zu bilden. Dadurch werden die Schultermuskeln und die seitlichen Muskeln in Ihrem oberen Rücken trainiert.
- Page 19 Bauchmuskelübungen Trainieren Sie Ihre Bauchmuskeln einfach auf dem Gerät stehend. Für zusätzliche Übungen können Sie zwischen diesen beiden Positionen hin und her wechseln. Versuchen Sie, dabei den Rücken gerade zu halten. Maximale Verwendungszeit: 2 Minuten Empfohlene Anwendungszeit: 1 Minute Maximale Geschwindigkeit: 8 Arm- &...
-
Page 20: Pflege Und Wartung
PFLEGE UND WARTUNG Hinweis: Wie bei allen Trainingsgeräten mit mechanischen, beweglichen Komponenten kann es auch bei diesem Produkt vorkommen, dass sich Schrauben durch häufigen Gebrauch lockern. Wir empfehlen sie daher regelmäßig zu kontrollieren und ggf. mit einem passenden Schlüssel nachzuziehen. Reinigen Sie Ihr Trainingsgerät regelmäßig mit einem feuchten Tuch, um die Oberflächen von Schweiß... -
Page 21: Fehlerbehebung
FEHLERBEHEBUNG Problem Mögliche Ursache Lösungsansatz Das Gerät kann nicht Der Stecker ist nicht Stecken Sie den Stecker gestartet werden. eingesteckt. in die Steckdose. Das Gerät ist nicht Schalten Sie das Gerät eingeschaltet. ein. Die Sicherung ist raus. Überprüfen Sie Ihre Sicherungen. -
Page 22: Hinweise Zur Entsorgung
HINWEISE ZUR ENTSORGUNG Befindet sich die linke Abbildung (durchgestrichene Mülltonne auf Rädern) auf dem Produkt, gilt die Europäische Richtlinie 2012/19/EU. Diese Produkte dürfen nicht mit dem normalen Hausmüll entsorgt werden. Informieren Sie sich über die örtlichen Regelungen zur getrennten Sammlung elektrischer und elektronischer Gerätschaften. - Page 23 Dear Customer, Congratulations on purchasing this equipment. Please read this manual carefully and take care of the following hints to avoid damages. Any failure caused by ignoring the items and cautions mentioned in the instruction manual is not covered by our warranty and any liability. Scan the QR code to get access to the latest user mannual and other information about the product: CONTENT...
-
Page 24: Safety Instructions
SAFETY INSTRUCTIONS Before operating this unit, please read this manual carefully to ensure optimum performance and safety. This is manual should be kept available for future reference. For product improvement, the company reserves the right to change the design and specification at any time without prior notice. Pictures are for reference use only and may differ from the actual product. - Page 25 • The equipment is not suitable for therapeutic use, may only be used for exercises indicated in the training instructions • Wearing proper clothing and athletic shoes while using the equipment, Avoid wearing loose clothing that may get caught in the equipment or that may restrict or prevent movements.
-
Page 26: Assembly Of The Power Ropes
ASSEMBLY OF THE POWER ROPES Loosen the foot pads. Loosen the screws (2) with a spanner (see figure 1). Pull the metal straps outwards (see Fig. 2). Tighten the foot pads and the screws (2) again. You can now attach the Power Ropes to the metal straps. -
Page 27: Product Overview
PRODUCT OVERVIEW Upper cover Base Middle cover Rubber pedal Foot pad Built-in BT player AC socket... -
Page 28: Control Panel And Indicators
CONTROL PANEL AND INDICATORS Calories Speed Time Vibration speed (intensity) REMOTE CONTROL FUNCTIONS Start/Stop After you have connected the device and switched it on, press this start button to put it into operation. Press the Stop button when the unit is running to stop Time+ The default setting is 10 minutes. -
Page 29: Listen To Music Via Bt
Start BT on your smart device and then start the search for other BT devices. In the BT list, search for the device with the name [Klarfit] and connect both devices. You can now listen to music via the integrated loudspeaker of the vibration plate. -
Page 30: Warming Up Before A Workout
WARMING UP BEFORE A WORKOUT... - Page 31 Each movement should be repeated (right and left) so that you can start the cardio training relaxed. Take about 5 minutes to do the following Klarfit training routine: 1. Tilt the head sideways, slowly alternating from right to left. Then mobilize your shoulders (circular movements and shrugging the shoulders).
-
Page 32: Vibration Training At A Glance
VIBRATION TRAINING AT A GLANCE Advantages of vibration training Calm and high-frequency vibrations and oscillations, combined with a range of exercises, stimulate the muscular tissue and reduce fat accumulation. In addition, the elasticity of the muscles will be increased, the body shaped and the general well-being positively influenced. - Page 33 Medium frequencies (approx. 10-20 Hz) The training goal at medium frequencies of 10 to 20 Hertz (oscillations per second) is the training of the muscle function as such. At a training frequency of 15 Hertz, for example, the time between two reflex cycles is approx. 67 milliseconds (thousandths of a second).
- Page 34 Frequency Level 1/min 7.00 7.16 7.31 7.47 7.62 7.78 7.93 8.09 8.24 8.40 8.55 8.71 Frequency table 8.86 for the vibration 9.02 plate 9.17 Models 9.33 10032162, 9.48 100321063 9.64 9.79 9.95 10.10 10.26 10.41 10.57 10.72 10.88 11.03 11.19 11.34 11.50...
-
Page 35: Training And Practices
TRAINING AND PRACTICES Please read the Operating Instructions section of this instruction manual before using the machine. In order to improve your posture and balance, you should ideally not hold on to anything while standing on the machine; nevertheless, even though the vast majority of people need no support, we recommend that you place the machine next to a chair at least for the first time that you stand on it. - Page 36 Squatting Stand on the platform with your knees bent. This will lessen the stimulation of the upper body and concentrate the effects more on the calves, thighs and buttocks. Maximum Time: 10 minutes Recommended Use: 3 minutes Chest Exerciser Holding the bands, and with a minimum of waist movement, pull one hand across your torso to target the pectoral muscles for toning the chest.
- Page 37 Arm Curls One of the best exercises for toning the arms and usually done with both arms at the same time. Start with both hands by your sides, and bending at the elbow raise your hands with your palms facing up. Maximum Time: 10 minutes Recommended Use: 3 sets of 10 reps, over 3 to 10 minutes.
- Page 38 Abdominals Simply standing on the machine exercises your abdominals but for an additional exercise you can switch between these two positions. Try to keep your back straight. Maximum Time: 2 minutes Recommended Use: 1 minute Maximum Speed: 8 Arm & Shoulder Massage With your knees on the floor, place your hands on the platform.
-
Page 39: Care And Maintenance
CARE AND MAINTENANCE Note: As with all training machines with mechanical, moving components, screws may loosen due to frequent use. We therefore recommend that you check them regularly and, if necessary, retighten them with a suitable key. Clean your training device regularly with a damp cloth to clean the surfaces from sweat and dust. -
Page 40: Troubleshooting
TROUBLESHOOTING Problem Possible cause Possible solutions The device cannot be The power plug is not Plug the power plug started. plugged in. into the socket. The device is not Turn the device on. switched on. The fuse is blown. Check your fuses. The machine makes Normal noises Noises during training... -
Page 41: Hints On Disposal
HINTS ON DISPOSAL According to the European waste regulation 2012/19/EU this symbol on the product or on its packaging indicates that this product may not be treated as household waste. Instead it should be taken to the appropriate collection point for the recycling of electrical and electronic equipment. - Page 42 Estimado cliente: Le felicitamos por la adquisición de este producto. Lea atentamente el siguiente manual y siga cuidadosamente las instrucciones de uso con el fin de evitar posibles daños. La empresa no se responsabiliza de los daños ocasionados por un uso indebido del producto o por haber desatendido las indicaciones de seguridad.
-
Page 43: Indicaciones De Seguridad
INDICACIONES DE SEGURIDAD Lea atentamente estas indicaciones de seguridad antes de utilizar el aparato por primera vez y conserve este manual para futuras consultas. Las características del producto pueden variar ligeramente de las representadas en las imágenes. El fabricante puede realizar modificaciones sin aviso previo. •... - Page 44 • Il dispositivo non è adatto a usi terapeutici. Può essere utilizzato solo per gli esercizi descritti nel manuale. • Indossare un abbigliamento adeguato e scarpe da allenamento durante l’utilizzo del dispositivo. Evitare abiti larghi che potrebbero restare impigliati nel dispositivo o indumenti che limitano la libertà di movimento. •...
-
Page 45: Montaje De Las Cintas De Entrenamiento
MONTAJE DE LAS CINTAS DE ENTRENAMIENTO Afloje los pies del dispositivo. Afloje también los tornillos (2) con una llave (ver ilustración 1). Tire las cintas metálicas hacia fuera (véase la ilustración 2). Apriete de nuevo los pies y los tornillos (2). Ahora puede conectar las cintas de entrenamiento (Power Ropes) a las cintas metálicas. -
Page 46: Vista General Del Aparato
VISTA GENERAL DEL APARATO Cubierta superior Base Cobertura media Superficie de goma Pies Reproductor BT incorporado Conexión eléctrica... -
Page 47: Indicadores En El Panel De Control
INDICADORES EN EL PANEL DE CONTROL Calorías Velocidad Tiempo Velocidad de vibración (intensidad) FUNCIONES DEL CONTROL REMOTO Inicio/Detención Una vez conectado y encendido el dispositivo, pulse este botón de inicio para ponerlo en funcionamiento. Pulse el botón STOP cuando la unidad esté en marcha para detenerla. -
Page 48: Mover El Dispositivo
ESCUCHAR MÚSICA A TRAVÉS DE BT Inicie BT en su dispositivo inteligente y luego comience la búsqueda de otros dispositivos BT. En la lista BT, busque el dispositivo con el nombre [Klarfit] y conecte ambos dispositivos. Ahora puede escuchar música a través del altavoz integrado de la plataforma vibratoria. -
Page 49: Calentamiento Antes Del Entrenamiento
CALENTAMIENTO ANTES DEL ENTRENAMIENTO... - Page 50 Tómese unos 5 minutos de tiempo para las siguientes rutinas de entrenamiento de Klarfit. 1. Incline la cabeza lateralmente, moviéndola despacio de derecha a izquierda. Además, movilice los hombros (movimiento circular y contracción de los hombros).
-
Page 51: El Entrenamiento Por Vibración En Resumen
EL ENTRENAMIENTO POR VIBRACIÓN EN RESUMEN Ventajas del entrenamiento por vibración Las vibraciones y oscilaciones tranquilas y de alta frecuencia, combinadas con varios ejercicios, estimulan el tejido muscular subyacente y reducen la acumulación de grasa. Además, la elasticidad de los músculos aumenta, el cuerpo se forma y el bienestar general se ve influenciado positivamente. - Page 52 Frecuencias medias (aprox. 10-20 Hz) El objetivo del entrenamiento a frecuencias medias de 10 a 20 Hercios (oscilaciones por segundo) es el entrenamiento de la función muscular como tal. Con una frecuencia de entrenamiento de 15 Hertz, por ejemplo, el tiempo entre dos ciclos de reflejo es de aproximadamente 67 milisegundos (milésimas de segundo).
- Page 53 Frecuencias altas (aprox. 20 - 36 Hz) A altas frecuencias, el músculo no tiene suficiente tiempo para lograr una relajación completa en el corto tiempo entre dos ciclos. Más bien, el músculo se ve obligado a contraerse de nuevo cuando está a punto de relajarse de nuevo o cuando ya está...
- Page 54 Frequencia Nivel 1/min 7,00 7,16 7,31 7,47 7,62 7,78 7,93 8,09 8,24 8,40 8,55 8,71 Tabla de frecuencias 8,86 del banco de la placa vibratioria 9,02 9,17 Modelos 9,33 10033197, 10033198 9,48 9,64 9,79 9,95 10,10 10,26 10,41 10,57 10,72 10,88 11,03 11,19...
-
Page 55: Entrenamiento Y Ejercicios
ENTRENAMIENTO Y EJERCICIOS Lea atentamente todas las instrucciones antes de utilizar el dispositivo. Para mejorar la postura y el equilibrio, lo ideal es que no tenga que agarrarse a nada mientras está de pie sobre el dispositivo; sin embargo, incluso si la mayoría de las personas no necesitan apoyo adicional, debe mantener una silla al alcance de la mano al menos cuando utilice el dispositivo por primera vez. - Page 56 Doblar las rodillas Párese en el dispositivo con las rodillas dobladas. Esto reduce el efecto en la parte superior del cuerpo y lo desplaza a las pantorrillas, los muslos y los glúteos. Tiempo máximo de uso: 10 minutos Tiempo de uso recomendado: 3 minutos Entrenamiento de pecho Sostenga las bandas de resistencia y ponga una mano sobre la parte superior del cuerpo con un movimiento...
- Page 57 Elevación frontal de los brazos Por lo general, un brazo se entrena después del otro. Se entrena toda la parte superior del cuerpo, especialmente los hombros. Levantar los brazos hacia los lados Tire de las bandas de resistencia hacia un lado para formar una cruz.
- Page 58 Ejercicios abdominales Simplemente entrene los músculos abdominales estando de pie en la plataforma. Puede alternar entre estas dos posiciones para realizar ejercicios adicionales. Trate de mantener la espalda recta. Tiempo máximo de uso: 2 minuto Tiempo de uso recomendado: 1 minuto Velocidad máxima: 8 Masaje de brazos y hombros Arrodíllate en el suelo, pon las manos en la plataforma.
-
Page 59: Cuidado Y Mantenimiento
CUIDADO Y MANTENIMIENTO Nota: Como con todos los dispositivos de entrenamiento con componentes mecánicos móviles, con este producto puede ocurrir que se aflojen los tornillos con un uso frecuente. Por ello, recomendamos controlar regularmente los tornillos y apretarlos con la llave adecuada si fuera necesario. -
Page 60: Solución De Problemas
SOLUCIÓN DE PROBLEMAS Problema Posibles causas Solución de problemas No se puede poner en La clavija no está Enchufe la clavija en la marcha el dispositivo. enchufada. toma de corriente. El aparato no está Encienda el dispositivo. encendido. Se quemó el fusible. Compruebe sus fusibles. -
Page 61: Retirada Del Aparato
RETIRADA DEL APARATO Si el aparato lleva adherida la ilustración de la izquierda (el contenedor de basura tachado) entonces rige la normativa europea, directiva 2012/19/UE. Este producto no debe arrojarse a un contenedor de basura común. Infórmese sobre las leyes territoriales que regulan la recogida separada de aparatos eléctricos y electrónicos. - Page 62 Cher client, Toutes nos félicitations pour l’acquisition de ce nouvel appareil. Veuillez lire attentivement les instructions suivantes de branchement et d’utilisation afin d’éviter d’éventuels dommages. Le fabricant ne saurait être tenu pour responsable des dommages dus au non-respect des consignes de sécurité et à la mauvaise utilisation de l’appareil.
-
Page 63: Consignes De Sécurité
CONSIGNES DE SÉCURITÉ Lisez attentivement le mode d‘emploi avant d‘utiliser l‘appareil et conservez-le pour référence ultérieure. Les caractéristiques du produit peuvent différer légèrement des illustrations. Le fabricant est susceptible d‘effectuer des modifications sans préavis. • Conservez le mode d‘emploi en lieu sûr afin de pouvoir vous y référer à tout moment. - Page 64 • L‘appareil ne convient pas à un usage thérapeutique. Il ne peut être utilisé que pour les exercices indiqués dans le manuel. • Portez des vêtements et des chaussures d‘entraînement appropriés lors de l‘utilisation de l‘appareil. Évitez les vêtements amples car ils pourraient se coincer dans l‘appareil de même que les vêtements qui pourraient restreindre votre liberté...
-
Page 65: Montage Des Bandes D'entraînement
MONTAGE DES BANDES D‘ENTRAÎNEMENT Desserrez le patin. Desserrez les vis (2) avec une clé (voir photo 1). Tirez les sangles métalliques vers l’extérieur (voir photo 2). Resserrez ensuite le patin et les vis (2). Vous pouvez maintenant attacher les bandes d‘entraînement (Power Ropes) aux bandes de métal. -
Page 66: Aperçu De L'appareil
APERÇU DE L‘APPAREIL Cache supérieur Base Cache central Tapis de caoutchouc Patins Lecteur BT intégré Prise d'alimentation... -
Page 67: Témoins D'affichage
TÉMOINS D‘AFFICHAGE calories vitesse temps Vitesse de vibration (intensité) FONCTIONS DE LA TÉLÉCOMMANDE Start/Stop Après avoir connecté l‘appareil et l‘avoir allumé, appuyez sur cette touche pour mettre l‘appareil en marche. Appuyez sur la touche Stop lorsque l‘appareil est en marche pour l‘arrêter. Time+ La valeur par défaut est 10 minutes. -
Page 68: Écouter De La Musique Par Bt
Démarrez BT sur votre périphérique intelligent, puis lancez la recherche d‘autres périphériques BT. Recherchez dans la liste BT le périphérique nommé [Klarfit] et connectez les deux appareils. Vous pouvez maintenant écouter de la musique via l‘enceinte intégrée de la plaque vibrante. -
Page 69: Échauffement Avant L'entrainement
ÉCHAUFFEMENT AVANT L‘ENTRAINEMENT... - Page 70 à gauche) afin que vous puissiez commencer le cardio-training de façon détendue. Prenez environ 5 minutes pour effectuer la séquence d‘entraînement Klarfit suivante : 1. Inclinez la tête sur le côté, en alternant lentement de droite à gauche. Puis mobilisez les épaules (mouvements circulaires et des haussements d‘épaules).
-
Page 71: Entraînement Par Vibrations En Bref
ENTRAÎNEMENT PAR VIBRATIONS EN BREF Avantages de l‘entraînement par vibrations Des vibrations douces et des vibrations à haute fréquence, combinées à divers exercices, stimulent le tissu musculaire plus profond et réduisent l‘accumulation de graisse. En outre, l‘élasticité des muscles est augmentée, le corps est formé... - Page 72 Fréquences moyennes (env. 10–20 Hz) Le but de l‘entraînement aux fréquences moyennes de 10 à 20 hertz (oscillations par seconde) est l‘entraînement de la fonction musculaire en tant que telle. Dans une séquence d‘apprentissage, par exemple à 15 Hertz, le temps entre deux cycles réflexe est d‘environ 67 millisecondes (millièmes de seconde).
-
Page 73: Entretien Et Maintenance
Fréquences élevées (env. 20 - 36 Hz) Aux hautes fréquences, le muscle n‘a pas assez de temps pour atteindre une relaxation complète (relaxation) dans le court laps de temps entre deux cycles. Au contraire, le muscle est forcé de se contracter à nouveau juste au moment où... - Page 74 Fréquence Niveau 1/min 7,00 7,16 7,31 7,47 7,62 7,78 7,93 8,09 8,24 8,40 8,55 8,71 Tableau de fréquence 8,86 du plaque vibrante 9,02 Modèles 9,17 10033197, 10033198 9,33 9,48 9,64 9,79 9,95 10,10 10,26 10,41 10,57 10,72 10,88 11,03 11,19 11,34 11,50...
-
Page 75: Entraînement Et Exercices
ENTRAÎNEMENT ET EXERCICES Lisez attentivement toutes les instructions avant d‘utiliser l‘appareil. Idéalement, pour améliorer votre posture et votre équilibre, vous ne devriez pas vous tenir lorsque vous êtes debout sur l‘appareil ; toutefois, même si la majorité des personnes n’a pas besoin de soutien supplémentaire, la première fois que vous utilisez l’appareil, placez une chaise à... - Page 76 Plier les genoux Tenez-vous debout avec les genoux pliés sur l‘appareil. Cela réduit l‘effet sur le haut du corps et le se déplace vers les mollets, les cuisses et les fessiers. Durée maximale d‘utilisation : 10 minutes Durée recommandée: 3 minutes Entraînement des pectoraux Tenez les bandes de résistance et en bougeant un minimum les hanches, passez une main sur le haut du...
- Page 77 Relever les bras devant soi Habituellement, un bras après l‘autre est entraîné. Ici, le tout haut du corps est sollicité, en particulier les épaules. Lever les bras sur les côtés Tirez les bandes de résistance de côté pour mettre les bras en croix.
- Page 78 Exercices d‘abdominaux Exercez vos abdominaux en restant simplement debout sur l‘appareil. Pour des exercices supplémentaires, vous pouvez basculer entre ces deux positions. Essayez de garder le dos droit. Durée maximale d‘utilisation: 2 minutes Durée recommandée: 1 minute Vitesse maximale: 8 Massage des bras et des épaules Avec les genoux sur le sol, mettez vos mains sur la plate- forme.
-
Page 79: Résolution Des Problèmes
RÉSOLUTION DES PROBLÈMES Problème Cause possible Solution Impossible de démarrer La fiche n'est pas Branchez la fiche dans l'appareil. branchée la prise. L'appareil n'est pas Allumez l'appareil. allumé. Le fusible a sauté. Vérifiez vos fusibles. L'appareil émet Bruits normaux Les bruits pendant des bruits pendant générés par le moteur l'entraînement... -
Page 80: Conseils Pour Le Recyclage
CONSEILS POUR LE RECYCLAGE Le pictogramme ci-contre apposé sur le produit signifie que la directive européenne 2012/19/UE s‘applique (poubelle à roues barrée d’une croix). Ces produits ne peuvent être jetés dans les poubelles domestiques courantes. Renseignez-vous concernant les règles appliquées pour la collecte d’appareils électriques et électroniques. - Page 81 Gentile cliente, La ringraziamo per aver acquistato il dispositivo. La preghiamo di leggere attentamente le seguenti istruzioni per l’uso e di seguirle per evitare possibili danni tecnici. Non ci assumiamo alcuna responsabilità per danni scaturiti da una mancata osservazione delle avvertenze di sicurezza e da un uso improprio del dispositivo.
-
Page 82: Avvertenze Di Sicurezza
AVVERTENZE DI SICUREZZA Leggere attentamente tutto il manuale prima di procedere all’uso del dispositivo e conservarlo per future consultazioni. Le caratteristiche del prodotto possono essere leggermente diverse da quelle rappresentate nelle immagini. Il produttore si riserva il diritto di effettuare modifiche senza preavviso. - Page 83 • Il dispositivo non è adatto a usi terapeutici. Può essere utilizzato solo per gli esercizi descritti nel manuale. • Indossare un abbigliamento adeguato e scarpe da allenamento durante l’utilizzo del dispositivo. Evitare abiti larghi che potrebbero restare impigliati nel dispositivo o indumenti che limitano la libertà di movimento. •...
-
Page 84: Montaggio Delle Battle Rope
MONTAGGIO DELLE BATTLE ROPE Allentare i piedi d’appoggio. Svitare le viti (2) con una chiave per dadi (v. immagine 1). Tirare verso l’esterno le fascette metalliche (v. immagine 2). Stringere poi nuovamente i piedi d’appoggio e le viti (2). Ora è possibile fissare le battle rope alle fascette metalliche. -
Page 85: Descrizione Del Dispositivo
DESCRIZIONE DEL DISPOSITIVO Copertura superiore Base Copertura intermedia Superficie gommata Piedi d’appoggio Lettore BT integrato Alimentazione... -
Page 86: Indicazioni Del Pannello Di Controllo
INDICAZIONI DEL PANNELLO DI CONTROLLO Calorie Velocità Durata Velocità della vibrazione (intensità) FUNZIONI DEL TELECOMANDO Start/Stop Dopo aver collegato il dispositivo all’alimentazione e averlo acceso, premere Start per metterlo in funzione. Premere Stop per fermarlo quando è in funzione. Time+ L’impostazione predefinita è... -
Page 87: Ascoltare Musica Tramite Bt
ASCOLTARE MUSICA TRAMITE BT Avviare il BT sul dispositivo smart e iniziare la ricerca di altri dispositivi BT. Cercare nell’elenco BT il dispositivo dal nome [Klarfit] e stabilire la connessione. Ora è possibile ascoltare la musica tramite la cassa integrata nella pedana vibrante. -
Page 88: Riscaldamento Prima Dell'allenamento
RISCALDAMENTO PRIMA DELL’ALLENAMENTO... - Page 89 Ogni movimento deve essere ripetuto diverse volte (a destra e a sinistra) in modo da poter realizzare un allenamento cardio in modo rilassato. Calcolare circa 5 minuti per la seguente routine di allenamento Klarfit: 1. Piegare lentamente la testa lateralmente, alternando a destra e sinistra. In seguito mobilitare le spalle (movimenti circolari e alzando e abbassando le spalle).
-
Page 90: Panoramica Sull'allenamento Con Vibrazioni
PANORAMICA SULL’ALLENAMENTO CON VIBRAZIONI Vantaggi dell’allenamento con vibrazioni Grazie alle vibrazioni e oscillazioni delicate e ad alta frequenza, in combinazione con diversi esercizi, è possibile stimolare i tessuti muscolari più in profondità e ridurre accumuli di grasso. Inoltre si incrementa l’elasticità muscolare, si definisce la corporatura e la condizione fisica in genere viene influenzata positivamente. - Page 91 Frequenze medie (circa 10-20 Hz) L’obiettivo dell’allenamento con frequenze medie da 10 a 20 Hertz (oscillazioni al secondo) è l’esercizio delle funzioni muscolari in quanto tali. Con una frequenza di allenamento di 15 Hz, ad esempio, la durata tra due cicli di riflessi è...
- Page 92 Alte frequenze (20-36 Hz) Con le alte frequenze, al muscolo non resta tempo sufficiente per rilassarsi completamente tra i due cicli. Il muscolo viene obbligato a una nuova contrazione, esattamente nel momento in cui tenderebbe naturalmente a rilassarsi o in cui ha già iniziato a rilassarsi. Il risultato è che viene allenata in breve tempo la coordinazione intermuscolare e intramuscolare, che porta a un incremento della potenza muscolare.
- Page 93 Frequenza Livello 1/min 7,00 7,16 7,31 7,47 7,62 7,78 7,93 8,09 8,24 8,40 8,55 8,71 Tabella delle frequenze 8,86 della pedana vibrante 9,02 Modelle 9,17 10033197, 9,33 10033198 9,48 9,64 9,79 9,95 10,10 10,26 10,41 10,57 10,72 10,88 11,03 11,19 11,34 11,50...
-
Page 98: Pulizia E Manutenzione
PULIZIA E MANUTENZIONE Nota: come per tutti i dispositivi da allenamento con componenti meccanici in movimento, le viti possono allentarsi a causa dell‘uso frequente. Si raccomanda pertanto di controllarle regolarmente e, se necessario, di serrarle nuovamente con una chiave adatta. Pulire regolarmente il dispositivo con un panno umido per rimuovere sudore e polvere. -
Page 99: Correzione Degli Errori
CORREZIONE DEGLI ERRORI Problema Possibile causa Soluzioni Non è possibile avviare La spina non è inserita. Inserire la spina. il dispositivo. Il dispositivo non è Accendere il acceso. dispositivo. Il fusibile è saltato. Controllare i fusibili. Il dispositivo emette Normali rumori, dovuti Alcuni rumori rumori durante al motore o alla frizione... -
Page 100: Smaltimento
SMALTIMENTO Se sul prodotto è presente la figura a sinistra (il cassonetto dei rifiuti mobile sbarrato), si applica la direttiva europea 2012/19/UE. Questi prodotti non possono essere smaltiti con i rifiuti normali. Informarsi sulle disposizioni vigenti in merito alla raccolta separata di dispositivi elettrici ed elettronici. Non smaltire i vecchi dispositivi con i rifiuti domestici.
Need help?
Do you have a question about the Vibe VX and is the answer not in the manual?
Questions and answers