Advertisement
Quick Links
Total solder points: 220+ 65
Difficulty level:
beginner 1o 2o 3o 4þ 5o advanced
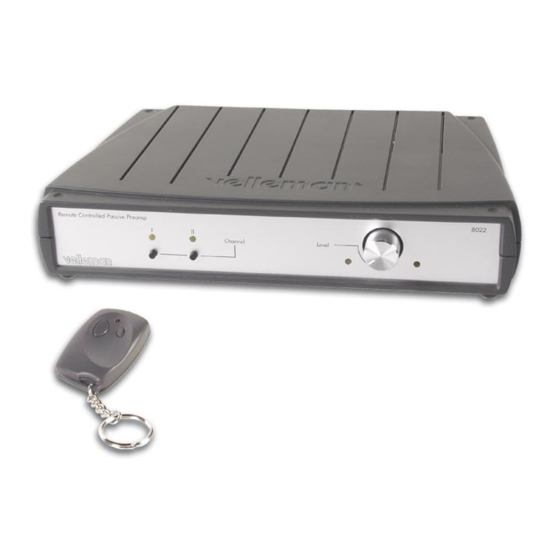
Passive Preamp with RF remote control
þ Two stereo line level RCA inputs
þ One stereo RCA output to power amp
þ Motor controlled volume control
þ RF remote control for all functions.
þ The remote does not need to 'see' the
receiver
þ Self-learning code
þ Range : up to 15m/yards depending
on environment.
þ Manual operation possible
þ Gold plated RCA connectors
þ Relay controlled input section
þ Totally passive
ILLUSTRATED ASSEMBLY MANUAL
Specifications :
Preamp :
Ÿ Inputs : .................................................. 2 (line level)
Ÿ Outputs : ............................................... 1 (line level)
Ÿ Input impedance : ....................................... 5K ohm
Ÿ Output impedance : .................................. 2.5K ohm
Ÿ Volume control speed : .15s typ. (0 to max. volume)
Ÿ Dimensions : .....235x165x47mm (9,5" x 6,7" x 1,9")
Ÿ Power supply : ............................... 12VDC / 300mA
Remote Control :
Ÿ 433MHz operation
Ÿ Approved design (report BLC/96-0452 according to
I-ETS 300 220)
Ÿ Keychain-style
Ÿ Battery (not included) :12V type V23GA, GP23A, ...
Ÿ Dimensions : ........ 39x15x57mm (1,57" x 0,6" x 2,3")
K8022
H8022IP-2
Advertisement

Subscribe to Our Youtube Channel
Related Manuals for Velleman High-Q Velleman-kit K8022


Summary of Contents for Velleman High-Q Velleman-kit K8022
- Page 1 Total solder points: 220+ 65 Difficulty level: beginner 1o 2o 3o 4þ 5o advanced Passive Preamp with RF remote control K8022 þ Two stereo line level RCA inputs þ One stereo RCA output to power amp þ Motor controlled volume control þ...
- Page 2 Assembly hints 1. Assembly (Skipping this can lead to troubles ! ) Ok, so we have your attention. These hints will help you to make this project successful. Read them carefully. 1.1 Make sure you have the right tools: • A good quality soldering iron (25-40W) with a small tip.
- Page 3 THE CORRECT MOUNTING SEQUENCE ! REMOVE THEM FROM THE TAPE ONE AT A TIME Velleman hereby certifies that the device K8022 meets the essential requirements and all other relevant stipulations of directive 1999/5/ EG and 1995/5/EC. For the complete conformity declaration check out :...
- Page 4 Color code table...
- Page 5 Construction IMPORTANT The construction of this kit consists of two parts : • The assembly of the passive preamp. • The assembly of the RF remote control unit. This manual only deals with the assembly and testing of the passive preamp. Please refer to the supplied RF remote control manuals for details on the as- sembly and configuration of the RF remote control unit.
- Page 6 Construction 6. IC socket 9. Push buttons. Mount them (Watch the position of the notch) straight against the PCB surface ! q SW1: TS-04PV q IC1 : 8p q SW2: TS-04PV q IC2 : 8p 7. Capacitors 10. Adaptor jack. Mount it straight against the PCB surface ! C...
- Page 7 Construction 13. Relay 16. Potentiometer. Mount it straight and against the PCB Connect as shown RY... q RY1 : VR1D122C 14. Electrolytic capacitors (Watch the polarity !) C... q C1 : 1000µ / 25V q C4 : 470µ / 25V q C7 : 1000µ...
- Page 8 Construction 17. Mounting the LED’s. Check the polarity ! Short lead = Cathode or - IMPORTANT Mount these LED’s exactly like in the LD... drawing, otherwise some LED’s will not fit correctly in the front panel. Please also use the front panel as a po- sitioning reference.
- Page 9 Construction 18. IC’s (Watch the position of the notch !) IC1 : VK8022 (programmed PIC 12CE518) IC2 : LM258 or eq. 19. Mounting the PCB into the enclosure Make sure to remove the protective foil from the front and rear panel ! Stick the supplied rubber feet onto the bottom of the enclosure.
- Page 10 Adjustment & testing 20. Adjustment and testing Inspect the complete assembly once more before applying power to the unit ! An adaptor jack allows hook-up of a suitable 12VDC / 300mA wall adaptor. Make sure the input voltage matches your domestic AC voltage. Mind the polarity ! 12VDC / 300mA Plug the adaptor into a wall outlet.
- Page 11 Should you ex- perience interference due to other Velleman remotes with identical code set- tings, then you can set a different code on your remote control (see remote control manual for ‘how-to’...
- Page 12 Hook-up 21. Hook-up to your system POWER LINE LINE AMPLIFIER SOURCE SOURCE 00:00 00:00 Hook-up the left and right outputs of your K8022 to the left and right inputs of the amplifier. You can hook up a line-level source (e.g. CD player, MD player, tuner, tape recorder, ...) to each input channel...
- Page 13 Volume control. Turn clockwise to increase volume ‘Volume up’-indicator. Lights when ‘volume up’ is pressed on remote control. Affix the supplied sticker to the housing. Remote control : Velleman 433,92 MHz SRFCE ‘Volume down’-pushbutton. Push to reduce volume ‘Volume up’-pushbutton. Push to...
- Page 14 23. PCB layout Motor control...
- Page 15 Diagram 24. Diagram...
- Page 16 VELLEMAN COMPONENTS NV Legen Heirweg 33 9890 Gavere Belgium Europe Info & support: www.velleman.be Modifications and typographical errors reserved © Velleman Components NV H8022IP - 2002 - ED2...
Need help?
Do you have a question about the High-Q Velleman-kit K8022 and is the answer not in the manual?
Questions and answers