Table of Contents
Advertisement
SNOW ICE MAKER
USER MANUAL
MODEL : IIS-320SA / WC-0700-AS
※ This machine cannot be used in any other country where the electric
voltage for its power supply is not available.
※ This product is designed for indoor installation.
Please be sure to install it indoors.
※ The external appearance, design, color, and/or components of this machine
may be changed without prior notice for the sake of the Company's product
manufacture.
※ For maximum hygiene, be sure to clean and sterilize the product
on a daily basis.
Advertisement
Table of Contents

Subscribe to Our Youtube Channel
Related Manuals for icetro IIS-320SA


Summary of Contents for icetro IIS-320SA
- Page 1 SNOW ICE MAKER USER MANUAL MODEL : IIS-320SA / WC-0700-AS ※ This machine cannot be used in any other country where the electric voltage for its power supply is not available. ※ This product is designed for indoor installation. Please be sure to install it indoors.
-
Page 2: Table Of Contents
INDEX 1. Preparations for safety 2. Installation and other information 9~14 3. How to install 15~16 4. Part names 5. Specification 6. Operation specifications and how to use 18~24 7. How to wash - Disassembling and washing 25~26 - Sterilizing and second washing 27~29 - Washing and cleaning - Keep this user manual within your reach and view at all times -... -
Page 3: Preparations For Safety
1. Preparations for safety Warning Failure to follow these instructions may result in severe personal injury or death. Failure to follow these instructions may result in parts replacement expense and / Caution or service repair expense. SHOULD BE DONE PROHIBITION DO NOT DO NOT DISCONNECT... - Page 4 Warning Do not place or store heavy items or the top of the product. ◆ Damage by excessive weight can cause the unit to overheat and/or fire. Do not install the machine under humidity area or near the area where water could spatter. ◆...
- Page 5 Warning Do not disassemble Do not modify the parts of icemaker, and repair without an authorized person ◆ It may cause the fire or extraordinary operation, and would result in the serious problem. Prohibition Do not bend the power cord severely, or allow it to be pressed by a heavy matter, which can cause damage to the cord.
- Page 6 Warning Disconnect power plug For long term usage interruption or product shut-down, close the water supply valve, remove the ice from the product and unplug the power cord. Disconnect power plug Unplug the power cord first when cleaning or servicing. ◆...
- Page 7 Caution Caution Remove any moisture oil, anything that may cause slipping on the ground near the product. ◆ Slipping and hitting the ice maker or sticking one's hand or foot into the bottom will cause injury. Hand over As you turn over the icemaker to the other user, please turn over the operation manual together.
-
Page 8: Installation And Other Information
2. Installation and other information Be sure to fix the product securely as in the figure at your preferred location. Otherwise, the manufacturer is not liable for any incident or injury resulting from the fall of the product while in use. <... -
Page 9: How To Install
3. How to install Power line 1. In the rightmost part of the back of the product is the power line, which can be connected to a power source. Water supply part 2. Fully tighten the socket on the water supply Socket part at the back before connecting the water hose. - Page 10 3. How to install Suitable installation condition and place ⊙ Places without heat sources The product has to be installed at places without a heat ◆ source such as stove or gas range or any place that is out of the range of the ambient temperature (10 ~ 38℃, 50~100℉).
- Page 11 3. How to install Suitable installation condition and place ⊙ Be sure to install the product in clean places. ◆ Ice will be used for food or human consumption. Thus, the installation site must be clean and hygienic. Clean and hygienic places! ⊙...
- Page 12 3. How to install After installation ⊙ Protection of the water supply hose Do not put any heavy object on the water supply hose. Do not step on it either. ⊙ Optimal water pressure, water temperature, or ambient temperature. This ice maker must be used under Water pressure : 1~5kg/㎠...
- Page 13 3. How to install About grounding ※ Be sure to ground the product to prevent electric shock. ⊙ Grounding method - When there is a grounding terminal GROUNDING POWER TERMINAL In case of plugging the icemaker into an power OUTLET outlet equipped with a grounding terminal, extra Grounding is grounding is unnecessary.
-
Page 14: How To Install
3. How to Install How to install tray holder STEP 1. Remove the front cover by inserting the fingers into the holes on the right and the left. STEP 2. Pull the tray holder to the front and close the front cover again until the top of the cover is fully attached. -
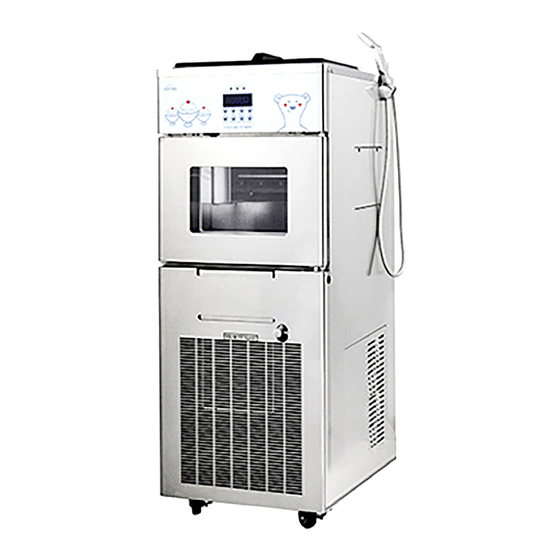
Page 15: Part Names
4. Part names T o p Washer valve Ingredient container cover (Dairy product) Upper cover F r o n t 520(525)mm Power switch Full loaded sensor Display Door & Buttons Transparent window Tray holder Drum evaporator Drum blade Drum gutter Drain Front cover Tray holder... - Page 16 4. Part names S i d e B a c k 740mm Drum side cover Back cover Water supply pipe port (Washing gun) Water supply pipe port Earth leakage breaker Machinery compartment side cover Power cord...
-
Page 17: Specification
5. Specification Category Specification Model IIS-320SA / WC-0700-AB Ice making capacity Water : 320kg(705.5Lbs)/day Milk : 500kg(1102.3Lbs)/day Size (W X H X D) 520 X 740 X 1,405 mm (20.5" X 29" X 55.3") Weight 140kg(309Lbs) Door Tight PVC foam integration for insulation... -
Page 18: Operation Specifications And How To Use
6. Operation specifications and how to use STEP 1. [ M o d e ] M o d e s e l e c t o r W a t e r > ― M i l k [ Milk / Water Mode ] When turned on the machine, ingredient type can be selected. - Page 19 6. Operation specifications and how to use STEP 4. B i n T e m p s e t t i n g > ― O n : O f f : [ Bin Temperature Setting ] Press MODE once more to set the bin temperature.
- Page 20 6. Operation specifications and how to use STEP 6. S e n s i t i v i t y s e t t i n g 1 ] s e t [ Touch Button Sensitivity Adjust ] Press MODE once more to adjust the sensitivity of the touch button.
- Page 21 6. Operation specifications and how to use STEP 9. P R O G R A M V E R 1 . 2 [ Program Version Display ] When you press the MODE button once again, you can check the current program version. STEP 10.
- Page 22 6. Operation specifications and how to use STEP 12. [ M o d e ] M i l k A U T O R U N I c e m a k i n g 6 3 0 ] r p m [ Operating ] Press RUN/STOP to start operating the product;...
- Page 23 6. Operation specifications and how to use STEP 13. [ C l e a n ] D r u m m o t o r [ 6 0 ] M i n [ Washing ] In wash mode, only the drum will be running for 60 minutes.
- Page 24 6. Operation specifications and how to use STEP 16. [ E r r ] M i l k s o l d o u t [ 1 0 0 ] M i x o u t [ FULL ] Displayed when the storage tank is filled with snow ice.
-
Page 25: How To Wash - Disassembling And Washing
7. How to wash - Disassembling and washing STEP 1. Level Sensor Removing drum gutter(Pull the extruding parts with both hands to remove the drum gutter.) PUSH ◆ Use caution since the remaining ingredients in the gutter may spill forward. Drum Gutter ◆... -
Page 26: Disassembling And Washing
7. How to wash - Disassembling and washing STEP 5. Disassemble the milk supply hose and its joint. (After disassembling the hose, press "VALVE" button at the front to enable "Pinch Valve ON," and then remove the hose.) Caution : Drum gutter has to be removed first. STEP 6. -
Page 27: Sterilizing And Second Washing 27~29
7. How to wash - Sterilizing and second washing STEP 1. Warning : Washing the blade can pose danger, so be sure to wear protective gloves first. Sterilize the removed blade and rubber seals first. [ Parts to disassemble and wash ] Milk supply fittings Water supply fittings Door rubber seal... - Page 28 7. How to wash - Sterilizing and second washing STEP 4. Clean the front drain hose with cleaning brushes. STEP 5. Assemble the cleaned parts and rubber seals in reverse order. Be sure to assemble the drain plug together. STEP 6. Adjust the blade after assembling all of the cleaned parts.(Use the #10 wrench included in the package.) ①...
-
Page 29: Sterilizing And Second Washing
7. How to wash - Sterilizing and second washing STEP 8. Pour diluted sanitizer into the hopper basket and water gutter, and then press WASH to start operating of the drum, so that the diluted sanitizer coats the entire drum evenly. (Run for 1 minute.) P i n c h V a l v e... -
Page 30: Washing And Cleaning
◆ The blade may rust, so it must be dried after cleaning before assembling. ◆◆ The blade is a consumable, so be sure to replace it when it rusts or every 6 months. The blade is available from the Icetro service center or your local dealer. - Page 31 MEMO...
- Page 32 Online Internet Service http://www.icetro.com 3 2 4 0 3 0 7 - 0 2...
Need help?
Do you have a question about the IIS-320SA and is the answer not in the manual?
Questions and answers