
Subscribe to Our Youtube Channel
Related Manuals for icetro ISM-72L


Summary of Contents for icetro ISM-72L
- Page 1 ISM-72L (FROZEN BEVERAGE) User's Manual * This product is designed for indoor use. * Make sure to install it indoors. * The appearance, design, color, and parts of the product are subject to change without prior notice.
-
Page 2: Table Of Contents
Contents 1. Names of Parts …………………………………………………………………………… 3 2. Overview …………………………………………………………………………………… 4 3. Safety Signs, Symbols, and Labels ……………………………………………………… 4 4. Safety Instructions ………………………………………………………………………… 5 5. Installation Requirements ………………………………………………………………… 6 6. Safety Cautions for Operation …………………………………………………………… 7 7. Operation Procedure ……………………………………………………………………… 8 7.1 LCD DISPLAY Description ………………………………………………………... -
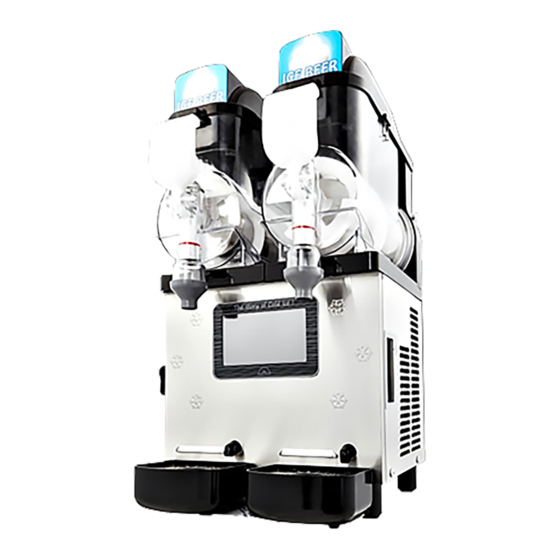
Page 3: Names Of Parts
1. Names of Parts CANISTER COVER IMAGE PC LEVER CANISTER TENSION BOLT PIN LEVER LEVER SHAFT BASE CANISTER ICEBEER SUPPLY USB PORT POWER SWITCH DRAIN BOX COVER DRAIN BOX... -
Page 4: Overview
2. Overview To become familiar with this product, be sure to read this manual carefully. This product requires cleaning and maintenance activities as in other machines. Any disassembly or cleaning mistakes may cause a product failure. It is highly recommended for the person in charge to have immersion training for activities. 3. -
Page 5: Safety Instructions
4. Safety Instructions Do not pull off the power Be sure to use the grounded plug. consent. It may cause a failure or It may cause a failure or electric shock. electric shock. Do not move the product Do not contact the power by pulling the power plug. -
Page 6: Installation Requirements
5. Installation Requirements Do not install the product Do not install the product near the heat generating in a humid, dusty, or water source. (e.g. rain) splashing place. It may cause a fire. It may cause an electric shock or fire. Do not install the product near When moving the product, combustible gases... -
Page 7: Safety Cautions For Operation
6. Safety Cautions for Operation Keep away any flammable If the product makes heavy noise or materials. does not operate properly, remove the ▶It may cause a fire or explosion power plug and contact the service due to electric spark. agency. -
Page 8: Operation Procedure
7. Operation Procedure ① Clean and sterilize the product according to the instructions in this manual. See “7.3 Cleaning and sterilization procedure.” ② Fill up the liquid material up to the level specified on the canister. Do not overfill it. The optimal quantity (in liter or gallon) is written on the surface of canister. -
Page 9: Lcd Display Description
7.1 LCD DISPLAY Description Ice beer generation button ① Startup screen Refrigerating button Product cleaning button (It activates Progress bar the spiral only.) Software version Configuration button Lamp ON/OFF button Press the power switch on the side of the machine This menu appears when the loading is complete. - Page 10 ⑤ Configuration screen ⑥ Language Language button Control setup button Date button Touch setup button Automatic Advertisement button refrigeration button Password setup button Press the setting button on the menu to change Select the language (Korean or English). various setting values. ⑦...
- Page 11 ⑨ Auto refrigeration setting display Time setup button 5℃ 5℃ 5℃ 5℃ Press the ‘AUTO REFRIGERATION’ button and Press the ‘TIME SETTING’ button to set the AUTO REFRIGERATION display will come up. the starting and the ending time of The ingredient can be kept in refrigerated AUTO REFRIGERATION function.
- Page 12 ⑪ Password setting display Password use setting button Password activation starting time Password change button On the main menu, press the 'SETTING' You can activate the password input screen button to get into the 'PASSWORD SETTING'. when no touch on the screen is occurred for a while.(This function is off when released from the factory.) ⑫...
-
Page 13: Operations
7.2 Operations ① Adjusting the Viscosity of beer: The optimal slush viscosity is set by the manufacturer. To change the viscosity, rotate the control bolt on the rear of the product as follows: - To make thicker slush, rotate the control bolt to the left (counter-clockwise). - To make watery slush, rotate the control bolt to the right (clockwise). -
Page 14: Cleaning And Sterilization Procedure
7.3 Cleaning and sterilization procedure Before disassembly and cleaning, remove the power plug to block power supply. Caution ① Remove the canister cover with Canister the key. Canister Cover ② Lift the front of the canister to unlock Canister the latch, and pull out the canister to the front. -
Page 15: Cleaning The Product
7.3.1 Cleaning the product Never clean the parts in the dish washer. Warning ① Prepare the solution mixed with five liters of warm water and kitchen detergent. Do not use a strong detergent. ② Mix an appropriate amount of food grade detergent with water, pour it into the ingredient tank, operate the product in "WASH"... -
Page 16: Sterilizing The Product
7.3.2 Sterilizing the product Sterilization is performed before operating the product. After sterilization, do not leave the product for a long time. ① Wash your hands with an anti-bacterial soap. ② According to the food safety regulations and manufacturer specifications, prepare five liters of warm (45 to 60℃) sterilization solution (dilute a spoon of chloride condense liquefaction or sodium chlorate with two liters of water (100 ppm)). -
Page 17: Sterilizing The Site
⑥ Push the canister fully into the canister to fix in the packing cushion and fixing latch. Canister Fixing Latch ⑦ Use fresh material to remove the remaining sterilization solution on the surface of the canister. Afterwards, do not rinse the product. To reuse the product after a long time, paint the packing cushion with edible grease as in ⑤. -
Page 18: Daily Check
8. Daily Check If the power cord is damaged, only the qualified person must replace it to prevent electric shock. Warning ① Daily check: It checks any possible leak through the packing or gasket. If leak happens through the packing or gasket even though properly assembled, check the use of improper grease or parts wear. -
Page 19: How To Add Video Clips
8.3 How to add video clips ① Connect the USB memory stick and open the "slush" folder. ② Open the "slush_mov" folder. × USB STORAGE(F:) File(F) Edit(E) View(V) Tool(T) Help(H) Address(D) F: \ USB STORAGE ▼ Move Name Type Date of revision slush File folder 2015-04-07... -
Page 20: Specifications
9. Specifications CLASSIFICATION SPECIFICATION MODEL ISM-72L (FROZEN BEVERAGE) Product Name SLUSH MACHINE Siz(W×D×H) 410×430×730 (Included Cover) Body Case Stainless Steel Insulation Urethane Foam Rated power 500W Current 4.0A Electric Consumption Feature Geared Motor 2 EA Fan Motor 10 W Compressor... -
Page 21: Circuit Diagram
10. Circuit diagram... -
Page 22: Before Calling Service
11. Before Calling Service Error Cause Solution Check the connection on the outlet. I cannot plug the power cord into the If the fan inside works, the product is outlet. connected. The backlight is turned off 5 seconds The LCD screen does not after turning power on, and then the The product is powered off. -
Page 23: Part List
12. Part list ITEM ITEM ITEM Angle Assy Assy Solenoid Valve Front Panel LCD Assy Comp BKT Solenoid Valve Drain Box Condenser Assy Column Back Drain Box Cover Bracket cable for USB LCD PCB Fan Motor Rocker Switch Assy LCD Module Fan Motor Bracket BKT Main S/W Rubber LCD... - Page 24 12. Part list ITEM ITEM ITEM Canister Cover Geared Motor Packing Down Canister Micro S/W Packing Pinston SSM-52 Spiral Assy Drum Lever Shaft Packing Back Base Canister Lever Spring 52 Dasher Shaft Packing Cushion Lever Tension Bolt Redenar Insert Joint Spring Joint Spring Redenar Bushing Key Canister Cover...
- Page 25 12. Part list ITEM ITEM ITEM Base wood Pad L Carton Box Wood Top Pad R...
- Page 26 MEMO...
- Page 27 MEMO...
- Page 28 Online Internet Service http://www.icetro.com 3 2 4 0 3 1 1 - 0 1...
Need help?
Do you have a question about the ISM-72L and is the answer not in the manual?
Questions and answers