Table of Contents
Advertisement
Quick Links
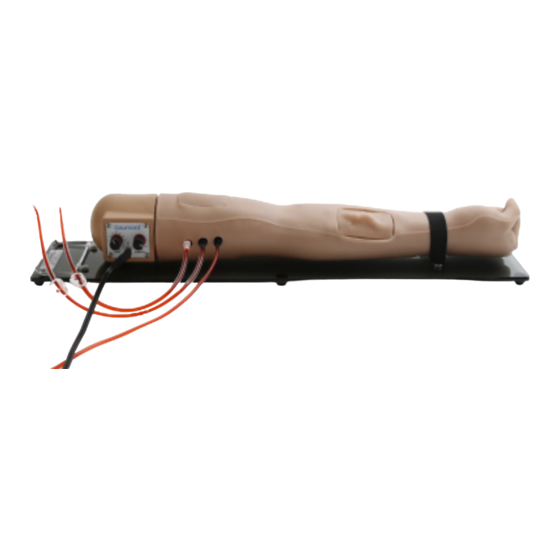
SMASH Advanced Patient
Training Arm
S402.100
Gaumard
®
Simulators for Health Care Education
User Guide 19.1.1
Arterial and Venous Patient Training Arm is an interactive educational
system developed to assist a certified instructor. It is not a substitute for
© Gaumard Scientific Company, 2019
All Rights Reserved
a comprehensive understanding of the subject matter and not intended for
www.Gaumard.com
clinical decision making
Advertisement
Table of Contents

Related Manuals for Gaumard S402.100


Summary of Contents for Gaumard S402.100
- Page 1 Arterial and Venous Patient Training Arm is an interactive educational system developed to assist a certified instructor. It is not a substitute for © Gaumard Scientific Company, 2019 All Rights Reserved a comprehensive understanding of the subject matter and not intended for www.Gaumard.com...
- Page 2 User Guide | Arterial and Venous Training Arm |...
-
Page 3: Table Of Contents
Care and Cautions Overall Warnings ....................5 General ..............................5 Storage ..............................5 Cleaning .............................. 5 Getting Started Overview........................ 7 Appearance ............................7 Simulator ............................. 7 Other..............................7 Contents ........................ 7 Equipment Set Up Simulator Set Up ..........................9 Priming The System .......................... 10 Working with the Simulator Arterial and Venous Exercises...................... -
Page 4: Care And Cautions
Care and Cautions User Guide | Care and Cautions |... -
Page 5: Overall Warnings
• Do not wrap this or any other Gaumard product in newsprint. • Indelible marks made with ballpoint pens, ink or marker cannot be removed. -
Page 6: Getting Started
Getting Started User Guide | Getting Started |... -
Page 7: Overview
- a person participating in the simulation as a healthcare provider. OTHER • One year limited warranty Contents Item Quantity Description S402.100 SMASH Advanced Patient Training Squeeze Bulb with 2 Ft Line Smoked Lucite® Base with Metal Stand for Blood Bag. Dispensing Bag... -
Page 8: Equipment Set Up
Equipment Set Up User Guide | Equipment Set Up |... -
Page 9: Simulator Set Up
In a separate container, mix a solution of 4. Connect the arterial and venous in-flow tube Gaumard simulated blood colorant and water and the arterial recirculation tube to the outlet following the mixing instructions on the bottle. -
Page 10: Priming The System
drainage tubes. The training arm is completely assembled, proceed to the “Priming The System” Section to 7. When satisfied, close the clamps on both fill the system. the drainage tubes. 8. Disconnect the syringe with filling tube from the A&V in-flow port and connect the A&V in- PRIMING THE SYSTEM flow tube from the bag. - Page 11 14. Connect the power supply to the power port located on the shoulder control panel. 15. Open the clamps on the A&V in-flow tube and arterial recirculation tube. 16. Let the blood flow towards the arm. 17. Set the pulse rate control to 80 beats per minute and pulse strength control to maximum value.
-
Page 12: Working With The Simulator
Working with the Simulator 12 | User Guide | Working with the Simulator |... -
Page 13: Arterial And Venous Exercises
“Priming the System” section above. Notice that these instructions are applicable for the both, the SMASH arm S402.100 and S263.100 SMASH arm with attachable shoulder. 5. Adjust the radial and brachial pulse rate and intensity using the controls in the shoulder panel. -
Page 14: Draining The System
7. Disconnect the syringe with filling tube. 8. Repeat steps 6-7 with air until all fluid has WARNING been drained from the arm. only Gaumard’s provided 9. Close all the clamps and disconnect all ports. simulated blood. Any other simulated blood... -
Page 15: Replacing The Incision And Suture Insert
REPLACING THE INCISION AND SUTURE HEMODIALYSIS EXERCISES INSERT The fistula insert represents a healed fistula that allows hemodialysis exercises. The Arterial and Venous Insert can be used for training of the placement of arteriovenous (AV) grafts or creation of an AV fistula 1. - Page 16 4. Repeat steps 2 and 3 for the insert’s distal side. 5. Completely remove the insert. 6. Gather the insert you wish to use as replacement. 7. Orient the wider end of the replacement insert with the proximal side. 8. Align and position the edges of the skin to smooth the transition between skin and insert.
- Page 17 Appendix | Appendix | User Guide |...
-
Page 18: Replacements
Replacements 8. Keep the shoulder base pad and the nut in position as shown below. SKIN REPLACEMENT To replace the skin of training arm follow the instructions below: 1. Drain any fluids from prior training exercises; refer to the “Draining The System” section to empty the system. - Page 19 15. Line up skin with the holes for the inserts. WARNING Do not use sharp objects or fingernails as they will puncture or tear the skin 16. Once the skin is in place, check for any areas that may have bunched up and massage them down.
-
Page 20: Vein Replacement
VEIN REPLACEMENT To replace the veins used in the arm, follow the instructions listed below: 1. Gather the following items: • Replacement vein set • Talcum powder • Clear tape 8. Measure and cut the new veins to be 2. Refer to the “Skin Replacement” section installed. - Page 21 14. Use new tape to hold the veins in position as there were originally. 15. Refer to steps 12-15 from the “Skin Replacement” section to place the skin back into position. 16. Proceed to the “Priming the System” section as replacing the vein will introduce air into the system and it will need to be re-primed.
-
Page 22: Consumables And Replacements
Consumables and Replacements SELECTED PARTS LIST Contact Gaumard Scientific for a complete list of consumables and replacement parts and their prices. Item ID Description S402.100.911.L/M/D Arterial and Venous Insert S402.100.912.L/M/D Fistula Insert S402.100.913.L/M/D Incision and Suture Insert 1308044(5/6/7)A Arm Skin S402.100.810... -
Page 23: Warranty
Defects in third-party products are covered exclusively by the warranty, if any, provided by the third-party. Any waiver or amendment of this warranty must be in writing and signed by an officer of Gaumard. In the event of a perceived defect in material or workmanship of the Gaumard product, the first purchaser must: Contact Gaumard and request authorization to return the Gaumard product. - Page 24 Monday-Friday, 8:30am - 4:30pm EST (GMT-5, -4 Summer Time) General Information Gaumard®, ZOE®, Michelle®, Mike®, PEDI®, Susie Simon®, Susie®, Simon® Code Blue®, SIMA Models®, SIMA GYN/AID®, Virtual Instruments®, Codemaker®, Code Blue®, NOELLE®, Simulation Made Easy™, HAL®, eCPR™, Zack™, RITA™, Chloe™, Seatbelt Susie™, Krash Kids™, Premie™, UNI™, Omni®, SmartSkin™...
Need help?
Do you have a question about the S402.100 and is the answer not in the manual?
Questions and answers