Advertisement
Quick Links
M O BI L E SUR VE I LL A NC E
2 C H H . 2 6 4 M o b i l e D V R / C a m e r a
Mobile Digital Video Recorder
2CH DVR
2CH
DVR
car cam
DC
10~14.5V
P r odu ct De scr i p t io n
Vehicle device
Crew for
protective cover
Recording
Power
Lights indicate
●
Power:Green light always on is indicating device power on.
●
Recording:Red light flashing represents the beginning of recording.
C ab le s Ins t a l l a t i o n I ns t r u c ti o n s
2
1
3
4
b
c
a
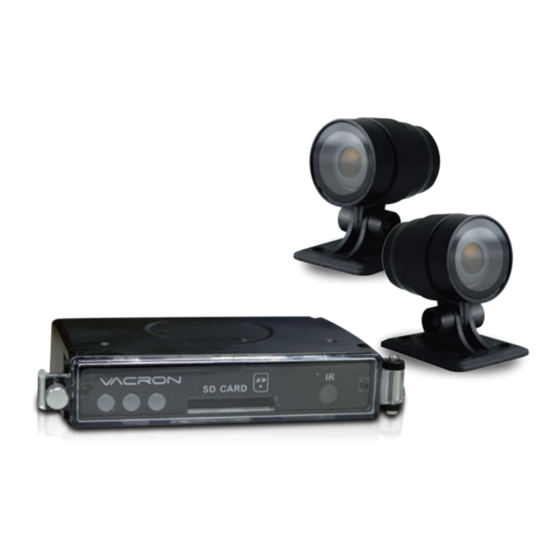
Camera *2
-15~50°C
SD card slot
DVR Cables
(1) Power connecter
(2) Channel 1 Video Input
(3) Channel 2 Video Input
(4) WiFi Dongle connecter
NOTE: Use this device with compatible
vehicle cameras
Power Cable
(a) Power Adapter - Female connector.
(b) Live Wire (red): Wire to the positive
pole of Engine Starter. (+)
(c) Earth Wire (Black): Wire to Negative
Pole. (-)
Ac ce sso ri e s
Before you use our product, please make sure everything that we list
below is includes in this package. Contact retailers if this package
missing any item.
※The memory card sold separately.
Standard package includes
1. Camera *2
2. 2.5M Power cable *2
3. Charge cable
4. USB WIFI dongle
5. Velcro tape
Safety Precautions
▪ System Installation Cautions
• Before install system, get knowledge of charge and power cable wiring.。
• The system must installed by technicians of professional vehicle manufacturers or
professional vehicle installation service.
• Place the device in a well-ventilated location inside a vehicle
• Please select the storage device following the storage device manufacturers advice, in
order to meet a long time, a large amount of data read and write requirements.
For ensure the storage devices quality, please purchase from the official channel.
• If you meet any problem during the installation, please contact technicians of dealer or
authorized vendor immediately.
▪ Vehicle System Cautions
• Do not let any solid or liquid seep inside the device.
• Do not disassemble this equipment, repair or replacement any component. If the machine
does not work properly, please contact the manufacturers or dealer, we will solve problems
as soon as possible.
• For avoiding battery leakage damage, Please remove battery from remote control when
you are not plan to use remote control recently.
• Please install ground first to avoid static / lightning might broke the recorder.
▪ Usage environment cautions
• Please place and use this product under the recommended temperature, avoid direct sunlight,
or near heat sources.
• Do not install the machine in moist environments.
• Do not expose the machine in smoky, dusty environment
• Do not drop the machine for avoiding strong collision
• Please install this product in ventilated locations, do not block the product's vents.
• Please use this device within the rated input and output range of current and voltage.
• This device is design for electronic engineering prolonged use; do not place the device next to
flammable or explosive materials. In order to avoid safety problems.
R e co r d i n g
Power on/Recording
Power On, and wait about 30 seconds later, the boot is complete.
During the recorder boot process, The PWR Green light is always on.
The red light flashing represents the beginning of recording.
Power off/Stop recording
A delay of approximately 3 seconds after the power is turned off to stop
recording, and then the system will write buffer zone back to the SD card.
After the light goes out, you can remove the memory card reader of the
video file.
M e m o r y D i sk
Open / Close
(1). Loose the screw in counterclockwise rotation, and open the
protective cover to insert/remove SD card.
(2). Please refer to the other sections for format / restore the
memory card.
C auti on
(1) Recommend using SDHC Card, Class 10 above (8G or better)
(2) Before using the memory disk, please format the disk first using the software
player in the CD-ROM. If not, device will automatically erase all data in the
memory disk before recording.
(3) To ensure recording quality, please do not use adapter card with Micro SD card.
Doing so may lead to bad connection due to shock and vibration.
(4) All memory disks have limited lifespan. Please regularly watch videos on PC and
check the memory disk to ensure proper functioning.
(5) Strongly recommend regular inspection and backup important data. The shock and
vibration can cause physically damaged to memory disk, resulting in choppy
playback or data damage.
Optional
8/16/32G SD memory card,
Class10 or above.
Protective cover
SD card slot
H12A0E1601
Advertisement

Related Manuals for Vacron 2CH H.264 Mobile DVR


Summary of Contents for Vacron 2CH H.264 Mobile DVR
-
Page 1: Safety Precautions
Ac ce sso ri e s M O BI L E SUR VE I LL A NC E Before you use our product, please make sure everything that we list below is includes in this package. Contact retailers if this package missing any item. - Page 2 I n s t al l ati on D i ag ram • DVR installation diagram • Installation on motorcycle USB WiFi Power on/off Vehicle DVR Car DVR Camera Camera Car Camera 2. Method 1. Method Motorbike ACC ON Explanation (a) Please install device by professional installation engineer;...