Accu-Chek Mobile Quick Start Manual
Hide thumbs
Also See for Mobile:
- User manual (255 pages) ,
- Quick reference manual (2 pages) ,
- Quick start manual (2 pages)
Advertisement
Quick Links
C
©2011 Roche Diagnostics
ACCU-CHEK, ACCU-CHEK MOBILE and FASTCLIX
are trademarks of Roche.
Roche Diagnostics GmbH
M
Sandhofer Strasse 116
68305 Mannheim, Germany
www.accu-chek.com
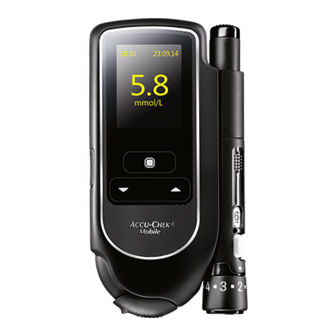
Overview: Test cassette, meter and finger pricker
Power and
Enter button
Test cassette
with 50 tests
Down/Up
buttons
Lancet drum
with 6 lancets
1. Starting to use the Accu-Chek Mobile system
kim_manual_0090
1.
Open the tip cover
completely as far
A
as it will go. Only then will you be able
to open the cassette compartment and
insert the test cassette.
5.
kim_manual_0180
E
Press the
button
E
2 seconds until the meter turns on.
W
If you have set the wrong language by mistake, you may not be able to read the menus any more. You can nevertheless change the language. The instructions can be found in Chapter 5.2 of the
User's Manual under the section Correcting a wrongly set language.
Release button
(priming and pricking)
Window showing
number of available
lancets
Lever for loading a new
lancet
Rotatable cap for setting
the penetration depth
Tip cover
Test area at the tip of the cassette
kim_manual_0240
2.
A
Push the slide button
B
opens the cassette compartment cover.
6.
for about
Use the
buttons to select the
language
.
F
kim_manual_0280
3.
B
upwards. This
Remove a new test cassette
the packaging. Insert the test cassette
into the meter. Close the cassette com-
partment cover and the tip cover.
7.
F
Press the
sired language
Accu-Chek
Mobile
®
BLOOD GLUCOSE MONITORING SYSTEM
START HERE
Quick Start Guide
W
Slide button to
This Quick Start Guide is not a sub-
release finger
stitute for the full User's Manual
pricker
supplied with your Accu-Chek Mobile
system. Please be sure to observe
the safety information in the User's
Slide button
Manual.
to open
the cassette
The Accu-Chek Mobile meter
compartment
and attached finger pricker
cover
are intended for patient self-
monitoring by an individual
person only. These items do not
Cassette
incorporate any features to guard
compartment
against spread of infection and
cover
must not be used on more than one
person. They are also not suitable
for professional use in healthcare
facilities and institutions.
4.
C
Pull the protective strip of the battery
from
C
D
backwards out of the meter to acti-
vate the batteries. Remove the protec-
tive film from the display.
8.
G
button to set the de-
Press the
.
G
selected language
D
H
button to confirm the
.
H
Advertisement

Subscribe to Our Youtube Channel
Related Manuals for Accu-Chek Mobile


Summary of Contents for Accu-Chek Mobile
- Page 1 Lancet drum Test area at the tip of the cassette with 6 lancets 1. Starting to use the Accu-Chek Mobile system kim_manual_0280 kim_manual_0090 kim_manual_0240 Pull the protective strip of the battery Open the tip cover...
-
Page 2: Preparing The Finger Pricker
Roche Diagnostics Australia Pty. Ltd. 31 Victoria Avenue, Castle Hill NSW 2154, Australia ABN 29 003 001 205 Accu-Chek Enquiry Line: 1800 251 816 Push the lever at the side of the finger You can tell that a lancet drum has been www.accu-chek.com.au...
Need help?
Do you have a question about the Mobile and is the answer not in the manual?
Questions and answers