Table of Contents

Subscribe to Our Youtube Channel
Related Manuals for Intellijel Steppy 3U


Summary of Contents for Intellijel Steppy 3U
- Page 1 1/17/2019 Steppy 3U Manual - Google Docs Steppy 3U Manual Steppy 3U 4-Track 64-Step Programmable Gate Sequencer Manual Revision: 2019.01.17 https://docs.google.com/document/d/1t44J8PhD-ITgo8YynRzrai9Oubbg2LoDghwJKaUlR-Y/edit# 1/33...
- Page 2 1/17/2019 Steppy 3U Manual - Google Docs Steppy 3U Manual Table of Contents Table of Contents Compliance Installation Installing Your Module Overview Quick Start: Create a Track Load an Empty Preset Connect a Clock & Program a Track ...
- Page 3 (2) this device must accept any interference received, including interference that may cause undesired operation. Changes or modifications not expressly approved by Intellijel Designs, Inc. could void the user’s authority to operate the equipment. Any digital equipment has been tested and found to comply with the limits for a ...
-
Page 4: Installation
Installation Intellijel Eurorack modules are designed to be used with a Eurorack-compatible case and power supply. We recommend you use Intellijel cases and power supplies. Before installing a new module in your case, you must ensure your power supply has a free ... - Page 5 1/17/2019 Steppy 3U Manual - Google Docs Steppy 3U Manual Most modules will come with the cable already connected but it is good to double check the orientation. Be aware that some modules may have headers that serve other purposes so ...
- Page 6 1/17/2019 Steppy 3U Manual - Google Docs Steppy 3U Manual Overview Steppy is a 4-track programmable gate sequencer with eight internal memory slots, external clocking, various playback options, and a performance-first design aesthetic. ...
-
Page 7: Quick Start: Create A Track
1/17/2019 Steppy 3U Manual - Google Docs Steppy 3U Manual Quick Start: Create a Track This tutorial is designed to get you up and running with Steppy as quickly as possible. Detailed descriptions of all functions, features and methodologies appear later in the manual. ... - Page 8 1/17/2019 Steppy 3U Manual - Google Docs Steppy 3U Manual Connect a Clock & Program a Track 1. Connect the output from an external clock module to Steppy’s CLK input. An external clock is needed to make Steppy start stepping. Steppy will advance one-step ...
- Page 9 1/17/2019 Steppy 3U Manual - Google Docs Steppy 3U Manual 7. Press the button corresponding to Track B (causing it to light instead of Track A), then press the black SELECT button again to exit Select Mode, and return to Play Mode. ...
-
Page 10: Front Panel
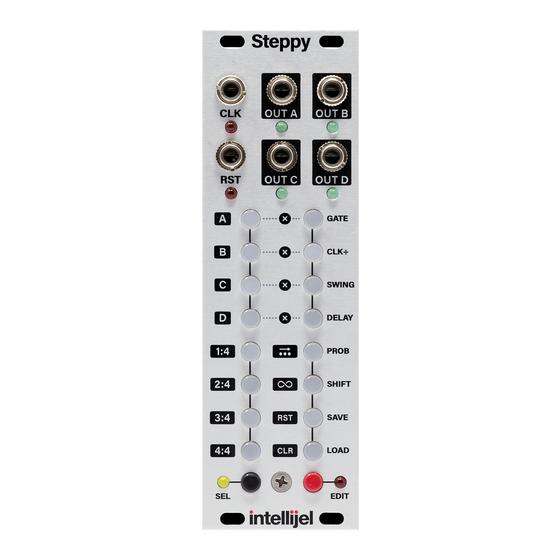
1/17/2019 Steppy 3U Manual - Google Docs Steppy 3U Manual Front Panel Inputs & Outputs A. OUT A - Gate output (+5V) for Track A. Corresponding LED lights when gate is high. B. OUT B - Gate output for Track B. ... - Page 11 1/17/2019 Steppy 3U Manual - Google Docs Steppy 3U Manual Controls 1. MULTIFUNCTION Buttons - These backlit button perform different functions depending on Steppy’s current mode. ● Play Mode: In Play Mode, the buttons set and display gate patterns. ...
- Page 12 1/17/2019 Steppy 3U Manual - Google Docs Steppy 3U Manual column sets the minimum value for a parameter, and the bottom button sets the maximum value, with interim values spread across the middle six buttons. ...
-
Page 13: Play Mode
1/17/2019 Steppy 3U Manual - Google Docs Steppy 3U Manual Reference The following sections discuss Steppy’s various modes, and the function of the buttons within those modes. Play Mode Play Mode is Steppy’s default mode. In Play Mode, the sixteen Multifunction buttons are used to ... - Page 14 1/17/2019 Steppy 3U Manual - Google Docs Steppy 3U Manual The illustration below shows identical patterns; but in the left example, the track length is set to 16-steps, and in the right example, it’s set to 5-steps: ...
-
Page 15: Select Mode
1/17/2019 Steppy 3U Manual - Google Docs Steppy 3U Manual Select Mode In Select Mode, the Multifunction buttons are used to select tracks for viewing & editing; to select pages within those tracks; ... - Page 16 1/17/2019 Steppy 3U Manual - Google Docs Steppy 3U Manual 3. PAGE buttons When in Select mode, these four buttons select which of the four pages (1, 2, 3, or 4) you wish to display/edit. Each page displays 16 steps at a time, meaning there are a ...
- Page 17 1/17/2019 Steppy 3U Manual - Google Docs Steppy 3U Manual For example, assume your current pattern looks like the one on the left, below: If Loopy( ) is active, pressing one button loops playback of that single step, ...
- Page 18 1/17/2019 Steppy 3U Manual - Google Docs Steppy 3U Manual The standard Track position continues to advance normally as a loop plays. This means, when you release the buttons, the pattern reverts to playing exactly the step it would ...
-
Page 19: Edit Mode
1/17/2019 Steppy 3U Manual - Google Docs Steppy 3U Manual Edit Mode In Edit Mode, the Multifunction buttons select and modify various parameters (such as gate length, clock division, swing, etc.), as indicated by the labels to the ... - Page 20 1/17/2019 Steppy 3U Manual - Google Docs Steppy 3U Manual 2. Gate Length (GATE) button When in Edit mode, press this button to edit the gate length for all steps in the selected Track (each ...
- Page 21 1/17/2019 Steppy 3U Manual - Google Docs Steppy 3U Manual 3. Clock Division (CLK ÷) button When in Edit mode, press this button to edit the clock rate at which the selected track plays (each ...
- Page 22 1/17/2019 Steppy 3U Manual - Google Docs Steppy 3U Manual 4. SWING button When in Edit mode, press this button to edit the swing percentage for the selected Track (each track has its own swing rate). Swing options conform to ...
- Page 23 1/17/2019 Steppy 3U Manual - Google Docs Steppy 3U Manual 5. DELAY button When in Edit mode, press this button to edit the amount of delay to apply to every step in a track. ...
- Page 24 1/17/2019 Steppy 3U Manual - Google Docs Steppy 3U Manual 6. Probability (PROB) button When in Edit mode, press this button to set the probability that any step within the pattern will actually play when requested. Probability editing is ...
- Page 25 1/17/2019 Steppy 3U Manual - Google Docs Steppy 3U Manual 7. SHIFT button When in Edit mode, press this button to enable pattern shifting. Pattern shifting allows you to rotate the active pattern forward or backward by a ...
- Page 26 1/17/2019 Steppy 3U Manual - Google Docs Steppy 3U Manual 8. SAVE button When in Edit mode, press this button to enable Preset saving. Steppy can store up to 8 presets (assigned to each of the 8 buttons in the left column of multifunction buttons). A ...
- Page 27 1/17/2019 Steppy 3U Manual - Google Docs Steppy 3U Manual You can also delete a preset from memory using the LOAD button. To do so: a. Press the red EDIT button to enter Edit mode. ...
- Page 28 1/17/2019 Steppy 3U Manual - Google Docs Steppy 3U Manual Ratcheting Steppy has a special Edit mode for creating and editing ratchets. Unlike Steppy’s other editing functions, which apply to every step in a pattern, ratchet editing is applied ...
- Page 29 1/17/2019 Steppy 3U Manual - Google Docs Steppy 3U Manual 3. Press whichever of the 16 multifunction buttons corresponds to the step you wish to ratchet. If you select steps from the left column of buttons, the right column of buttons will ...
- Page 30 1/17/2019 Steppy 3U Manual - Google Docs Steppy 3U Manual Tap Recording Tap Recording is a special, alternate way to program trigger patterns into Steppy. Instead of manually turning steps on/off in a grid, Tap Recording lets you tap out your rhythms in real-time. ...
-
Page 31: Steppy Architecture
1/17/2019 Steppy 3U Manual - Google Docs Steppy 3U Manual Steppy Architecture The following diagram illustrates the architecture of a Steppy preset: Page 30 https://docs.google.com/document/d/1t44J8PhD-ITgo8YynRzrai9Oubbg2LoDghwJKaUlR-Y/edit# 31/33... -
Page 32: Copying Patterns
1/17/2019 Steppy 3U Manual - Google Docs Steppy 3U Manual Copying Patterns 1. Press the SELECT button to enter Select Mode. 2. Hold the button corresponding to the track you want to copy from (A, B, C or D). ... -
Page 33: Firmware Version Display
1/17/2019 Steppy 3U Manual - Google Docs Steppy 3U Manual Firmware V1.0 (January, 2019) ● Initial release Firmware Version Display Steppy displays the current version number during start up. Specifically, the left column of buttons indicates the first digit in the FW version (from ...
Need help?
Do you have a question about the Steppy 3U and is the answer not in the manual?
Questions and answers