
Related Manuals for Intellijel MIDI 1U


Summary of Contents for Intellijel MIDI 1U
- Page 1 MIDI 1U System 1U USB/DIN MIDI-to-CV Interface System Manual (English) Revision: 2020.10.12 (PRELIMINARY)
-
Page 2: Table Of Contents
Before You Start Installing Your Modules Connecting Power to the MIDI 1U Connecting the MIDI 1U to a MIDI IN Jacks 1U Connecting the MIDI 1U to a 7U Case Connecting the MIDI 1U to a Palette Case Connecting a MIDI Expander 1U... - Page 3 FIRMWARE UPDATES TECHNICAL SPECIFICATIONS MIDI 1U MIDI Expander 1U MIDI IN Jacks 1U MIDI 1U System Manual 2 ...
-
Page 4: Compliance
(2) this device must accept any interference received, including interference that may cause undesired operation. Changes or modifications not expressly approved by Intellijel Designs, Inc. could void the user’s authority to operate the equipment. Any digital equipment has been tested and found to comply with the limits for a Class A digital device, pursuant to part 15 of the FCC Rules. -
Page 5: Overview
Pitch, Velocity and Gate messages derived from two separate MIDI channels. ● MIDI input connector - the MIDI 1U module does not have its own MIDI input jack. This enables you to use the MIDI/USB inputs built-in to your Intellijel 7U Performance Case or Palette Case. -
Page 6: Installation
INSTALLATION The MIDI 1U system is designed specifically for use within an Intellijel-standard 1U row, such as contained within the Intellijel 4U, 7U, and Palette cases. Intellijel’s 1U specification is derived from the Eurorack mechanical specification set by Doepfer that is designed to support the use of lipped rails within industry standard rack heights. -
Page 7: Installing Your Modules
Connecting Power to the MIDI 1U To power the MIDI 1U module, use the included 10-pin to 16-pin cable. Plug the 10-pin end into the 10-pin connector labelled “POWER” on the MIDI 1U (as shown above). DO NOT plug it into the other 10-pin connector. -
Page 8: Connecting The Midi 1U To A Midi In Jacks 1U
Connecting the MIDI 1U to a MIDI IN Jacks 1U You will need to connect the MIDI 1U to either a MIDI IN Jacks 1U module or to a case with built-in MIDI/USB jacks. This section discusses how to connect the MIDI 1U to the MIDI IN Jacks 1U module. -
Page 9: Connecting The Midi 1U To A 7U Case
Connecting the MIDI 1U to a 7U Case You will need to connect the MIDI 1U to either a MIDI IN Jacks 1U module or to a case with built-in MIDI/USB jacks. This section shows how to connect the MIDI 1U to the MIDI/USB jacks on an Intellijel 7U case. -
Page 10: Connecting The Midi 1U To A Palette Case
Connecting the MIDI 1U to a Palette Case You will need to connect the MIDI 1U to either a MIDI IN Jacks 1U module or to a case with built-in MIDI/USB jacks. This section discusses how to connect the MIDI 1U to the MIDI/USB jacks on an Intellijel Palette case. -
Page 11: Connecting A Midi Expander 1U
Connect one end of the supplied 6-pin to 6-pin ribbon cable to the 6-pin connector on the MIDI 1U module. The connector is keyed, and will fit in only one direction. Connect the other end of the supplied 6-pin-to-6-pin ribbon cable to the 6-pin connector on the MIDI Expander 1U. -
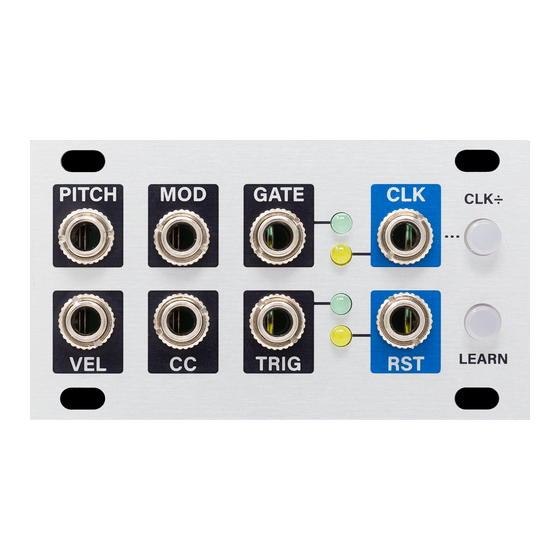
Page 12: Midi 1U Front Panel
CC or MOD polarity. NOTE: MIDI 1U automatically saves any changes after 2 seconds of MIDI inactivity — ensuring it returns to exactly the same state after a power cycle, and that it does not interfere with time-sensitive operations (such as clock). -
Page 13: Outputs
Pressing the button cycles through three states: OFF : When the LEARN button is off, MIDI 1U is in normal operation and works to convert incoming MIDI data into CV for your eurorack system. SOLID BLUE... - Page 14 By default, the Trigger length is 5ms, but you can override this using the Intellijel Config app. The corresponding LED lights whenever the TRIGGER out is high. Dual Mode , this jack outputs CH B’s GATE signal. MIDI 1U System Manual 13 ...
-
Page 15: Midi Expander 1U Front Panel
The optional MIDI expander has eight user-assignable outputs. Using the Intellijel Config app, you can assign each of the eight jacks to generate just about any type of voltage that can be derived from a MIDI signal. MIDI 1U System Manual 14 ... -
Page 16: Configuring Midi 1U Using The Front Panel
. In LEARN MOD+CH mode, the LEARN button flashes blue , indicating that MIDI 1U is awaiting a MIDI message (and that it’s also capable of learning the MOD jack assignment). Send any channel-based MIDI message into the MIDI 1U. -
Page 17: Learn The Cc Jack Assignment
MOD voltage will be bipolar (i.e. CC Value of 64 = 0V; CC Value of 0 = -5V; CC Value of 127 = +5V). Send the MIDI 1U a MIDI message using the MIDI CC number that you want assigned to the MIDI 1U’s CC jack. -
Page 18: Learn The Mod Jack Assignment
MOD voltage will be bipolar (i.e. CC Value of 64 = 0V; CC Value of 0 = -5V; CC Value of 127 = +5V). Send the MIDI 1U a MIDI message using the MIDI CC number that you want assigned to the MIDI 1U’s MOD jack. -
Page 19: Dual Mode
Dual Mode MIDI 1U offers an alternate, dual channel mode that reconfigures the jacks for 2-channel operation. In this mode, you have independent MIDI control of the pitch, gate and velocity for two different MIDI channels (repurposing the MOD , CC and TRIG jacks for PITCH , VEL and GATE jacks, respectively, for CH B). - Page 20 ), long press (>1.5 sec) the LEARN button to revert to Normal Mode. MIDI 1U reconfigures back to a single channel device, and restores the MOD , CC and TRIG settings to their previously programmed conditions. NOTE: By default, Normal Mode uses the same MIDI channel as CH A. So, if you changed CH A’s setting in Dual Mode, that will be the new MIDI channel assignment in Normal Mode.
-
Page 21: Intellijel Config App
INTELLIJEL CONFIG APP You can customize various aspects of the MIDI 1U module using the Intellijel Config app (available for both Mac and Windows), which is available to download from the www.intellijel.com website. MIDI 1U System Manual 20 ... -
Page 22: Configuring The Midi 1U Module
Configuring the MIDI 1U Module This section describes how to use the Intellijel Config app to configure the MIDI 1U module. NOTE: MIDI 1U automatically saves any changes made via the Inteillijel Config app after 2 seconds — ensuring it returns to exactly the same state after a power cycle. The buttons flash... -
Page 23: Midi 1U Config Column
MIDI 1U Config Column The right column is used to configure the various parameters of the MIDI 1U you selected in the left column’s MIDI Input and MIDI Output menus. At the top of the menu is the name of the selected device and its current firmware version. - Page 24 Bend messages will bend the PITCH output voltage. Coarse Tuning (±24) Changes overall coarse tuning (in semitones) of the MIDI 1U. This is particularly useful for shifting octaves, and placing 0V at the desired octave (i.e. C0, C1, etc). CC Output Settings:...
-
Page 25: Configuring The Midi Expander 1U Module
The MIDI Expander 1U is not yet available. This manual will be updated when it is. Once available, this section will describe how to use the Intellijel Config app to customize the jack assignments on a MIDI Expander 1U module. -
Page 26: System Reset
To Reset using the Intellijel Config app: Launch the Intellijel Config app on your Mac or Windows computer In the left column, select the desired MIDI 1U device from both the MIDI Input and MIDI Output drop-down menus. Click Connect . - Page 27 Click the Instructions button to read specific instructions for updating your module. If you wish to see what firmware versions are currently installed in your MIDI 1U and MIDI EXPANDER 1U modules, you will need to download and install the Intellijel Config app, which will display the modules’...
- Page 28 14 hp Maximum Depth TBD mm Current Draw TBD mA @ +12V TBD mA @ -12V MIDI IN Jacks 1U Width 8 hp Maximum Depth 30 mm Current Draw None - Passive module MIDI 1U System Manual 27 ...
Need help?
Do you have a question about the MIDI 1U and is the answer not in the manual?
Questions and answers