
Related Manuals for Intellijel MIDI1U


Summary of Contents for Intellijel MIDI1U
- Page 1 MIDI1U System 1U USB/DIN MIDI-to-CV Interface System Manual (English) MIDI 1U Firmware: 1.1 | Revision: 2021.01.09...
-
Page 2: Table Of Contents
TABLE OF CONTENTS TABLE OF CONTENTS COMPLIANCE OVERVIEW INSTALLATION Before You Start Installing Your Modules Connecting Power to the MIDI 1U Connecting the MIDI 1U to a MIDI IN Jacks 1U Connecting the MIDI 1U to a 7U Case Connecting the MIDI 1U to a Palette Case Connecting a CVx to a MIDI 1U Connecting Multiple CVx Modules to a MIDI 1U SYNTHS... - Page 3 INTELLIJEL CONFIG APP System Region MIDI 1U Config Column Global/Transport Settings Single Mono MOD Output Settings Single Mono CC Output Settings Synths Column Expander Column(s) Expander Shortcuts Menu SYSTEM RESET FIRMWARE UPDATES TECHNICAL SPECIFICATIONS MIDI 1U CVx 1U MIDI IN Jacks 1U MIDI 1U System Manual 2 ...
-
Page 4: Compliance
(2) this device must accept any interference received, including interference that may cause undesired operation. Changes or modifications not expressly approved by Intellijel Designs, Inc. could void the user’s authority to operate the equipment. Any digital equipment has been tested and found to comply with the limits for a Class A digital device, pursuant to part 15 of the FCC Rules. -
Page 5: Overview
● MIDI input connector - The MIDI 1U module does not have its own MIDI input jack. This enables you to use the MIDI/USB inputs built-in to your Intellijel 7U Performance Case or Palette Case . If you don’t own one of these cases, you can purchase the MIDI IN Jacks 1U module to allow connection of an external MIDI device. -
Page 6: Installation
INSTALLATION The MIDI 1U system is designed specifically for use within an Intellijel-standard 1U row, such as contained within the Intellijel 4U, 7U, and Palette cases. Intellijel’s 1U specification is derived from the Eurorack mechanical specification set by Doepfer that is designed to support the use of lipped rails within industry standard rack heights. -
Page 7: Installing Your Modules
10-pin connector. The connector is shrouded, and can only be inserted in one direction (ensuring proper orientation if you use the supplied Intellijel power cable). If you’re using a different power cable, make sure the red stripe (negative) is closest to the thick white line printed on the circuit board along one edge of the POWER connector. -
Page 8: Connecting The Midi 1U To A Midi In Jacks 1U
both ends and that all the pins are correctly aligned. If the pins are misaligned in any direction or the ribbon is backwards you can cause damage to your module, power supply, or other modules. After you have confirmed all the connections, you can reconnect the power cable and turn on your modular system. -
Page 9: Connecting The Midi 1U To A 7U Case
You will need to connect the MIDI 1U to either a MIDI IN Jacks 1U module or to a case with built-in MIDI/USB jacks. This section shows how to connect the MIDI 1U to the MIDI/USB jacks on an Intellijel 7U case. Turn off power to the case. -
Page 10: Connecting The Midi 1U To A Palette Case
You will need to connect the MIDI 1U to either a MIDI IN Jacks 1U module or to a case with built-in MIDI/USB jacks. This section discusses how to connect the MIDI 1U to the MIDI/USB jacks on an Intellijel Palette case. Turn off power to the Palette Case. -
Page 11: Connecting A Cvx To A Midi 1U
Connecting a CVx to a MIDI 1U If you use the optional CVx expander module, you will need to connect it to both power and to the MIDI 1U module. Turn off power to your case. Connect the supplied 10-pin-to-16-pin power cable between the CVx and one of your case’ 16-pin power connectors (using the same technique discussed earlier in Connecting Power to the MIDI 1U... -
Page 12: Connecting Multiple Cvx Modules To A Midi 1U
Connecting Multiple CVx Modules to a MIDI 1U You can connect up to four CVx modules to a single MIDI 1U module — creating an expansive and powerful MIDI-to-CV controller for your eurorack system. Each CVx has two I2C jacks, allowing them to be chained together, with their dip switches each set to a different address. -
Page 13: Synths
“synth” defines the device you wish to control, and the MIDI channel on which you want to control it. Intellijel’s MIDI 1U system can control up to 10 different synths on up to 10 different MIDI channels. By itself, without any CVx expanders, the MIDI 1U can control up to two monophonic synths (called synth 1 and synth 2 ) on up to two different, user-selectable MIDI channels. -
Page 14: Module Modes
Many functions can be learned and configured from the front panel, while the Intellijel Config app offers even greater opportunity for customization. When MIDI 1U is in Single Mode, the LEARN button is unlit (unless you’re using it to learn parameter values). -
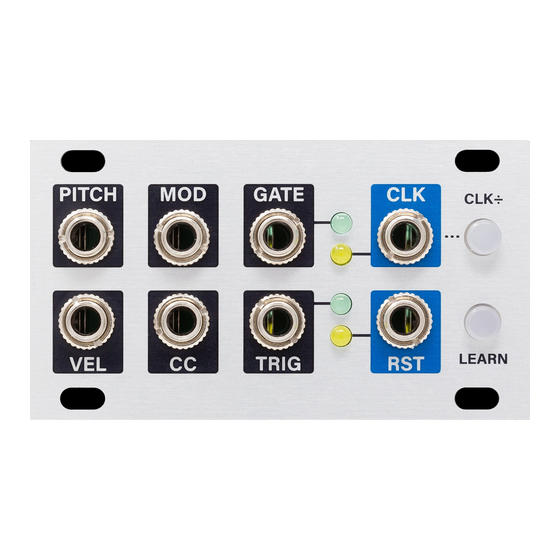
Page 15: Midi 1U Front Panel
Panel , later in this manual. Alternatively, you can set the MIDI channel, MOD, and CC jack assignments using the Intellijel Config app, discussed later. DUAL MODE: MIDI 1U offers an alternate, dual channel mode that reconfigures the jacks for dual synth (2-channel) operation. - Page 16 ● /48 (clock out = half notes) ● /96 (clock out = whole notes) The CLK LED blinks in time with the clock division. Alternatively, you can use the Intellijel Config app to set the desired Clock Division. LEARN OPERATION: When the MIDI 1U is either...
-
Page 17: Outputs
RST out - Operates as either a RESET output or a RUN output, depending on how it’s configured in the Intellijel Config app. If configured as a RESET output (the factory default), this jack transmits a trigger signal whenever a MIDI reset message is received. The corresponding LED lights whenever a RESET message is sent. - Page 18 MIDI 1U’s synth 1 . You can override this default CC assignment using the LEARN button, or you can redefine its purpose entirely using the Intellijel Config app. ● DUAL Mode : Pitch output for synth 2 . This is 1V/oct CV output with a range of ±5V. The voltage output is determined by the note value present on the MIDI Channel Number assigned to MIDI 1U’s synth 2 , plus any additional pitch bend.
-
Page 19: Configuring Midi 1U Using The Front Panel
CONFIGURING MIDI 1U USING THE FRONT PANEL You can configure the MIDI 1U module using either its front panel or the Intellijel Config (available for download from www.intellijel.com). This section discusses configuration via the front panel. Using the Intellijel Config app is discussed later in this manual. -
Page 20: Learn The Cc Jack Assignment (Synth 1)
Learn the CC Jack Assignment (Synth 1) If using Single Mode , you can also assign a function to the MIDI 1U’s CC jack using the LEARN button. Specifically: If the LEARN button is not lit, press it once. The LEARN button lights solid blue , indicating the MIDI 1U is in LEARN CC+CH mode, and is... -
Page 21: Learn The Mod Jack Assignment (Synth 1)
Learn the MOD Jack Assignment (Synth 1) If using Single Mode , you can also assign a function to the MIDI 1U’s MOD jack using the LEARN button. Specifically: If the LEARN button is not lit, press it twice . The LEARN button flashes blue , indicating the MIDI 1U is in LEARN MOD+CH mode, and is... -
Page 22: Dual Mode Configuration (Synth 1 + Synth 2)
Dual Mode Configuration (Synth 1 + Synth 2) MIDI 1U offers an alternate, dual channel mode that reconfigures its output jacks for dual synth operation. In this mode, you control both synth 1 and synth 2 from the MIDI 1U module, giving you independent MIDI control of the pitch, gate and velocity for two different MIDI channels (repurposing the MOD , CC and TRIG jacks for PITCH , VEL and GATE jacks, respectively, for synth 2 ). -
Page 23: Cvx 1U Front Panel
CVx 1U FRONT PANEL Each of the optional CVx 1U expander modules has eight user-assignable outputs. Using the Intellijel Config app, you can assign each of the eight jacks to generate just about any type of voltage that can be derived from a MIDI signal. -
Page 24: Intellijel Config App
INTELLIJEL CONFIG APP You can customize various aspects of the MIDI 1U system using the Intellijel Config app (available for both Mac and Windows), which is available to download from the www.intellijel.com website. MIDI 1U System Manual 23 ... -
Page 25: System Region
MIDI Output menus. Once connected, the button becomes a Disconnect button. Refresh Devices With the Intellijel Config app disconnected from any devices, click this to refresh the list of available MIDI devices supplied to the MIDI Input and MIDI Output columns. -
Page 26: Midi 1U Config Column
MIDI 1U Config Column The MIDI 1U Config column is used to configure the various outputs of the MIDI 1U module selected in System Region’s MIDI Input and MIDI Output menus. At the top of the column is the name of the selected device and its current firmware version. -
Page 27: Global/Transport Settings
Global/Transport Settings Use these settings to configure the MIDI 1U Clock and RST jack functions. Specifically: Module Mode The MIDI 1U module works in one of two modes : Single or Dual. Use this menu to select between the two operations. Single Mono This is the default (and most basic) mode of... -
Page 28: Single Mono Mod Output Settings
Clock Division Selects a clock division to apply to the incoming MIDI clock. The divided clock is sent out the CLK output. clock out = 24 ppq clock out = 1/32 notes clock out = 1/16 notes clock out = 1/8 notes clock out = 1/4 notes clock out = 1/2 notes clock out = whole notes... - Page 29 DAW or MIDI Device capable of transmitting them. NOTE: Ableton Live users who wish to take advantage of MIDI 1U’s 14-bit control capabilities can download Intellijel’s free “High-Res CC” Max for Live plugin from the Intellijel website. Pressure (Aftertouch) The jack outputs a voltage derived from Channel Aftertouch on the MIDI Channel assigned to synth 1 .
-
Page 30: Single Mono Cc Output Settings
Clock Division NOTE: Available only if Output Type = “Clock (Always)” or “Clock (Running)” Selects a clock division to apply to the incoming MIDI clock. clock out = 24 ppq clock out = 1/32 notes clock out = 1/16 notes clock out = 1/8 notes clock out = 1/4 notes clock out = 1/2 notes... -
Page 31: Synths Column
Synths Column Intellijel’s MIDI 1U system can control up to ten different synths on up to ten different MIDI channels. By itself (without a CVx), the MIDI 1U can control up to two monophonic synths . Connecting one or more CVx expanders adds eight additional synths —... - Page 32 MIDI Channel ( 1-16) Selects the MIDI channel to which the synth responds. Each synth can respond to a different MIDI Channel, or you can assign the same channel to multiple synths for layers and splits. Minimum Pitch (0-127) Sets the minimum pitch value to which the synth responds.
- Page 33 Note Priority NOTE: Appears only if Type = ”Monophonic”. If the incoming MIDI stream has more sustained notes than your system can play simultaneously, this option determines which note is actually heard. Last The most recently played (last) note will always override the currently playing note, and is always the note you will hear.
- Page 34 Pitch Bend Range NOTE: Does not appear if Type = ”Drum”. (1 - 24) Sets the max number of semitones that an incoming MIDI Pitch Bend message will affect the PITCH output. Coarse Tuning NOTE: Does not appear if Type = ”Drum”. (±...
-
Page 35: Expander Column(S)
Expander Column(s) When you connect one or more CVx modules to your MIDI 1U and launch the Intellijel Config app, you’ll see an additional Expander column for each CVx in the chain. Each additional column will be titled “Expander <n>”, where <n> is the Expander ID as... - Page 36 DAW or MIDI Device capable of transmitting them. NOTE: Ableton Live users who wish to take advantage of MIDI 1U’s 14-bit control capabilities can download Intellijel’s free “High-Res CC” Max for Live plugin from the Intellijel website. Pressure (Aftertouch)
- Page 37 Trigger The jack outputs a +5V trigger signal whenever a MIDI Note On message is received on the MIDI Channel used by the selected Synth. By default, the Trigger length is 5ms, but you can override this, per-synth, using the Trigger Length option in the Synths Column Velocity...
- Page 38 CV Polarity NOTE: Available only if Output Type = “CC Number” or “CC Number (High Res)” Unipolar The jack outputs a unipolar signal ranging from 0V to +5V. Incoming MIDI CC data is interpreted as a unipolar signal, meaning a CC value of 0 maps to 0V and a CC value of 127 maps to +5V.
-
Page 39: Expander Shortcuts Menu
Expander Shortcuts Menu At the top of each Expander column is a drop-down shortcuts menu, which enables you to quickly configure all 8 CVx outputs for a particular use. Set All Synths To Sets all output jacks to the selected Synth number (1-10). Quick Poly Various shortcuts that configure the 8 output jacks for 2-voice, 3-voice, or 4-voice polyphonic operation. -
Page 40: System Reset
SYSTEM RESET You can restore MIDI 1U to its factory default configuration using either the Intellijel Config app or the hardware itself. To Reset using the Device: Power up with Clock Div held down test mode to reset defaults The CLK ± and LEARN buttons will both flash... -
Page 41: Firmware Updates
If you wish to see what firmware versions are currently installed in your MIDI 1U and CVx 1U modules, you will need to download and install the Intellijel Config app, which will display the modules’ current firmware versions. -
Page 42: Technical Specifications
TECHNICAL SPECIFICATIONS MIDI 1U Width 14 hp Maximum Depth 32 mm Current Draw 34 mA @ +12V 2 mA @ -12V CVx 1U Width 14 hp Maximum Depth 32 mm Current Draw 55 mA @ +12V 6 mA @ -12V MIDI IN Jacks 1U ...
Need help?
Do you have a question about the MIDI1U and is the answer not in the manual?
Questions and answers