Advertisement
Quick Links
Installation instructions for part 99-3314G
Chevy Malibu
KIT FEATURES
• ISO DIN radio provision with pockets
• Painted gray to match factory dash
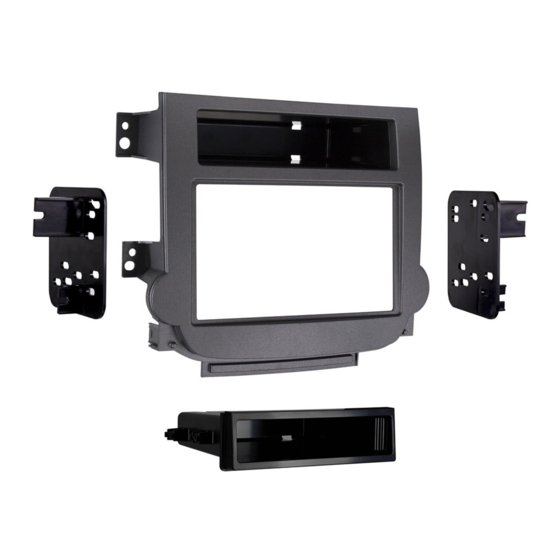
KIT COMPONENTS
• A) Radio trim panel • B) Brackets • C) Upper pocket • D) Pocket • E) (8) #8 x 3/8" Phillips screws
• F) (2) White panel clips
A
B
WIRING & ANTENNA CONNECTIONS (sold separately)
Wiring Harness: • LC-GMRC-044 or AX-ADBOX2 and AX-ADGM04
Antenna Adapter: • 40-EU55
2013-up
(with monochrome screen)
99-3314G
C
D
TOOLS REQUIRED
E
• Panel removal tool • Phillips screwdriver
• Socket wrench (9/32")
F
CAUTION: Metra recommends disconnecting the
negative battery terminal before beginning any
installation. All accessories, switches, and especially
air bag indicator lights must be plugged in before
reconnecting the battery or cycling the ignition.
NOTE: Refer to the instructions included with the
aftermarket radio.
Advertisement

Related Manuals for Metra Electronics 99-3314G


Summary of Contents for Metra Electronics 99-3314G
- Page 1 Installation instructions for part 99-3314G Chevy Malibu 2013-up (with monochrome screen) 99-3314G KIT FEATURES • ISO DIN radio provision with pockets • Painted gray to match factory dash KIT COMPONENTS • A) Radio trim panel • B) Brackets • C) Upper pocket • D) Pocket • E) (8) #8 x 3/8” Phillips screws •...
-
Page 2: Dash Disassembly
99-3314G Dash Disassembly 2014-up Chevy Malibu 2013 Chevy Malibu (with monochrome screen) (with monochrome screen) 1. Unclip and remove the trim panel 1. Unclip and lift up the panel surrounding the center stack surrounding the shifter. (Figure A) including the a/c vents. (Figure A) 2. -
Page 3: Kit Assembly
Metra recommends using the proper mating adapters from Metra and/or AXXESS. 6. Mount the new radio assembly into the dash and reassemble dash in reverse order of disassembly using the 99-3314G radio housing panel.
Need help?
Do you have a question about the 99-3314G and is the answer not in the manual?
Questions and answers