Table of Contents
Advertisement
Quick Links
Advertisement
Table of Contents

Related Manuals for AEMC L205


Summary of Contents for AEMC L205
- Page 1 L205 SIMPLE LOGGER ® RMS VOLTAGE MODULE L230 L260 E N G L I S H User Manual...
- Page 2 Refer to our repair and calibration section at www.aemc.com. Serial #: ________________________________ Catalog #: 2116.05 / 2113.93 / 2113.94 Model #: L205 / L230 / L260 Please fill in the appropriate date as indicated: Date Received: _________________________________ _______________________ Date Calibration Due: Chauvin Arnoux , Inc.
-
Page 3: Table Of Contents
Table of Contents 1. INTRODUCTION ................2 1.1 International Electrical Symbols ..........4 1.2 Definition of Measurement Categories ........5 1.3 Receiving Your Shipment ............5 1.4 Ordering Information ..............5 1.4.1 Accessories and Replacement Parts .......5 2. PRODUCT FEATURES ..............4 2.1 Indicators and Buttons ..............4 2.2 Inputs and Outputs ..............5 2.3 Mounting ...................5 3. SPECIFICATIONS................6 3.1 Electrical Specifications ............6 3.2 Mechanical Specifications ............7 3.3 Environmental Specifications . -
Page 4: Introduction
• ALWAYS inspect the instrument and leads prior to use. Replace any defective parts immediately. • NEVER use the Simple Logger Models L205, L230, L260 on ® electrical conductors rated above 600V in overvoltage cat- egory III (CAT III). International Electrical Symbols This symbol signifies that the instrument is protected by double or reinforced insulation. -
Page 5: Definition Of Measurement Categories
Examples are measurements on household appliances or portable tools. Receiving Your Shipment Upon receiving your shipment, make sure that the contents are consistent with the packing list. Notify your distributor of any missing items. If the equip- ment appears to be damaged, file a claim immediately with the carrier and notify your distributor at once, giving a detailed description of any damage. Save the damaged packing container to substantiate your claim. Ordering Information Simple Logger Model L205, Stray Voltage with Leads ® (0 to 25.5V Input) ............. Cat. #2116.05 Simple Logger Model L230, RMS Voltage with Leads ® (0 to 300V Input) .............. Cat. #2113.93 Simple Logger Model L260, RMS Voltage with Leads ®... -
Page 6: Product Features
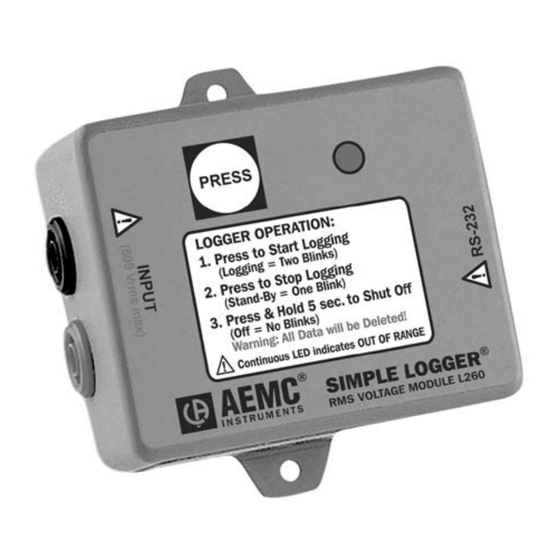
CHAPTER 2 PRODUCT FEATURES Models L205, L230 and L260: PRESS LOGGER OPERATION: 1. Press to Start Logging (Logging = Two Blinks) 2. Press to Stop Logging (Stand-By = One Blink) 3. Press & Hold 5 sec. to Shut Off (Off = No Blinks) -
Page 7: Inputs And Outputs
Inputs and Outputs The left side of the logger incorporates 4mm safety banana jack input con- nectors compatible with the current probes for which your Simple Logger ® was designed. The right side has a female 9-pin “D” shell serial connector used for data transmission from the logger to your computer. Mounting Your Simple Logger is equipped with clearance holes in the base plate ® tabs for mounting. For less permanent mounting, the Velcro pads (sup- ® plied loose) can be attached to the logger and the surface to which the logger will be mounted. RMS Voltage Simple Logger L205/L230/L260 ®... -
Page 8: Specifications
CHAPTER 3 SPECIFICATIONS Electrical Specifications Number of Channels: 1 Measurement Range: L205: 0 - 25Vrms (stray voltage) L230: 0 - 300Vrms L260: 0 - 600Vrms Input: L205: 0 - 25Vrms L230: 0 - 300Vrms L260: 0 - 600Vrms Input Connection: Recessed Safety Banana Jacks Input Impedance: L205: 1MΩ L230 and L260: 2MΩ Resolution: 8 Bit L205 Scale Range Maximum Input Resolution 100% 0.1V 12.5V 0.05V 6.25V 0.025V 12.5% 3.125V 0.0125V... -
Page 9: Mechanical Specifications
Size: 2-7/8 x 2-5/16 x 1-5/8" (73 x 59 x 41mm) Weight (with battery): 5 oz (140g) Mounting: Base plate mounting holes or Velcro pads ® Case Material: Polystyrene UL V0 Environmental Specifications Operating Temperature: -4 to 158°F (-20 to 70°C) Storage Temperature: -4 to 176°F (-20 to 80°C) Relative Humidity: 5 to 95% non-condensing Safety Specifications Working Voltage: EN 61010 600V Cat III *All specifications are subject to change without notice RMS Voltage Simple Logger L205/L230/L260 ®... -
Page 10: Operation
CD into your CD-ROM drive. ® If auto-run is enabled, the Setup program will start automatically. If auto-run is not enabled, select Run from the Start menu and type in D:\SETUP (if your CD-ROM drive is drive D. If this is not the case, substitute the appropriate drive letter). 2. The Set-up window will appear. Figure 1 RMS Voltage Simple Logger L205/L230/L260 ®... -
Page 11: Recording Data
*Acrobat Reader - Links to the Adobe web site to download the ® most recent version of Adobe Acrobat Reader. Acrobat Reader is ® required for viewing PDF documents supplied on the CD-ROM. • *Check for Available Software Updates - Opens the AEMC Software update web site, where updated software versions are available for downloading, if necessary. • View User Guide and Manuals - Opens Windows Explorer for ® viewing of documentation files. 3. To install the software, select Simple Logger Software Setup in the top section of the Set-up window, then select Simple Logger, Version 6.xx in the Options section. -
Page 12: Using The Software
(ID number of the logger and number of points recorded displayed). Select Download to display the graph (download takes about 90 sec- onds). RMS Voltage Simple Logger L205/L230/L260 ®... -
Page 13: Maintenance
5. If the unit is not in record mode after installing the new battery, dis- connect it and press the button twice then reinstall the battery. 6. Reattach the base plate using the four screws removed in Step 2. Your logger is now recording (LED blinking). Press the PRESS button for five seconds to stop the instrument. NOTE: For long-term storage, remove the battery to prevent discharge effects. Cleaning The body of the logger should be cleaned with a cloth moistened with soapy water. Rinse with a cloth moistened with clean water. Do not use solvent. RMS Voltage Simple Logger L205/L230/L260 ®... -
Page 14: Importing .Txt Files Into A Spreadsheet
3. Next, change the file type to “Text Files” in the field labeled Files of Type. All the .TXT files in the logger directory should now be visible. 4. Double-click on the desired file to open the Text Import Wizard. 5. Review the selections in the first wizard screen and make sure that the following choices are selected: Original Data Type: Delimited Start Import at Row: 1 File Origin: Windows (ANSI) 6. Click the “NEXT” button at the bottom of the Wizard dialog box. The second wizard screen will appear. 7. Click on “Comma” in the Delimiters box. A check mark should appear. 8. Click the “NEXT” button at the bottom of the Wizard dialog box. The third wizard screen will appear. 9. A view of the actual data to be imported should appear in the lower section of the window. Column 1 should be highlighted. In the Column Data Format window, select “Date”. 10. Next, click on “Finish” to complete the process and import the data. 11. The data will now appear in your spreadsheet in two columns (A and B) and will look similar to that shown in Figure A-1. RMS Voltage Simple Logger L205/L230/L260 ®... -
Page 15: Formatting The Date And Time
35401.49 34.5 35401.49 Figure A-1. Sample Data Imported into Excel. Formatting the Date and Time Column ‘A’ contains a decimal number that represents both date and time. Excel can convert this number directly as follows: 1. Click on column ‘B’ at the top of the column to select the data, then click on “Insert” from the main menu and select “Columns” from the drop-down menu. 2. Next, click on column ‘A’ at the top of the column to select the data, then click on “Edit” from the main menu and select “Copy” to copy the entire column. 3. Click on cell 1 of column ‘B’ and then click on “Edit” and select “Paste” to insert a duplicate of column ‘A’ into column ‘B’. This is necessary if you want to show the date and time in two separate columns. 4. Next, click on the top of column ‘A’, then click on “Format” and select “Cells” from the drop-down menu. RMS Voltage Simple Logger L205/L230/L260 ®... - Page 16 12/02/04 11:45 AM 12/02/04 11:45 AM 12/02/04 11:45 AM 23.5 12/02/04 11:45 AM 27.5 12/02/04 11:45 AM 12/02/04 11:45 AM 34.5 12/02/04 11:45 AM 12/02/04 11:45 AM 41.5 12/02/04 11:45 AM 45.5 12/02/04 11:46 AM 12/02/04 11:46 AM Figure A-2. Shows Date, Time and Value RMS Voltage Simple Logger L205/L230/L260 ®...
-
Page 17: Repair And Calibration
NOTE: You must obtain a CSA# before returning any instrument. Technical and Sales Assistance If you are experiencing any technical problems, or require any assistance with the proper operation or application of your instrument, please call, mail, fax or e-mail our technical support team: Chauvin Arnoux , Inc. d.b.a. AEMC Instruments ® ® 200 Foxborough Boulevard Foxborough, MA 02035 USA Phone: (800) 343-1391 (508) 698-2115 Fax: (508) 698-2118 E-mail: techsupport@aemc.com www.aemc.com NOTE: Do not ship Instruments to our Foxborough, MA address. RMS Voltage Simple Logger L205/L230/L260 ®... -
Page 18: Limited Warranty
® For full and detailed warranty coverage, please read the Warranty Coverage Information, which is attached to the Warranty Registration Card (if enclosed) or is available at www.aemc.com. Please keep the Warranty Coverage Information with your records. What AEMC Instruments will do: ®... - Page 20 08/18 99-MAN 100210 v16 Chauvin Arnoux , Inc. d.b.a. AEMC Instruments ® ® 15 Faraday Drive • Dover, NH 03820 USA • Phone: (603) 749-6434 • Fax: (603) 742-2346 www.aemc.com...
Need help?
Do you have a question about the L205 and is the answer not in the manual?
Questions and answers