Advertisement
Quick Links
Quick Guide
Original instructions
Motor controller CMMB
Note
For all available product documentation www.festo.com/pk
3
Pin connection
X2 – Power connector
Pin 1
L1C
Control power input L/N
1
Pin 2
L2C
Pin 3
L1
Drive power input L/N
Pin 4
L2
Pin 5
DC+
DC+
DC bus+
/RB1
RB1
External braking resistor input
Pin 6
RB2
Internal braking resistor input
Pin 7
RB-
External braking resistor input
Pin 8
DC-
DC bus-
Pin 9
U
U/V/W phase power output for
servo motor
Pin 10 V
Pin 11 W
Short-circuit DC+ / RB1 and RB2 if choosing controller
internal braking resistor (power: 10 W).
Wire cross section for all pins:
AWG 22 (0.32 mm²) to AWG 14 (2.1 mm²)
Pin 1
1
Warning
It is forbidden to use the internal braking resistor if average brake power
is greater than 10 W.
Model
Fuse 1
Fuse 2
CMMB-AS-01
1 A
3.5 A
CMMB-AS-02
1 A
3.5 A
CMMB-AS-04
1 A
7 A
CMMB-AS-07
1 A
15 A
1
General information / Preparation
Safety and requirements for product use
Warning
Festo AG & Co. KG
Danger of electric shock
• If cables are not mounted to the plug (X2).
Ruiter Straße 82
73734 Esslingen
• If connecting cables are disconnected when energised.
Germany
Touching live parts causes severe injuries and can lead to death.
+49 711 347-0
www.festo.com
The product may only be operated in the installed state and when all
safeguards have been initiated.
Before touching live parts during maintenance, repair and cleaning work
and after been long service interruptions:
8068721
1. Switch off power to the electrical equipment via the mains switch and
2017-07a
secure it against being switched on again.
[8069599]
2. After switching-off, allow to discharge for at least 5 minutes and check
that power is turned off before accessing the controller. Make sure that
the charge lamp on the front of the controller is off.
Warning
Danger of electric shock
Motor controllers are devices with increased leakage current (> 3.5 mA). If
wiring is incorrect or the device is defective, high voltage can occur on the
housing, which can result in serious injury or even death if the housing is
touched.
• Before commissioning, also for brief measuring and test purposes, con-
nect the PE protective conductor.
• Observe the regulations of EN 60204-1 for the protective earthing.
1
2
Pin 1
1
2
X4 – Multi-function connector
Pin 1
OUT1+
Pin 19
Pin 2
COMI
Pin 20
Pin 3
OUT1-
Pin 21
Pin 4
DIN1
Pin 22
Pin 5
OUT2+
Pin 23
Pin 6
DIN2
Pin 24
Pin 7
OUT2-
Pin 25
Pin 8
DIN3
Pin 26
Pin 9
OUT3
Pin 27
Pin 10
DIN4
Pin 28
Pin 11
OUT4
Pin 29
Pin 12
DIN5
Pin 30
Pin 13
COMO
Pin 31
Pin 14
DIN6
Pin 32
Pin 15
VDD
Pin 33
Pin 16
DIN7
Pin 34
Pin 17
VEE
Pin 35
Pin 18
MZ-
Pin 36
Warning
Danger of electric shock
This product can cause a DC current in the protective ground conductor.
In cases where an error current protection unit (RCD) or an error current
monitoring device (RCM) is used to protect against direct or indirect con-
tact, only the Type B kind of RCD or RCM is permitted on the power supply
side of this product.
Intended use
The CMMB is intended for:
• Use in control cabinets for power supply to AC servo motors and their
regulation of torques (current), rotational speed and position.
The CMMB is intended for installation in machines or automated systems
and may only be used:
• When in excellent technical condition
• In original status without unauthorised modifications
• Within the limits of the product defined by the technical data
• In an industrial environment
The product is intended for use in industrial areas. When used outside an
industrial environment, e.g. in commercial and mixed residential areas,
measures for radio interference suppression may be necessary.
4
Default I/O function
The following figure shows the wiring of X4 with default IO function. More
IO functions can be defined with the digital panel or PC software.
Enable
DIN1
Reset Errors
DIN2
Start Homing
DIN3
P limit +
DIN4
Digital
Input
P limit -
DIN5
DIN6
Home Signal
DIN7
Input Common
COMI
PUL+ / CW+ / A+
MA+
PUL- / CW- / A-
MA-
DIR+ / CCW+ / B+
Impulse
MB+
Command
(<500k)
DIR- / CCW- / B-
MB-
Pin 19
Z+
MZ+
Z-
MZ-
AIN1+
Analog
Speed
AIN1-
AIN1+
Analog
Torque
AIN2+
Analog
Max.Torque
OUT5
AIN2-
AIN1-
+5V
AIN2+
GND
AIN2-
ENCO_Z
MA+
ENCO_/Z
MA-
ENCO_B
MB+
ENCO_/B
MB-
ENCO_A
MZ+
ENCO_/A
3
4
2
3
Circuit Breaker
(MCCB)
Noise Filter
(NF)
Magnetic
Contactor
(MC)
1
2
5
4
1
Ready
OUT1+
6
3
OUT1-
8
5
Motor Brake
OUT2+
10
7
OUT2-
Digital
Position Reached
12
9
OUT3
Output
14
11
Zero Speed
OUT4
Error
16
20
OUT5
2
13
Output Common
COMO
27
34
Self-adapt
ENCO_A
Encoder Out A+
29
36
ENCO_/A
Encoder Out A-
31
30
Self-adapt
ENCO_B
Encoder Out B+
Encoder
33
32
ENCO_/B
Output
Encoder Out B-
35
26
Self-adapt
ENCO_Z
Encoder Out Z+
18
28
ENCO_/Z
Encoder Out Z-
+5V
22
+5V
Internal 5V Output+
19
Internal 5V
24
Output
GND
Internal 5V Output-
21
GND
23
A/D
+24V
15
25
VDD
Internal 24V Output+
Internal 24V
17
Output
VEE
Internal 24V Output-
VEE
4
5
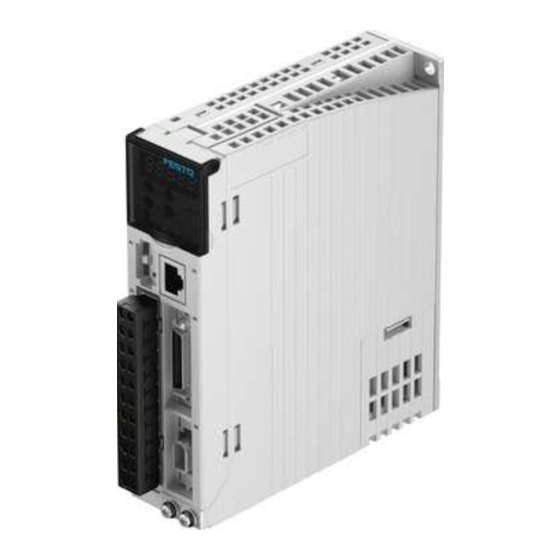
Electrical installation
Front view of CMMB series motor controller
X1
Reserved connector
1
X2
Power & motor connector
X3
RS232 connector
X4
Multi function connector
X5
Encoder connector
1
Front panel
2
Ground
3
Charge lamp
2
220VAC
Power Supply
N
L
RS232 Cable
Motor Brake Cable
Brake 24V
Power Supply
Motor Encoder Cable
Fuse 1
L1C
Motor
L2C
Power Cable
L1
L2
RB1
Fuse 2
RB-
U
V
W
Braking
PE
Resistor
2
Parameter description
Easy Use function
The Easy Use function helps users set up the CMMB motor controller for
the main types of applications in a very short time. The LED panel guides
the user step by step through the settings of the few most important
parameters in order to prepare the controller for the desired application.
The servo control loops of the motor controller are pre-configured to use-
ful default settings which are adequate for many applications at as they
are. A robust auto-tuning function can be used additionally to identify the
applied mechanical system more precisely. After that, the user only needs
to adjust the controller's servo performance with the stiffness parameter.
Setup process with Easy Use function
The process for setting up the CMMB motor controller with the Easy Use
function follows a simple procedure.
Step 1: The parameters of the EASY panel menu have to be accessed and
confirmed, or set one by one. The auto-recognized motor type can be
confirmed, the control interface has to be selected, interface-related main
parameters have to be set and the mechanical and control application
types must be chosen. Afterwards, these parameter have to be stored
and the controller has to be rebooted. As a result of these settings, the
controller is configured for a suitable I/O setting and the servo control
loop parameters are set to matching defaults. The controller is ready for
use for a wide range of standard applications and can be tested.
Step 2: If the servo control performance of the controller has to be further
improved, the tunE panel menu must be accessed. With the help of the
functions in this menu, the controller can start an auto-tuning motor run
in order to identify motor load conditions and measure load inertia. The
controller detects the ratio of the load inertia relative to motor inertia and
tunes the servo loops according to one single parameter, namely stiff-
ness. Stiffness can be easily adjusted up or down in the tunE menu with
the panel buttons. during the application can be test-run via the selected
command interface. After finding the best value for stiffness, the tunE
parameters need to be stored and the controller is finally ready for use.
If adjustment of stiffness does not result in the required performance, the
PC software "CMMB configurator" can be used to for further optimisation.
5
3
6
Advertisement

Related Manuals for Festo CMMB


Summary of Contents for Festo CMMB
- Page 1 Easy Use function X2 – Power connector IO functions can be defined with the digital panel or PC software. The Easy Use function helps users set up the CMMB motor controller for Pin 1 Control power input L/N the main types of applications in a very short time. The LED panel guides...
- Page 2 Display an switch functions EASY and TunE parameters Flowchart and description of the EASY menu The following flowchart and table explain the procedure for settings in Parameters Description Default Parameters Description Default the EASY menu in detail. Display Display EA01 Motor Type For a new motor controller, the set motor type is “00”...
Need help?
Do you have a question about the CMMB and is the answer not in the manual?
Questions and answers