Festo CMMP-AS-...-M3 Series Description
Motor controller
Hide thumbs
Also See for CMMP-AS-...-M3 Series:
- Manual (294 pages) ,
- Description (132 pages) ,
- Quick start manual (4 pages)

Related Manuals for Festo CMMP-AS-...-M3 Series


Summary of Contents for Festo CMMP-AS-...-M3 Series
- Page 1 Motor controller CMMP-AS-...-M3 Description Exchange and project conversion Motor controller CMMP-AS-...-M3 as a replacement device for motor controller CMMP-AS 8004593 1206NH...
- Page 2 Essential or useful accessories. Information on environmentally sound usage. Text designations: • Activities that may be carried out in any order. 1. Activities that should be carried out in the order stated. – General lists. Festo – GDCP-CMMP-M3-RP-EN – 1206NH...
-
Page 3: Table Of Contents
Concluding the configuration process ....... . . Festo – GDCP-CMMP-M3-RP-EN – 1206NH... - Page 4 Service Please consult your regional Festo contact if you have any technical problems. Product identification, versions This description refers to the following versions: – Motor controller CMMP-AS-...-M3 from Rev. 01 –...
- Page 5 (firmware). Overview of FHPP, fieldbus, safety engineering. Description FHPP, Control and parametrisation of the motor controller through the GDCP-CMMP-M3-C-HP-... Festo profile FHPP with the following fieldbusses: CANopen, PROFIBUS, DeviceNet, EtherCAT. Description CiA 402 (DS 402), Control and parametrisation of the motor controller through the GDCP-CMMP-M3-C-CO-...
-
Page 6: Introduction
• Proceed carefully when mounting. When dismantling the CMMP-AS and mounting the CMMP-AS-...-M3, make sure that no metal shavings, metal dust or mounting parts (screws, nuts, pieces of wire, etc.) fall into the motor controller. Festo – GDCP-CMMP-M3-RP-EN – 1206NH... -
Page 7: Cmmp-As
The Festo Configuration Tool (FCT) is the software platform for configuring and commissioning different components from Festo. A plug-in with all of the necessary descriptions and dialogues is available for the special requirements of these components. The system components are configured with the help of these plug-ins. -
Page 8: Procedure
4. Power switch Motor controller for replacement Fuses Power pack for logic voltage Motor (e.g. EMMS-AS with encoder) Optional: external braking resistor Fig. 1.1 Complete structure of the motor controller with motor and PC Festo – GDCP-CMMP-M3-RP-EN – 1206NH... -
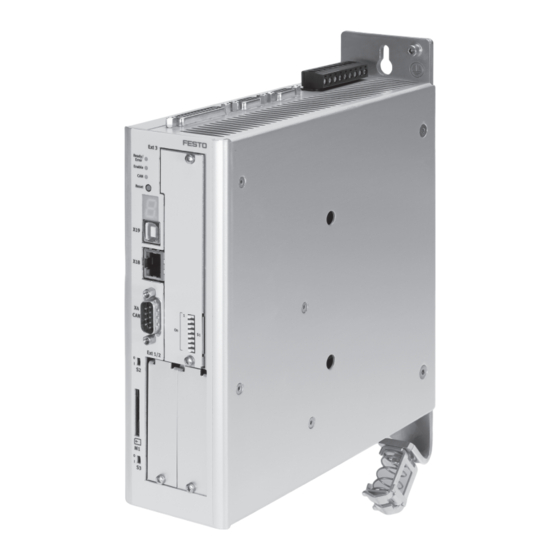
Page 9: Device View By Comparison
Activation of firmware download [S3] 7-segment display SD-/MMC card slot [M1] Reset pushbutton Activation of CANopen terminating LEDs resistor [S2] PE connection 1) does not exist on CMMP-AS Fig. 1.2 Motor controller CMMP-AS-...-M3: front view Festo – GDCP-CMMP-M3-RP-EN – 1206NH... - Page 10 Introduction PE connection Incremental encoder input [X10] Power supply [X9] with plug coding I/O communication [X1] Incremental encoder output [X11] Fig. 1.3 Motor controller CMMP-AS-...-3A-M3: top view Festo – GDCP-CMMP-M3-RP-EN – 1206NH...
- Page 11 Introduction PE connection Incremental encoder input [X10] Power supply [X9] I/O communication [X1] Incremental encoder output [X11] Fig. 1.4 Motor controller CMMP-AS-...-11A-P3-M3: top view Festo – GDCP-CMMP-M3-RP-EN – 1206NH...
- Page 12 Introduction Spring-loaded terminal connection for the Connection for the resolver [X2A] outer shield of the motor cable Connection for the encoder [X2B] Motor connection [X6] with plug coding Fig. 1.5 Motor controller CMMP-AS-...-M3: bottom view Festo – GDCP-CMMP-M3-RP-EN – 1206NH...
-
Page 13: Mechanical Conversion
4. Lift the device slightly and tilt it away from the mounting plate so that the upper screw head can be guided through the enlarged hole. 5. Then lift the device from the lower mounting screw. Festo – GDCP-CMMP-M3-RP-EN – 1206NH... -
Page 14: Mounting
3. Slide the device down slightly until it is positioned securely in the elongated holes of the clips. Con- tinue to secure the device with one hand. 4. Tighten the two mounting screws. Festo – GDCP-CMMP-M3-RP-EN – 1206NH... -
Page 15: Dip Switch Setting [S1]
Recommendation: When exchanging, set the following dip switches to 0 so that the ad- dress specified in the FCT corresponds to the node number (compatible with CMMP-AS): – CANopen, DriveBus, DeviceNet: DIP switch 1 … 5 = 0 – PROFIBUS: DIP switch 1 … 7 = 0 Festo – GDCP-CMMP-M3-RP-EN – 1206NH... -
Page 16: Electrical Conversion
Plug connectors [X2A], [X10] and [X11] on the CMMP-AS-...-M3 are identical. • Before switching on the device check to make sure the appropriate counterplugs are connected correctly (see code Tab. 3.1). Control cable and D-Sub plug www.festo.com/catalogue. Festo – GDCP-CMMP-M3-RP-EN – 1206NH... -
Page 17: Exchanging The Counterplug [X6]
The assignment of the counterplug on the CMMP-AS and the CMMP-AS-...-M3 for connecting the motor is pin-compatible. Pin assignment [X6] Pin no. Counterplug CMMP-AS Counterplug CMMP-AS-...-M3 Protective earth -MTdig +MTdig Protective earth 1) Example plug from the motor controller CMMP-AS-...-3A-M3 Tab. 3.3 Pin assignment [X6] - motor connection Festo – GDCP-CMMP-M3-RP-EN – 1206NH... -
Page 18: Exchanging The Counterplug [X9] (9-Pin)
Pin assignment [X9] – power supply connection, single-phase Circuit diagrams for connecting the motor controller CMMP-AS-...-M3 to the supply voltage, the motor, the external braking resistor and the holding brake can be found in the description GDCP-CMMP-M3-HW-..Festo – GDCP-CMMP-M3-RP-EN – 1206NH... -
Page 19: Safety Module Camc-G-S1
Note During operation, the acknowledgment contacts on the CMMP-AS and the CMMP-AS-...-M3 exhibit compatible behaviour. When the logic supply (24 V) is switched off, they behave differently: – CMMP-AS: Contact closed. – CMMP-AS-...-M3: Contact open. Festo – GDCP-CMMP-M3-RP-EN – 1206NH... -
Page 20: Converting A Project
Converting a project Converting a project FCT projects are converted with the Festo FCT Project Converter. This programme adapts the data format for configuring individual components to the selected plug-in version. The converted FCT project can be re-opened and edited in the FCT with appropriately installed plug-ins. This means that after an FCT project has been converted, the CMMP-AS motor controller can be configured without restriction by using the new plug-in version 2.0. -
Page 21: Preparing A Project
FCT Project Converter. Archives that have been created with other programmes are not supported. 1. Start the programme Festo Configuration Tool (FCT). 2. Open the FCT project that is to be converted for use with the motor controller CMMP-AS-...-M3 online help). - Page 22 Converting a project Fig. 4.2 Archiving a project - progress display All of the configuration settings for the project are now saved in a special FCT archive file (*.zip). Festo – GDCP-CMMP-M3-RP-EN – 1206NH...
-
Page 23: Using The Project Converter
Using the Project Converter Selecting an archive file The FCT Project Converter programme can be accessed from the Start menu of your Windows operating system by selecting [Programs] [Festo Software]. Fig. 4.3 Festo FCT Project Converter 1. Open the FCT project to be converted by selecting “Open FCT-Archive...”. - Page 24 Information about the programme version and available conversion options Fig. 4.5 FCT Project Converter with selected FCT project 3. Open an alternative archive file, if necessary, by selecting “Change...”. 4. Confirm your selected archive file by pressing “Next >”. Festo – GDCP-CMMP-M3-RP-EN – 1206NH...
- Page 25 Any components that are not provided with new plug-in versions remain unchanged in the converted project. Subsequent use of a CMMP-AS-...-M3 as an alternative motor controller for an axis in your system requires the selection of plug-in version 2.0.x. 2. Confirm your selection by pressing “Next >”. Festo – GDCP-CMMP-M3-RP-EN – 1206NH...
- Page 26 If an error occurs, the affected components are designated with an error symbol. These errors can be displayed by clicking “Show error details ...”. Faulty components are saved without change in the data format used for the original plug-in version. Festo – GDCP-CMMP-M3-RP-EN – 1206NH...
- Page 27 Cancel Exits the programme without saving the archive file. Finish Saves the archive file with the selected settings. The programme is then exited without any further queries. Tab. 4.2 FCT Project Converter – button functions Festo – GDCP-CMMP-M3-RP-EN – 1206NH...
-
Page 28: Using A Converted Project
A dialogue window opens in the FCT for extracting the project. Fig. 4.9 Extracting an FCT project The default setting is to select a project in the FCT archive folder. 5. Open an alternative project folder, if necessary, by clicking “Search”. Festo – GDCP-CMMP-M3-RP-EN – 1206NH... - Page 29 All of the configuration settings for the selected project are now restored from the archive file (*.zip). 8. Acknowledge the confirmation message by pressing “OK.” 9. Open the extracted FCT project by selecting “Open project”. Fig. 4.11 Extracted FCT project Festo – GDCP-CMMP-M3-RP-EN – 1206NH...
-
Page 30: Change Motor Controller
The type of controller used can be found in the “Controller” section. Directly next to this is the com- mand to convert the motor controller within the FCT project. 2. Click on the command “Change to …-M3…”. Festo – GDCP-CMMP-M3-RP-EN – 1206NH... - Page 31 Tab. 4.3 Selection aid Using a new CMMP-AS-...-M3 After a successful change the drive configuration is shown in the FCT work space with the new motor controller CMMP-AS-...-M3. Fig. 4.15 FCT – work space Festo – GDCP-CMMP-M3-RP-EN – 1206NH...
-
Page 32: Adapt Configuration
2. Select the menu command [Component] [FCT Interface]. Fig. 4.17 FCT interface dialogue window 3. Use the “Ethernet” or “USB” tab, for example, for communication with the CMMP-AS-...-M3 (Ether- net is selected in this example). Festo – GDCP-CMMP-M3-RP-EN – 1206NH... - Page 33 Fig. 4.18 Festo Device Tool When the “Festo Device Tool” programme is started the network is scanned automatically. The scan- ning process is represented by a progress bar. 1. Filter your scan for certain device types by using the list field to the right of the button labelled “Scan for:”.
-
Page 34: Interfaces For Ext1 And Ext2
2. Press the “Change…” button to open the “Edit Drive Configuration” dialogue window. 3. Select the STO module CAMC-G-S1 from the list field for slot Ext3. Fig. 4.19 Selecting the extension module for Ext3 4. Click the “Next >” and “Finish” buttons. Festo – GDCP-CMMP-M3-RP-EN – 1206NH... - Page 35 The exchanged CMMP-AS-...-M3 is not yet configured. A dialogue window is therefore displayed with a request to synchronise the project and device data. Fig. 4.21 Synchronise project and device data dialogue window 2. Click the “Download” button to transfer the configuration to the CMMP-AS-...-M3. Festo – GDCP-CMMP-M3-RP-EN – 1206NH...
- Page 36 Base data tab for the safety module The status of the safety module is displayed under “Module properties”. As the module still has to be confirmed, the CMMP-AS-...-M3 reports an error “Dissimilar module type”. 2. Click the “Confirm module” button. Festo – GDCP-CMMP-M3-RP-EN – 1206NH...
-
Page 37: Concluding The Configuration Process
These settings complete the project conversion process. Recommendation: Check all of the settings again before commissioning and downloading the project to the CMMP-AS-...-M3. Further instructions on commissioning the new motor controller(s) CMMP-AS-...-M3 can be found in the device description description GDCP-CMMP-M3-HW-…. Festo – GDCP-CMMP-M3-RP-EN – 1206NH... - Page 38 ......Instructions on the description ... . . Festo – GDCP-CMMP-M3-RP-EN – 1206NH...
- Page 40 Copyright: Festo AG & Co. KG Postfach D-73726 Esslingen Phone: +49 711 347 0 Fax: +49 711 347 2144 e-mail: service_international@festo.com Reproduction, distribution or sale of this document or communica- Internet: tion of its contents to others without express authorization is www.festo.com...
Need help?
Do you have a question about the CMMP-AS-...-M3 Series and is the answer not in the manual?
Questions and answers