Table of Contents
Advertisement
Quick Links
Advertisement
Table of Contents

Related Manuals for Bresser Meteo TP Colour


Summary of Contents for Bresser Meteo TP Colour
- Page 1 Digital RC alarm clock · Meteo TP Colour Instruction manual...
- Page 2 Entonces visite nuestra página web utilizando el siguiente enlace (código QR) para ver las versiones disponibles. Desidera ricevere informazioni esaustive su questo prodotto in una lingua specifica? Venga a visitare il nostro sito Web al seguente link (codice QR Code) per conoscere le versioni disponibili. www.bresser.de/P7007910000000 GARANTIE · WARRANTy · GARANTíA · GARANzIA www.bresser.de/warranty_terms...
-
Page 3: Table Of Contents
Contents 1 Imprint ................................ 4 3 Features................................ 4 4 About this Instruction Manual........................ 5 5 Parts overview and scope of delivery ...................... 6 6 Screen display .............................. 7 7 Before starting operation.......................... 8 8 Setting up power supply.......................... 8 9 Automatic time setting........................... 9 10 Manual time setting ............................ 9 11 Alarm setting.............................. 9 12 Snooze function............................ 10 13 Temperature alarm setting .......................... 10... -
Page 4: Imprint
Please be aware that any requests or submissions sent directly to the manufacturer cannot be processed. Errors excepted. Subject to technical modifications. © 2018 Bresser GmbH All rights reserved. Reproduction of this document, including extracts, in any form (photocopied, printed etc.) or the use and distribution of this document by electronic means (image file, website etc.) is not permitted without... -
Page 5: About This Instruction Manual
4 About this Instruction Manual NOTICE These operating instructions are to be considered a component of the device. Please read the safety instructions and the operating instructions carefully before use. Keep these instructions for renewed use at a later date. When the device is sold or given to someone else, the instruction manual must be provided to the new owner/user of the product. -
Page 6: Parts Overview And Scope Of Delivery
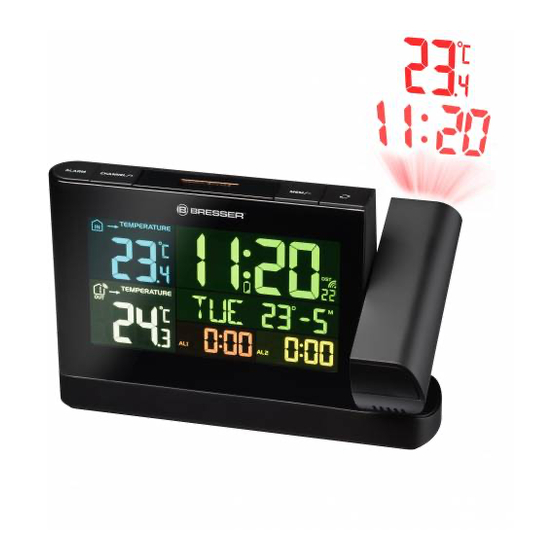
5 Parts overview and scope of delivery Illustration 1: Parts overview for base station (top) and remote sensor (bottom) 1 ALARM button (Alarm setting) 2 +/CHANNEL button (channel selection or value change upwards) 3 ALARM/SNOOZE button (snooze function) 4 -/MEM button (retrieve saved values or value change downwards) 5 REVERSE button (image rotation of the pro- 6 Projector lens... -
Page 7: Screen Display
11 Display 12 YEAR button (display change between year and date) 13 TIME SET button (manual time/date setting 14 ALERT button (set temperature alarm) and user defined settings) 15 SENSOR button (initialize remote sensor data 16 12/24 button (display change between 12 and reception) 24 hours mode) 17 °C/°F button (display change between °C or... -
Page 8: Before Starting Operation
1 Symbol indoor area 2 Temperature trend (indoor) (rising, steady or falling) 3 Alarm symbol for defined low temperature (in- 4 Alarm symbol for defined high temperature (in- door) door) 5 AM/PM information in 12-hour time mode 6 Current time (hours) 7 Battery level indicator (base device) 8 Current time (minutes) 9 Daylight saving time (DST) -
Page 9: Automatic Time Setting
NOTICE! For permanent operation, mains power supply is recommended. Alternatively a power supply with batteries is also possible, to keep the time setting in case of power fail- ure. Proceed as follows: 5. Remove the battery compartment cover. 6. Insert the batteries into the battery compartment. Ensure that the battery polarity (+/-) is correct. 7. -
Page 10: Snooze Function
3. Press +/CHANNEL or -/MEM button to change the value. 4. Press ALARM button to confirm and continue to the next setting. 5. Settings order: Hours > Minutes 6. Finally press the ALARM button to save the settings and exit the setting mode. Alarm will be activ- ated automatically. -
Page 11: Trend Arrow Indicators
15 Trend arrow indicators 1 Rising 2 Steady 3 Falling The temperature trend indicator shows the trends of changes in the forthcoming few minutes. Arrows indicate a rising, steady or falling trend. 16 Ice pre-alert 1. When the outdoor temperature hits 3° C (37 ° F), the ice pre-alert symbol will appear on the display, flashing continuously. -
Page 12: Ec Declaration Of Conformity
20 EC Declaration of Conformity Hereby, Bresser GmbH declares that the equipment type with part number: 7007910000000 is in compliance with Directive: 2014/30/EU.The full text of the EU declaration of conformity is available at the following internet address: http://www.bresser.de 21 Disposal Sort packaging into different materials for disposal. - Page 16 Teléfono*: +34 91 67972 69 Telephone*: +44 1342 837 098 BRESSER UK Ltd BRESSER Iberia SLU c/Valdemorillo,1 Nave B Unit 1 starborough Farm, P.I. Ventorro del cano Starborough Road, Nr Marsh Green, Edenbridge, Kent TN8 5RB 28925 Alcorcón Madrid...
Need help?
Do you have a question about the Meteo TP Colour and is the answer not in the manual?
Questions and answers