
Related Manuals for Bresser MyTime Sunrise BT


Summary of Contents for Bresser MyTime Sunrise BT
- Page 1 Digitaler Funkwecker · Digital RC alarm clock · MyTime Sunrise BT Bedienungsanleitung Instruction manual...
- Page 2 Entonces visite nuestra página web utilizando el siguiente enlace (código QR) para ver las versiones disponibles. Desidera ricevere informazioni esaustive su questo prodotto in una lingua specifica? Venga a visitare il nostro sito Web al seguente link (codice QR Code) per conoscere le versioni disponibili. www.bresser.de/P8010080000000 GARANTIE · WARRANTy · GARANTíA · GARANzIA www.bresser.de/warranty_terms...
-
Page 3: Table Of Contents
Inhaltsverzeichnis 1 Impressum .............................. 4 2 Eigenschaften .............................. 4 3 Zu dieser Anleitung ............................ 4 4 Allgemeine Sicherheitshinweise........................ 5 5 Teileübersicht und Lieferumfang........................ 7 6 Stromversorgung herstellen (Netzbetrieb) .................... 8 7 Automatische Zeiteinstellung ........................ 8 8 Bluetooth-Verbindung herstellen........................ 8 9 Manuelle Zeiteinstellung.......................... 9 10 Weckrufeinstellung ............................ 9 11 Schlummerfunktion............................ 10 12 Bluetooth-Verbindung herstellen........................ 10 13 Radio einstellen ............................ 10 14 Einschlafautomatik (Sleeptimer)......................... 11 15 Automatische Messwertanzeige ......................... 11... -
Page 4: Impressum
„Garantie“ und „Service“ in dieser Dokumentation. Wir bitten um Verständnis, dass direkt an die Her- steller-Anschrift gerichtete Anfragen oder Einsendungen nicht bearbeitet werden können. Irrtümer und technische Änderungen vorbehalten. © 2018 Bresser GmbH Alle Rechte vorbehalten. Die Reproduktion dieser Dokumentation – auch auszugsweise – in irgendeiner Form (z.B. Fotokopie, Druck, etc.) sowie die Verwendung und Verbreitung mittels elektronischer Systeme (z.B. -
Page 5: Allgemeine Sicherheitshinweise
4 Allgemeine Sicherheitshinweise GEFAHR Gefahr eines Stromschlags! Dieses Gerät beinhaltet Elektronikteile, die über eine Stromquelle (Netzteil und/oder Batterien) betrie- ben werden. Bei unsachgemäßer Verwendung dieses Produkts besteht die Gefahr eines Strom- schlags. Ein Stromschlag kann zu schweren bis tödlichen Verletzungen führen. Beachten Sie daher unbedingt die nachfolgenden Sicherheitsinformationen. - Page 6 HINWEIS Gefahr von Sachschäden! Bei unsachgemäßer Handhabung können das Gerät und/oder die Zubehörteile beschädigt werden. Verwenden Sie das Gerät deshalb nur entsprechend den nachfolgenden Sicherheitsinformationen. • Bauen Sie das Gerät nicht auseinander! Wenden Sie sich im Falle eines Defekts an Ihren Fach- händler.
-
Page 7: Teileübersicht Und Lieferumfang
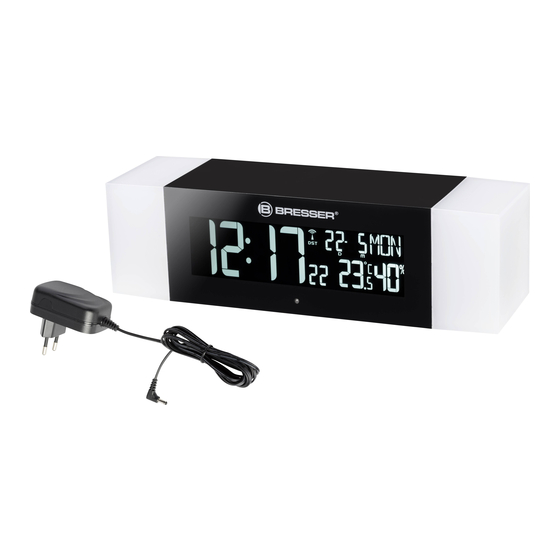
5 Teileübersicht und Lieferumfang Abb. 1: Teileübersicht für den Funkwecker 1 Aktuelle Uhrzeit (Stunden) 2 Berührungsempfindliche Fläche (Lichteinstel- lung oder Schlummerfunktion aktivieren) 3 Aktuelle Uhrzeit (Minuten) 4 Symbol für das Funksignal 5 Symbol für aktiven Weckruf 6 Datum (Monat) 7 Datum (Tag) 8 Wochentag 9 Luftfeuchtigkeit (in %) 10 Innentemperatur (in °C oder °F) -
Page 8: Stromversorgung Herstellen (Netzbetrieb)
13 Lichtwürfel 14 AM/PM-Information im 12-Stunden-Zeitmodus 15 BLUETOOTH-Taste 16 VOLUME DOWN-Taste 17 VOLUME UP-Taste 18 Lautsprecher 19 DC-Anschlussbuchse für Hohlstecker 20 UP-Taste (Wertänderung aufwärts oder Zeit- modus-Wahl) 21 DOWN-Taste (Wertänderung abwärts oder 22 RADIO/SLEEP-Taste (Radio einschalten oder Wahl der Temperatureinheit) Weckruf beenden) 23 ALARM ON/OFF-Taste (Alarm aktivieren oder 24 MODE-Taste (Zeitmodus-Wahl und -Einstel-... -
Page 9: Manuelle Zeiteinstellung
3. In den Bluetooth-Einstellungen des Smartphones das Gerät ‚Bresser WakeUp‘ wählen. Die Ver- bindung wird hergestellt. Nach erfolgreicher Verbindung ertönt erneut ein Signalton und die Funkti- onsleuchte leuchtet gelb. Der Funkwecker fungiert nun als Lautsprecher für das Smartphone. 4. BLUETOOTH-Taste lange drücken bis ein Signalton ertönt und die Funktionsleuchte erlischt. Die Verbindung ist getrennt. -
Page 10: Schlummerfunktion
1. Die Bluetooth-Taste am Lichtwecker etwa 3 Sekunden drücken bis ein Signalton ertönt. Die Blue- tooth-Funktionsleuchte blinkt rot. 2. Die Bluetooth-Funktion auf dem Endgerät aktivieren und nach dem Lichtwecker ‚Bresser WakeUp‘ suchen. Nähere Informationen entnehmen Sie der Anleitung des Endgeräts. -
Page 11: Einschlafautomatik (Sleeptimer)
3. Im Radiomodus können die gespeicherten Sender nun durch gegebenenfalls mehrfaches Drücken der MODE-Taste abgerufen werden. HINWEIS! Bei Trennung des Lichtweckers von der Stromquelle gehen die gespeicherten Infor- mationen verloren. 1. Über die VOLUME UP- und VOLUME DOWN-Tasten die Lautstärke regeln. 2. -
Page 12: Eg-Konformitätserklärung
Schadstoffes bezeichnet, "Cd" steht für Cadmium, "Hg" steht für Quecksilber und "Pb" steht für Blei. 18 EG-Konformitätserklärung Hiermit erklärt Bresser GmbH, dass der Funkanlagentyp mit Artikelnummer 8010080000000 der Richtlinie 2014/53/EU entspricht. Der vollständige Text der EG-Konformitätserklärung ist unter der folgenden Internetadresse verfügbar: http://www.bresser.de 19 Garantie Die reguläre Garantiezeit beträgt 2 Jahre und beginnt am Tag des Kaufs. - Page 13 Contents 1 Imprint ................................ 14 2 Features................................. 14 3 About this Instruction Manual........................ 14 4 General safety instructions ......................... 15 5 Parts overview and scope of delivery ...................... 17 6 Establishing the power supply (mains operation) .................. 18 7 Automatic time setting.......................... 18 8 Setting up a Bluetooth connection ...................... 18 9 Manual time setting ............................ 19 10 Alarm time setting ............................ 19 11 Snooze function............................ 19...
-
Page 14: Imprint
Please be aware that any requests or submissions sent directly to the manufacturer cannot be processed. Errors excepted. Subject to technical modifications. © 2018 Bresser GmbH All rights reserved. Reproduction of this document, including extracts, in any form (photocopied, printed etc.) or the use and distribution of this document by electronic means (image file, website etc.) is not permitted without... -
Page 15: General Safety Instructions
4 General safety instructions DANGER Risk of electric shock This device has electronic parts operated via a power source (power supply and/or batteries). Im- proper use of this product can cause an electric shock. An electric shock can cause serious or poten- tially fatal injuries. - Page 16 • Do not immerse the unit in water! • Protect the device from severe shocks! • For this device only use accessories and spare parts that comply with the technical information. • Use only the recommended batteries. Always replace weak or empty batteries with a new, com- plete set of batteries at full capacity.
-
Page 17: Parts Overview And Scope Of Delivery
5 Parts overview and scope of delivery Illustration 1: Parts overview for the radio-controlled alarm clock 1 Current time (hours) 2 Touch sensitive area 3 Current time (minutes) 4 Symbol for radio signal 5 Symbol for active alarm 6 Date (month) 7 Date (day) 8 Weekday 9 Humidity (in %) -
Page 18: Establishing The Power Supply (Mains Operation)
The Bluetooth function indicator lights red. 3. Select 'Bresser WakeUp' from the list in the Bluetooth settings of the Smartphone. The connection will be set up. After a successful connection, another signal tone will sound and the function indic- ator will light yellow. -
Page 19: Manual Time Setting
4. Press and hold the BLUETOOTH button for a longer time until a signal tone will sound and the function indicator is switched off. The connection is disabled. NOTICE! Always disable the Bluetooth connection when it is not needed. When connecting again, the Bluetooth device will remember the terminal device and enable the connection auto- matically. -
Page 20: Setting Up A Bluetooth Connection
1. Press Bluetooth button on the light larm clock for approx. 3 seconds until a signal tone sounds. The Bluetooth function indicator lights red. 2. Enable Bluetooth function on the mobile device and search for the light alarm clock called 'Bresser WakeUp'. Find more information in the manual of the mobile device. -
Page 21: Automatic Measurement Display
“Pb” stands for lead. 18 EC Declaration of Conformity Hereby, Bresser GmbH declares that the equipment type with part number: 8010080000000 is in compliance with Directive: 2014/30/EU.The full text of the EU declaration of conformity is available at the following internet address: http://www.bresser.de... -
Page 22: Warranty
You can consult the full guarantee terms as well as information on extending the guarantee period and details of our services at www.bresser.de/warranty_terms. 22 / 24... - Page 24 Teléfono*: +34 91 67972 69 Telephone*: +44 1342 837 098 BRESSER UK Ltd BRESSER Iberia SLU c/Valdemorillo,1 Nave B Unit 1 starborough Farm, P.I. Ventorro del cano Starborough Road, Nr Marsh Green, 28925 Alcorcón Madrid Edenbridge, Kent TN8 5RB España...
Need help?
Do you have a question about the MyTime Sunrise BT and is the answer not in the manual?
Questions and answers