Table of Contents
Advertisement
Quick Links
Advertisement
Table of Contents

Related Manuals for Robe ROBIN BMFL LightMaster Side


Summary of Contents for Robe ROBIN BMFL LightMaster Side
- Page 1 Version 1.7...
-
Page 2: Table Of Contents
Table of contents 1. Safety instructions ......................3 2. Description of the Robin BMFL LightMaster ............. 4 2.1 Control elements of the FollowSpot controller ............5 3. Installation........................6 3.1 Installation of the BMFL fixture on the tripod ............11 4. -
Page 3: Safety Instructions
FOR YOUR OWN SAFETY, PLEASE READ THIS USER MANUAL CAREFULLY BEFORE YOU INSTALL THE PRODUCT 1. Safety instructions CAUTION! The ROBIN BMFL LightMaster was designed for indoor use only. The product is for professional use only, it is not for household use. This product has left our premises in absolutely perfect condition. -
Page 4: Description Of The Robin Bmfl Lightmaster
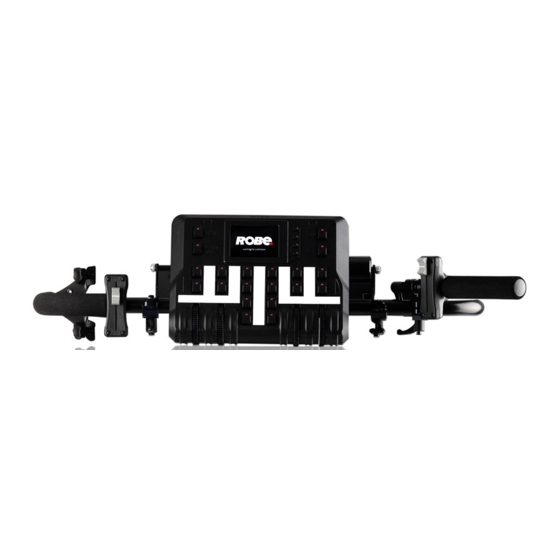
2. Description of the Robin BMFL LightMaster Side version 1 - Collar 2 - Collar lock 3 - Handle bar (side version), supporting frame (rear version) 4 - Handle 5 - FollowSpot controller 6 - USB (type A) 7 - Handle 8 - Fastening screws 9- Adjusting locks for the balance weight bar ( side version),... -
Page 5: Control Elements Of The Followspot Controller
2.1 Control elements of the FollowSpot controller 1 - Active button (actives the FollowSpot Controller) 2 - BlackOut button 3 - Graphic touch screen 4 - Switch On screen button 5 - Pan button(switches pan and tilt motors from soft mode to hard mode 6 - Tilt button(switches pan and tilt motors from soft mode to... -
Page 6: Installation
Switch the Robin BMFL fixture to the Follow Spot Mode (option Soft) before installing the Robin BMFL LightMaster. Robin BMFL LightMaster Side 1. Switch the BMFL fixture to the Soft option of the Follow Spot Mode (Personality-->Follow Spot Mode -->Soft). - Page 7 Collar lock (2) in the unlocked position. Collar lock (2) in the locked position. By turning the lock (2) clockwise you will tighten the collar (1). Do not use brute force! 6. Attach the FollowSpot Controller (5) to the FollowSpot Controller base (14). During attaching, both spring locks (10) have to be in an unlocked position (pressed towards the Follow Spot Controller).
- Page 8 This USB connection with fixture head is possible for the Robin BMFL FollowSpot only. If you use the Robin BMFL Spot, Robin BMFL Blade or Robin BMFL WashBeam, connect the FollowSpot Controller base (14) with the fixture base (18) by means of the USB cable (17). 8.
- Page 9 Robin BMFL LightMaster Rear The installation should do two workers as the supporting frame is heavy. Danger! Never put fingers between the balance weight (13) and the supporting frame (3) when you adjust the position of the balance weight. There is a danger of injury of your fingers by the heavy balance weight.
- Page 10 6. Attach the FollowSpot Controller (5) to the FollowSpot Controller base (14). During attaching, both spring locks (10) have to be in an unlocked position (pressed towards the Follow Spot Controller). 7. Connect the FollowSpot Controller base (14) with the fixture head (19) by means of the USB cable (17). This USB connection with fixture head is possible for the Robin BMFL FollowSpot only.
-
Page 11: Installation Of The Bmfl Fixture On The Tripod
3.1 Installation of the BMFL fixture on the tripod 1. Unfold and adjust height of the tripod and distance of legs (8) by means of adjusting locks (4,5,6,7). The lock (3) has to be in a lower position (as shows arrow on picture below). 2. -
Page 12: Operation
4. Operation After installing the ROBIN BMFL LightMaster on the fixture and connecting with the fixture via USB cable, connect the fixture to mains and leave it to perform resets (except pan/tilt reset). After finishing resets, the fixture is in the FollowSpot mode with pan/tilt motors in the Soft mode. Press the button ACTIVE (1) in order to activate the FollowSpot Controller. - Page 13 To assign an effect to the Jog-wheels and faders 1.Touch desired effect. Buttons (8/10/16/18) which activate jog-wheels (23/24/25/26) and buttons (20/22), which matches faders (27/28) will start to flash. 2.Press desired button and selected effect will be assigned to its jog-wheel (fader). Assigned effect is displayed in a yellow colour, free effects stay in a white colour.
-
Page 14: Saving And Recalling Followspot Controller Presets
Functionality of the BMFL LightMaster can by restricted by means of commands on the channel Power/Special Functions of the Robin BMFL fixtures as follows: 240-244 DMX -LightMaster enabled 245-249 DMX - LightMaster disabled (except two faders on its handle bar and pan/tilt) 250-255 DMX - LightMaster disabled (except pan/tilt) To control desired effect 1.Use its fader on the screen or press the activating button for its jog-wheel and use this jog wheel or use a... - Page 15 3. Press and hold selected preset button until jog-wheels activating buttons stop to flash. Note: the FollowSpot controller presets are common for all user show and cannot be saved on the USB flash drive. If you use the FollowSpot Controller in the RoboSpot, the FollowSpot controller presets will be overwriten by presets from RoboSpot.
-
Page 16: Control Menu
5. Control menu The FollowSpot Controller is equipped with the QVGA Robe touch screen with battery backup which allows to set the device behaviour according to your needs. Icons used in the touch screen menu: - [back arrow] used to move back to the previous screen (or menu level). -
Page 17: Menu Functions Mapping
5.1 Menu Functions Mapping By entering the menu you can assign effects from the list of available effects to the jog-wheels and faders. The item All - releases all assigned effects at one go. List of available effect channels depends of used moving head: Fixture Effect Available DMX values... - Page 18 Fixture Effect Available DMX values Dimmer 0-255 Iris 0-191 Focus 0-255 Zoom 0-255 L Frost 0,1-50 M Frost 0,87-136 H Frost 0,173-222 Color 1 0,130-189 Color 2 0,130-189 Cyan 0-255 Magenta 0-255 Yellow 0-255 0-255 Efw. pos 0-127 Robin BMFL Blade Efw.
-
Page 19: Menu Show Library
Fixture (continuing) Effect Available DMX values RGW 1 0,32-59 RGWr 1 0-255 FS rot 0-255 FS 1 m 0-255 FS 1 s 0-255 Robin BMFL WashBeam FS 2 m 0-255 FS 2 s 0-255 FS 3 m 0-255 FS 3 s 0-255 FS 4 m 0-255... - Page 20 2. Edit the name of selected show by means of the alphanumerical keyboard. Function keys has the following meaning: ALT key- switches among keyboards: DEL key - deletes a character Sh key - shift key, changes order of displayed characters aA ---> Aa. The key 0_ serves as a space bar.
- Page 21 3. Select option "Export Show" 4. Select show and confirm it. Wait until the message "Show Saved" appears on the screen. Touch the Cancel button. Default name of saved show file on the USB flash drive has the following sentence structure e.g.
-
Page 22: Menu All Lamps On/Off
4. Select desired show file to load it. After loading, the message " Show Loaded" will appear on the screen: Touch the Cancel button. 5.3 Menu All Lamps On/Off The menu item allows to switch on/off lamp in the Robin BMFL FollowSpot. 5.4 Menu Product IDs Select this menu item to read a MAC Address , RDM UID, and RDM Label. -
Page 23: Software Update
2. Connect the computer and the FollowSpot Controller base via Ethernet cable. 3. Set computer to address 2.x.x.x/255.0.0.0. Do not change any IP settings on the FollowSpot Controller. 4. Use the ROBE Uploader → Devices → Discovery and Devices → Update. This will update the FollowSpot Controller. -
Page 24: Technical Specifications
7. Technical specifications Input voltage: 5V DC Setting & Control: graphic touch screen Number of control elements: 20 buttons, 4 jog-wheels and 2 faders Connection: 1 x USB A,1x USB B, 1x RJ45 Fastening: via 2 (4) screws and collar with lock Weight: 4 kg (side version),10.7kg (rear version) Dimensions (mm) -
Page 25: Cleaning And Maintenance
To preserve the environment please dispose or recycle this product at the end of its life according to the local regulations and codes. Copyright © 2017-2018 Robe Lighting - All rights reserved Specifications are subject to change without notice. December 6, 2018 Made in CZECH REPUBLIC by ROBE LIGHTING s.r.o. Palackeho 416/20 CZ 75701 Valasske Mezirici...
Need help?
Do you have a question about the ROBIN BMFL LightMaster Side and is the answer not in the manual?
Questions and answers