
Related Manuals for 3D Systems Geomagic Capture Series


Summary of Contents for 3D Systems Geomagic Capture Series
- Page 1 Geomagic Capture ® Harness the Power of 3D Scanning User Guide Geomagic Capture ® Series 3D Scanner for 3D Scan-Based Design and Quality Inspection...
-
Page 2: Table Of Contents
SPECIFICATIONS AND REQUIREMENTS FOR YOUR GEOMAGIC CAPTURE SCANNER SPECIFICATIONS SYSTEM REQUIREMENTS FOR GEOMAGIC CAPTURE APPLICATION 3D SCANNING BASICS SETTING UP GEOMAGIC CAPTURE SERIES 3D SCANNER CREATING SCAN DATA SCAN AN OBJECT AND CREATE SCAN DATA SCAN AN OBJECT USING MULTIPLE SCANNERS... -
Page 3: Introduction
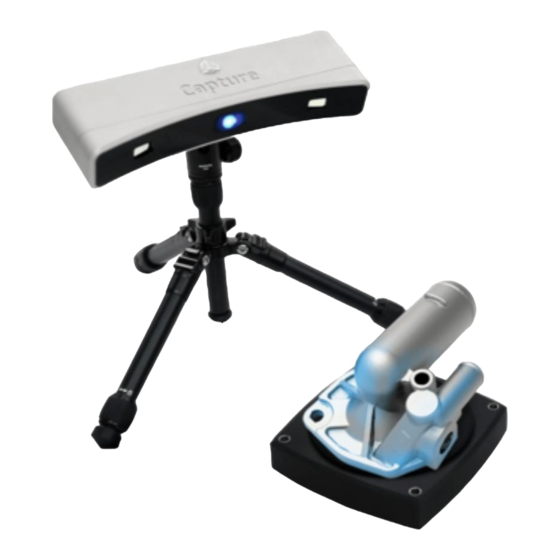
INTRODUCTION Thank you for purchasing the Geomagic Capture Series 3D Scanner. Geomagic Capture is a family of powerful, integrated scanner and software systems for professional Scan-Based Design and quality inspection. It is available in six application-specific configurations, combining the best of Geomagic software with a compact, ultra-precise blue light LED 3D scanner. -
Page 4: Copyright
©1993-2014. 3D Systems, Inc. All rights reserved. The content of this manual is furnished for informational use only, is subject to change without notice, and should not be construed as a commitment by 3D Systems, Inc. Any names, places, and/or events in this publication are not intended to correspond or relate in any way to individuals, groups or associations. -
Page 5: At A Glance On Geomagic Capture Application
Adjusts the resolutions of scanners. Methods for registering the position of Device Registration connected devices or aligning scans into one coordinate system Advanced Options Opens the Advanced Settings menu. Back Goes back to the Scan menu. Help Shows the Help document. 3D Systems, Inc. - Page 6 Advanced Settings Device Status Manages device connection status. Network Configures the network to Configuration communicate with scanners. Update Device Updates device firmwares via file. Firmwares 3D Systems, Inc.
-
Page 7: Specifications And Requirements For Your Geomagic Capture
190 x 174 mm (Far) 88 x 87 mm (Far) Calibration Pre-calibrated Note: It is not recommended that you use scanner setup mixed with different type of the Geomagic Capture Series 3D scanners. SYSTEM REQUIREMENTS FOR GEOMAGIC CAPTURE APPLICATION •... -
Page 8: Scanning Basics
Scanning with target markers provides a faster and more convenient way of aligning multiple scans since the alignment algorithm is greatly speed up by having far fewer reference points to search for and match up. 3D Systems, Inc. - Page 9 3. Hold the can 12 to 18 inches from the part and spray a light first coat. 4. Set the object aside to dry for a few minutes. 5. Re-spray any areas that need it. 6. Clean any target markers with a cotton swab prior to scanning if necessary. 3D Systems, Inc.
-
Page 10: Setting Up Geomagic Capture Series 3D Scanner
Note: If it is the first time to connect the Geomagic Capture series scanners to the PC, you must configure the network. Once the check box is selected, the application will automatically try to connect the scanner. - Page 11 On the Windows Start menu, click Control Panel. b) Under Network and Internet, click View network status and tasks. c) In the left pane, click Change adapter settings. Local Area Connection, then click d) Right-click Properties. 3D Systems, Inc.
- Page 12 Updating Device Firmwares Geomagic Capture includes the latest device firmware for the Geomagic Capture Series 3D scanner. If the scanner firmware is incompatible, a message will appear when the application is started up. You can simply update the device firmware by clicking the message.
-
Page 13: Creating Scan Data
If the Target Markers alignment method was used, make sure that at least three target markers from the first scan area are visible in the next scan. Accept (or OK) in your Geomagic application. Continue scanning until the project is completed and click 3D Systems, Inc. -
Page 14: Scan An Object Using Multiple Scanners
SCAN AN OBJECT USING MULTIPLE SCANNERS Note: It is not recommended that you use scanner setup mixed with different type of the Geomagic Capture Series 3D scanners. Place either the partifact or another object on the stable plate and position the scanners around the part. - Page 15 If the Target alignment method was used, make sure that at least three targets from the first scan area are visible in the next scan. Continue scanning until the project is completed and click Accept (or OK) in your application. 3D Systems, Inc.
-
Page 16: Automatically Scan An Object Using Turntable
If necessary, you can also place the part on its side and run another scan to capture the bottom and top of the part. Align to the other scans as needed by using the alignment commands provided in your Geomagic application. 3D Systems, Inc. -
Page 17: Scan An Object Using Multiple Scanners With Target Markers
SCAN AN OBJECT USING MULTIPLE SCANNERS WITH TARGET MARKERS By connecting multiple Geomagic Capture Series 3D scanners to a single PC, you can automate the 3D scanning process. The Geomagic Capture generates complete 3D scan data without any motion control and helps you to reduce scanning time. - Page 18 Continue scanning until the project is completed and click Accept (or OK) in your application. 3D Systems, Inc.
-
Page 19: Menu Overview
Scanning Button Starts the scanning. This button is available after the Geomagic Capture Series 3D scanner is connected to the application. When a turntable is connected and while the number of scans are being adjusted in the Turntable option, the small triangles will be displayed around the Scan button according to the specified number of divisions. - Page 20 6 to 12 scans are recommended. The number of scans can be adjusted up to 16 scans. Status Bar Shows the current working status of the scanner. Settings Goes to the Settings menu. Help Shows the Help document. 3D Systems, Inc.
-
Page 21: Settings
Over-Exposed Optimal Resolution Adjusts the resolutions of scanners. High • – Constructs a high-density mesh (1/1 capture ratio). Medium • – Constructs a medium-density mesh (1/4 capture ratio). • – Constructs a low-density mesh (1/9 capture ratio). 3D Systems, Inc. - Page 22 Geomagic Capture. Register - After scanning an object with the selected registration method, and then uses the transforms for registering the position of connected devices or for aligning scans into one coordinate system. 3D Systems, Inc.
- Page 23 Advanced Options Opens the Advanced Settings menu. Back Goes back to the Scan menu. Help Shows the Help document. 3D Systems, Inc.
-
Page 24: Advanced Settings
– Used to manually set a static IP address. Subnet Mask / Default Gateway – Used to manually set a subnet mask and a default gateway. For more information on setting up your Geomagic Capture Series 3D scanner and scanner connections, see Network Configuration. - Page 25 3D Systems, Inc. 333 Three D Systems Circle | Rock Hill, SC | 29730 www.3dsystems.com ©2014 3D Systems, Inc. All rights reserved.
Need help?
Do you have a question about the Geomagic Capture Series and is the answer not in the manual?
Questions and answers